this motion detecting night light tells Home Assistant when you pass by
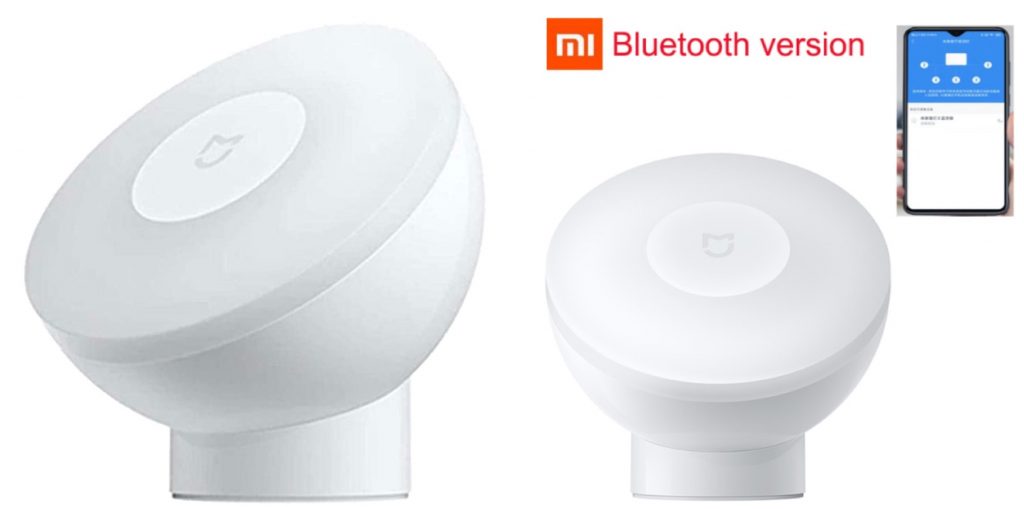
The very popular, but hardly-known Xiaomi nightlight, which lights up a dark space when you pass, now has a ‘smart’ version. A night light is nice on a dark stairway and toe-saving on a bedroom floor, but this version is able to send these exciting events to a home automation hub. If it can do that maybe we can use it to trigger other smart devices? Today’s post explains how to read the light’s sensors with Home Assistant – as well as how to buy the right model.
what can I do with the Xiaomi Yeelight night light – MJYD02YL-A
When added to the Xiaomi Mi Home app you can set the light’s brightness; the light level at which it doesn’t turn on and how long the light should remain on. You can turn off the night light feature completely if you want to use it as a sensor and save power. Your phone must be within Bluetooth range to change a setting.
IN THEORY, the app can also set up triggers that notify you, fire an alarm, or turn on a light or a camera. You’d need a Xiaomi gateway, if such a thing exists, to be available to listen for triggers and effect actions. BUT HAPPILY we use Home Assistant so there’s hope for us.
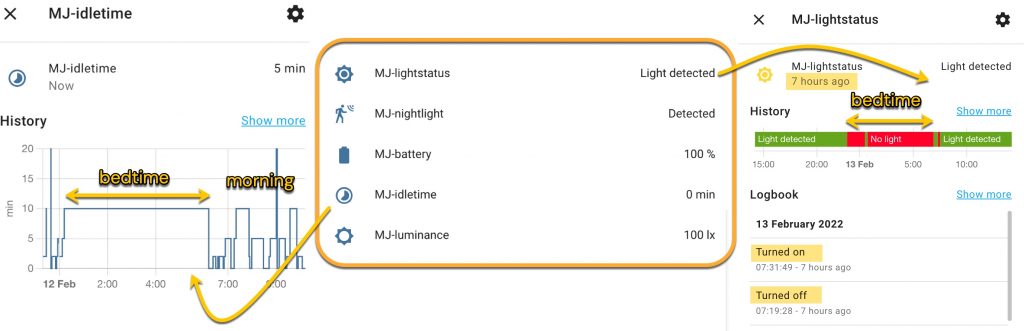
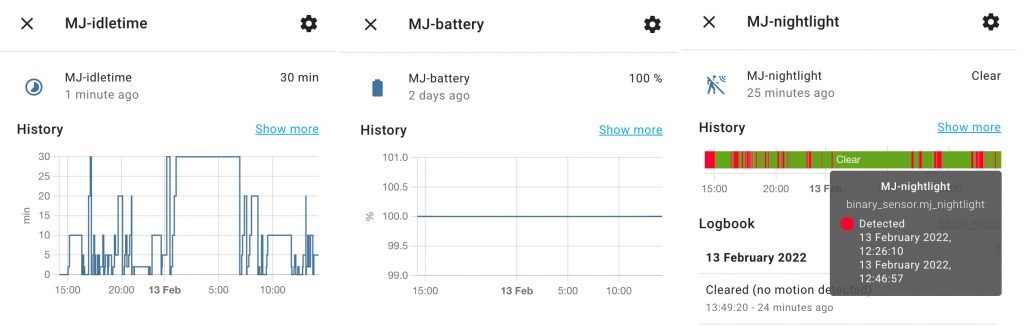
You connect the Xiaomi night light to Home Assistant via a Bluetooth BLE gateway (which we’ll make below – and it has other good uses such as here). The night light provides three sensors that report on the battery level, the idle time, and the light brightness setting. Two more sensors have on/off states that detect motion and report whether the ambient light level is at a trigger level (I think). There appears to be no way for Home Assistant to trigger the night light or adjust anything.
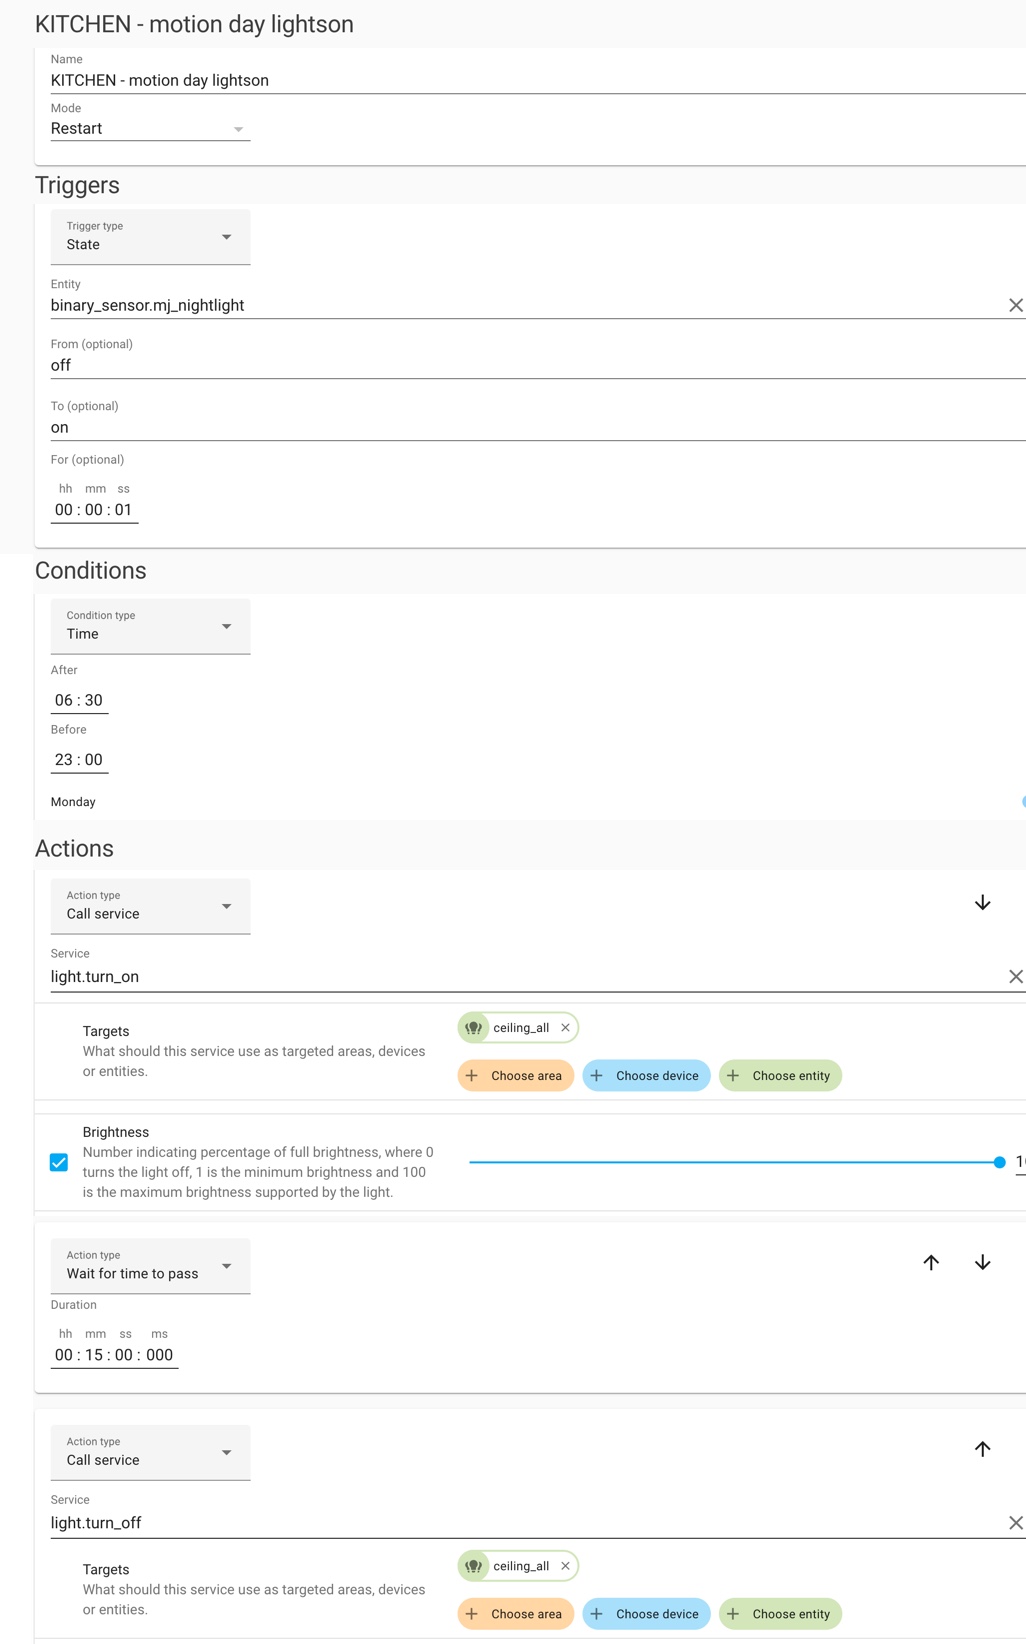
A first use case is to put the night light in a kitchen. When motion is detected the main kitchen light fades up. If there’s no further activity for 15 minutes the main light turns off. When motion is detected during the night, the main kitchen light only fades up to 20%. If there’s no activity for 5 minutes the main light turns off. See below for the automation setup.
You could also place the night light near a door and use it to trigger all the security cameras to start recording. But I’m riffing: the device seems to work, and experience will lead to meaningful uses.

all the deets on the Bluetooth version
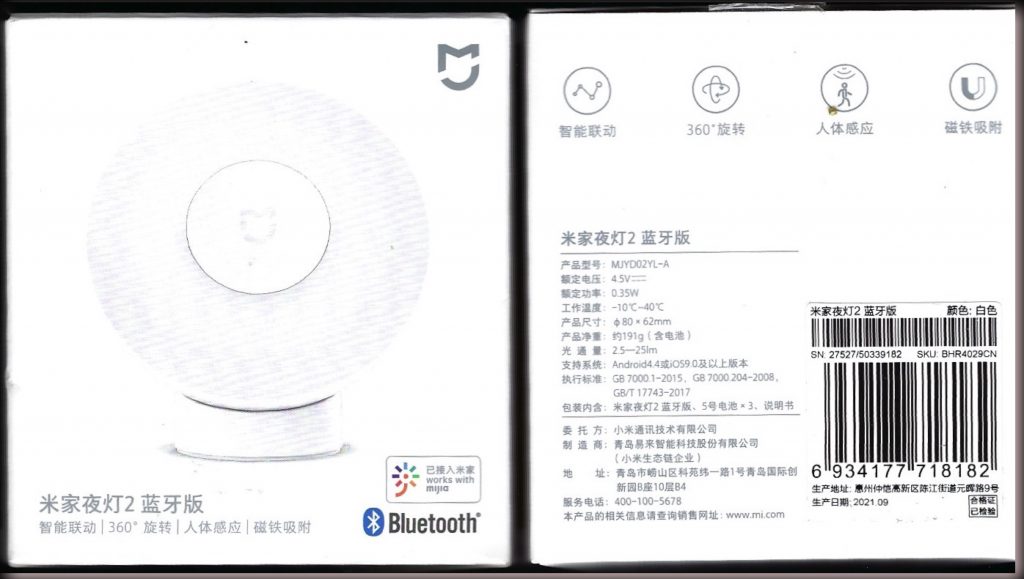
Alert to misleading shops: there are more than two versions of the Xiaomi night light. All versions have a motion sensor and are deemed smart. There are versions that also have Bluetooth to communicate with the Mi Home / Mijia app and communicate with ESPHome. You want that one and it costs £12. Look for Xiaomi Mijia night light 2021 Bluetooth-compatible for app with adjustable brightness. The model number might be MJYD02YL-A but look for “Bluetooth” or “BLE”.
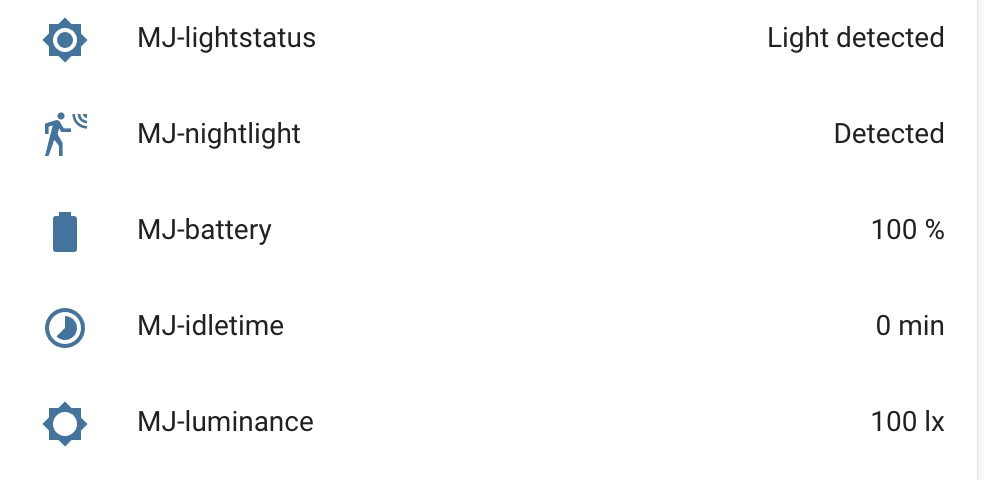
The entities that can be monitored by Home Assistant
what you need to make this work
- the Bluetooth (BLE) version of the MJYD02YL
- the Xiaomi Mi Home app, signed in on a phone or tablet
- an ESP32 development board eg MV-HT ESP32 minikit
- possibly CH34xVCP drivers to connect to the ESP32 USB
- Home Assistant, the home automation hub running on eg a Raspberry Pi – see my introduction here
- ESPHome, an add-on for Home Assistant, installed within Home Assistant – see how and why here
what to do to make this nightlight more useful
- set up the nightlight in the Xiaomi Mi Home app and register a login account
- go to ESPHome and set up a new device for our Bluetooth ‘sniffer’
- edit the code below and get a security ‘bindkey’
- compile the code and download a bin file to put on the ESP32 minikit
- connect the ESP32 minikit to a USB power source
- discover the Bluetooth ‘sniffer’ and add entities to a Home Assistant dashboard.
- use an entity as a trigger in an automation routine
install the MiHome app and add the Xiaomi nightlight
- The MiHome app is used to monitor and control a huge range of Xiaomi brand devices. Whatever your initial impression, over the years the app has become very capable and it doesn’t miss a trick. After you install it, register an account with an email address and password. Unless you read otherwise, some devices work best when set up with ‘Chinese mainland’ as the account location.
- Turn on Bluetooth on your phone. When you’re signed into the app, look for a ‘+’ to add a device, choose the Xiaomi nightlight and follow the guide. You’ll be asked to remove the nightlight white cover and flick the Bluetooth switch from side to side to make the nightlight discoverable.
- Explore the settings for the nightlight and get it working as required. Now’s the best time to repeat the discovery process for other Xiaomi devices that you may have.
add the code to your ESPhome node
- in your browser, go to the ESPhome section of your Home Assistant installation for example, 192.168.1.X:8123.
- create a new ‘node’ or click +. You’ll now identify the ESP32 development board you use. Worry not if you can’t find it: the generic ESP32 will be fine. (A ‘node’ is fancy-speak for a device with an IP on a network)
- click edit to use the ESPHome code editor and note the code that’s already been added. Add in (paste) the following and click SAVE. Now edit each section to switch my details (wifi; ip; mac address; names) for yours. Ensure that you have only one of each section heading eg you want only one esphome: in the left margin.
substitutions:
  devicename: bluesniffer

esphome:
  name: ${devicename}
  platform: ESP32
  board: mhetesp32minikit

# when you create a 'new node' in ESPhome it adds esphome: above. The name can be anything without punctuation. I use a substitution string which helps to reduce my typos later in the code. It's more useful in other projects where simply changing the devicename above changes the name throughout the code.

# variously useful features - you can add a password to stop your ESP being accessed by another Home Assistant device on your home wifi
logger:
api:
ota:
captive_portal:


# add your own wifi details

wifi:
  ssid: "mywifidetails"
  password: "password"
# details for the hotspot (captive portal) in case your wifi connection fails
  ap:
    ssid: "ble_hotspot"
    password: "password"
# details for the ESP32 to have a self-assigned IP address
  manual_ip:
  # Set the IP of the ESP
    static_ip: 192.168.1.24
  # Set gateway to the IP address of the router which often ends with .1
    gateway: 192.168.1.1
  # The subnet of the network - the following works for most home networks
    subnet: 255.255.255.0


# this code adds the Bluetooth sniffer feature to the ESP32

esp32_ble_tracker:


sensor:
# optional you can also use the xiaomi temperature sensor platform on this same ESP.
  - platform: xiaomi_lywsdcgq
    mac_address: '58:2D:34:34:XX:XX'
    temperature:
      name: "hall temperature"
    humidity:
      name: "hall humidity"
    battery_level:
      name: "hall battery"

# optional this is a bit of code to tell you if the wifi is ok
  - platform: wifi_signal
    name: ${devicename} wifi signal
    update_interval: 600s

binary_sensor:
# optional you can detect the presence of a Bluetooth phone on the same ESP.
  - platform: ble_presence
    mac_address: D0:B4:5D:33:XX:XX
    name: roger_huaweiwatch

# this code helps to recognise the Xiaomi nightlight
  - platform: xiaomi_mjyd02yla
    name: "MJ-nightlight"
# insert the mac address of the Xiaomi nightlight - see next section
    mac_address: "EC:4D:3E:D9:BB:BB"
# insert the BLEkey of the Xiaomi nightlight - see next section
    bindkey: "1605be6026ac8276e7f49cf7fa07xxxx"
    idle_time:
      name: "MJ-idletime"
    light:
      name: "MJ-lightstatus"
    battery_level:
      name: "MJ-battery"
    illuminance:
      name: "MJ-luminance"

get the Bluetooth BLE key or ‘bindkey’ for the Xiaomi nightlight, compile and upload the code
By now you should have added the nightlight to the Xiaomi Mi Home app. These details are stored in Xiaomi’s cloud so that if you mislaid your phone, you could login to the app on an ipad and find your nightlight there. You now need these account login details.
It might be important that outsiders can’t access your devices so each time a device is set up a new password or bind key is made for the connection. We need that bindkey to decode the ‘secure’ data sent by the nightlight.
- Get the Xiaomi Cloud Tokens Extractor by Piotr Machowski. Download his token_extractor.exe on a Windows machine: https://github.com/PiotrMachowski/Xiaomi-cloud-tokens-extractor. (Alternative methods are mentioned below)
- Right click the token_extractor.exe icon, choose Run as Administrator and agree to let it run. Answer the three questions with your login email, password and hit enter to access all servers.
- After some moments you’ll see an output as below. Copy the BLE KEY hex code and paste it in the ESPHome code above. Do the same for the Mac address.
- In the ESPhome code editor click Save and Install and choose Manual download. When the compiler finishes it may download the bin file to your computer.
- Plug the ESP32 dev board into the computer. Start ESPhome Flasher. Choose a COM port and choose the bin file just saved.
- If the above goes wrong try again once more. Hit view logs. Or try again after removing / reinstalling the CH34xVCP drivers. You may need to choose a different port. You may need to hold the dev board button when you power it.
OUTPUT AFTER ENTERING YOUR XIAOMI LOGIN DETAILS in token_extractor.exe

Devices found for server "cn":
   ---------
   NAME:     door nightlight
   ID:       blt.4.18rbaug400000
   BLE KEY:  3906f4b284b4131e533869c6cd111111
   MAC:      EC:4D:3E:D9:CC:CC
   TOKEN:    819fdceb1808117775222211
   MODEL:    yeelink.light.nl1
   ---------
   NAME:     kitchen nightlight
   ID:       blt.4.19adadmd00000
   BLE KEY:  1605be6026ac8276e7f49cf7fa07xxxx
   MAC:      EC:4D:3E:D9:BB:BB
   IP:       10.174.205.33
   TOKEN:    278f150de3c3b5a37d22223f
   MODEL:    yeelink.light.nl1
   ---------
   NAME:     workshop camera
   ID:       50639001
   MAC:      34:CE:00:E6:AA:AA
   IP:       192.168.10.145
   TOKEN:    33566e50504e73774931595174522222
   MODEL:    isa.camera.df3
   ---------

Press ENTER to finish
more ways to get the Bluetooth BLE key or ‘bindkey’ for the Xiaomi nightlight
- Use the browser on your phone: read various ways how to obtain the ‘bindkey’ at the ESPhome manual page. https://esphome.io/components/sensor/xiaomi_ble.html
Use the command line in Linux
- An alternative method for Linux is described at https://github.com/PiotrMachowski/Xiaomi-cloud-tokens-extractor. It downloads the same token extractor written in python. Here’s what you do:
- open a Linux terminal on a PC or Raspberry Pi with python
- enter sudo wget https://github.com/PiotrMachowski/Xiaomi-cloud-tokens-extractor/releases/latest/download/token_extractor.zip extractor/raw/master/run.sh)
- enter sudo unzip token_extractor.zip
- If that fails enter sudo apt-get install unzip then try it again
- enter cd token_extractor
- enter sudo pip3 install -r requirements.txt
- enter sudo python3 token_extractor.py
add the ESPhome ESP32 node to Home Assistant
Home Assistant on the Raspberry Pi will discover the ESP32 that we’ve just programmed. The ESPhome ‘logs’ window lets you see the what the ESP32 sees and we hope that’s encouraging.
Go to the Home Assistant Overview tab and choose edit dashboard in the top corner. Add an entities card and add the entities shown below. Their names may be different to mine
make a routine (aka automation) where something triggers the light
Disclaimer: at present my night light isn’t triggering fast enough to be useful. However the following shows what the automation looks like first as ‘yaml code’ and secondly as set up in the automation editor.
alias: KITCHEN - motion day lightson
description: ''
mode: restart
trigger:
  - platform: state
    entity_id: binary_sensor.mj_nightlight
    from: 'off'
    to: 'on'
    for:
      hours: 0
      minutes: 0
      seconds: 1
condition:
  - after: '06:30'
    before: '23:00'
    condition: time
action:
  - service: light.turn_on
    data:
      brightness_pct: 100
    target:
      entity_id: light.ceiling_all
  - delay:
      hours: 0
      minutes: 15
      seconds: 0
      milliseconds: 0
  - service: light.turn_off
    data: {}
    entity_id: light.ceiling_all
click the image to expand – click back to return here