network map, scan and traffic – setup nmap; webmap and ntopng in docker
If you have curiosity and/or paranoia about what happens across your network there are tools which can gather information for you. This post will show how to install tools to see what’s going on. The harder bit is understanding it but getting started is key to start doing that.
there are dozens of expensive network tools, instead of those here’s how to setup two open source apps – ntopng and nmap – for those that prefer to host them as Docker containers rather than install them on ‘the bare metal’.
NMAP is a classic network tool – it’ll find network devices and what ports and services run on them. With its manual to hand you can go far with its command line tools and drill down to see e.g. what software versions are running on a device. I ran a long scan of my network and it still didn’t find my Mac for some reason – but then I’m new here.
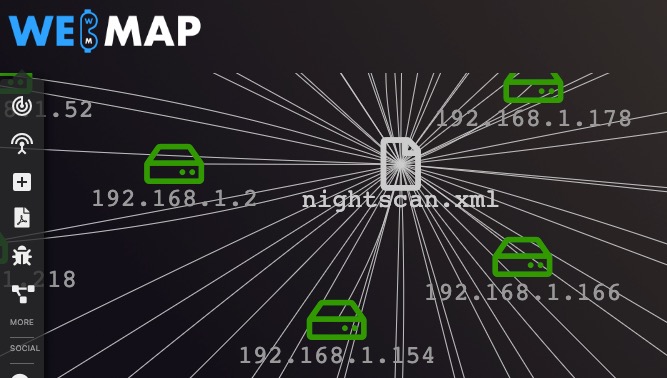
WEBMAP always goes with NMAP. It is a browser based tool that will index the results of an NMAP scan in a useful visual way. For example will collate the devices running Linux and bring these into one list. It will create a bizarre visual network map to get your head around. If you install the WEBMAP Docker you can run scans from the web interface – seemingly without needing a separate NMAP Docker.
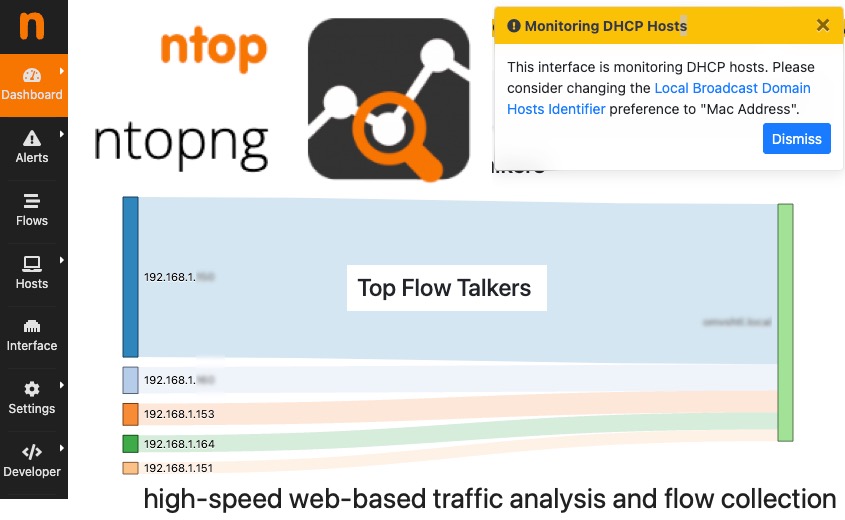
NTOPNG is a go to tool for network discovery and for examining network traffic. It’s packed with information to show e.g. which IP cameras are hitting the network. I’ll probably be using this hereon.
what’s needed to install these apps in your Docker setup:
- a computer running the Docker engine. You could use Ubuntu or Windows or a Mac. My computer aka ‘home server’ is an old PC installed with openmediavault which in turn makes it easy to set up ‘shared folders’, easy to set users permissions, easy to install ‘docker’ and an associated app called ‘portainer’ which helps to manage docker containers.
- optionally: a Docker version of Visual Studio Code makes it easy to edit my docker-compose files without using the command line editor ‘nano’. Either nano or Visual Studio Code may be used interchangeably.
- a terminal program (Mac) or ‘Putty’ (PC) to ssh into the server and issue commands. You start a ssh session by entering ‘ssh roger@192.168.1.10’. Next you can issue commands to create docker containers from a command line. I sometimes create docker containers as a ‘stack’ in Portainer. Use what works for you.
- importantly you also need the path or device uuid for a shared folder which will store the data created by the dockerised apps (aka containers). This data survives (meaning that it persists through) any re-installation of those apps. The appeal of Docker is that you don’t have to repeatedly set up your apps when you update or reinstall them. Also when you’re finished experimenting and they’re deleted, they’re gone without leaving any mess on your PC.
NTOPNG – docker-compose.yml for creating ntopng Docker container
Below are two approaches to executing ‘docker-compose.yml’ which is a configuration script for Docker. The yaml ‘script’ needs editing to suit your system. Save this file in a folder called ‘ntopng’ and initiate the installation from there.
make these edits to the docker-compose.yaml file just below:
- edit my volume line for the location of a shared folder where you keep your docker app data (mine is called dockerconfig/ntopng)
- edit the address of my ethernet adapter ‘enxa0cec8a0d58f’ for your ethernet adapter which might be ‘enp1s0’. To find this go to a command line using ssh and enter ‘ip a’. The adapter you want is probably at the top of the list that shows.
- it’s likely that port 6379 is free for redis. However ntopng uses the host network on port 3000. I suggest that you make port 3000 available and remove it from some other app that might be using it. A ‘port’ specifier is no use in this docker-compose.yml because we use the ‘host network’ port of 3000.
- Optional: find your PGID/PUID by typing ‘id roger’ on an ssh command line and replace mine with yours.
# ntopng STACK docker-compose.yml in folder homes/me/compose/ntopng

version: '3'
services:
  ntopng:
    image: vimagick/ntopng
    container_name: ntopng
    command: --community -d /var/lib/ntopng -i enxa0cec8a0d58f -r 127.0.0.1:6379@0 -w 0.0.0.0:3000
# the above is all on one line
    volumes:
      - /srv/dev-disk-by-uuid-899011d029d9/dockerconfig/ntopng:/var/lib/ntopng
    network_mode: host
    restart: unless-stopped
    environment:
      - PUID=1000
      - PGID=100

  redis:
    image: redis:alpine
    container_name: redis
    command: --save 900 1
    ports:
      - 6379:6379
    volumes:
      - /srv/dev-disk-by-uuid-899011d029d9/dockerconfig/redis/data:/data
    restart: unless-stopped
    environment:
      - PUID=1000
      - PGID=100
Command line method – first SSH into the server using a terminal program. You need to create a text file (called docker-compose.yml) in a folder (perhaps called ‘ntopng’). Copy my text but make the edits above to suit your system.
$ ssh roger@192.168.1.10 / or use ssh root@192.168.1.10
$ ip a / TO FIND YOUR ETHERNET ADAPTER
$ mkdir ntopng
$ cd ntopng
$ nano docker-compose.yml / ADD & EDIT THE TEXT FROM MY docker-compose.yml
$ WHEN THE FILE HAS BEEN MADE DO THESE TWO COMMANDS
$ sudo docker-compose config / THIS CHECKS THE FILE FOR YOU
$ sudo docker-compose up -d  / THIS INITIATES THE NTOPNG SERVICE
Command line method – now open a browser and go to 192.168.1.10:3000. You’ll be asked to login with admin / admin. Now ntopng is yours to explore.
Portainer Stack method – open Portainer and go to Stacks > Add Stack. Paste in the docker-compose.yml code but make the edits, discussed earlier, to suit your system. Now deploy the stack. Now open a browser and go to 192.168.1.10:3000. Login with admin / admin and enter a new password. Now explore the web interface.
NMAP – docker-compose.yml for creating a nmap Docker container with a webmap Docker container
make the following edits to the docker-compose.yaml file below:
- edit my volume line for the location of a shared folder where you keep your docker app data (mine is called dockerconfig/webmap)
- port 8000 isn’t available on my system for webmap so I’ve set the access port to 8001.
- optional: find your PGID/PUID by typing ‘id roger’ on an ssh command line and replace mine with yours.
# WEBMAP-NMAP STACK docker-compose.yml in folder homes/me/compose/webmap
version: '3.3'
services:
    nmap:
      image: instrumentisto/nmap
      container_name: nmap
      command: -sT -A -T3 -oX tmp/myscan.xml 192.168.1.0/24
      cap_add:
        - NET_ADMIN
      volumes:
        - /srv/dev-disk-by-uuid-899011d029d9/dockerconfig/webmap:/tmp
      network_mode: host
      environment:
        - PUID=1000
        - PGID=100


    webmap:
      container_name: webmap
      hostname: webmap
      ports:
        - '8001:8000'
      volumes:
        - /srv/dev-disk-by-uuid-/dockerconfig/webmap:/opt/xml
      image: reborntc/webmap
      environment:
        - PUID=1000
        - PGID=100
      restart: unless-stopped
Command line method – first SSH into the server using a terminal program. You need to create a text file (called docker-compose.yml) in a folder (perhaps called ‘webmap’). Copy my docker-compose.yml but edit it to suit your system.
$ REPLACE MY IP WITH THE IP ADDRESS OF YOUR SERVER $ ssh roger@192.168.1.10 / or use ssh root@192.168.1.10 $ mkdir webmap $ cd webmap $ nano docker-compose.yml / ADD / EDIT THE TEXT FROM MY docker-compose.yml $ WHEN THE FILE HAS BEEN MADE DO THESE TWO COMMANDS $ sudo docker-compose config / THIS CHECKS THE FILE FOR YOU $ sudo docker-compose up -d / THIS INITIATES THE SERVICES. NMAP WILL RUN A REPORT & STOP$ sudo docker exec -ti webmap /root/token / THIS GENERATES A TOKEN TO COPY FOR THE WEB UI
Command line method – finally open a browser and go to 192.168.1.10:8001. You’ll be asked to enter the token you received from the command (sudo docker exec -ti webmap /root/token). Login with admin / admin and enter a new password. Now it’s yours to explore.
Portainer Stack method – open Portainer and go to Stacks > Add Stack. Paste in the docker-compose.yml code but make the edits, discussed earlier, to suit your system. Now deploy the stack. Start a ssh session in a terminal to get your token as below. Now open a browser and go to 192.168.1.10:8001. You’ll be asked to enter the token you received from the command (sudo docker exec -ti webmap /root/token). Login with admin / admin and enter a new password. Now explore the web interface.
$ ssh roger@192.168.1.10 / or use ssh root@192.168.1.10
$ sudo docker exec -ti webmap /root/token / THIS GENERATES A TOKEN TO COPY FOR THE WEB UI
how nmap and webmap work together
Unusually, the nmap docker container runs, scans, saves the results to a file and then terminates. No matter really because you can do an nmap scan on the network with a command in the webmap web interface at 192.168.1.10:8001 (or your IP)
When the nmap container does a scan it saves the results in a file that webmap recognises and has access to. I have adjusted the volumes in the docker-compose.yml to make the nmap and webmap apps work together and share this file. The filename is tmp/myscan.xml
When the nmap container does a scan it looks for a startup command in the container. This is set by the command line in the docker-compose.yml as -sT -A -T3 -oX tmp/myscan.xml 192.168.1.0/24 which you can edit in Portainer: go to the container page and click Duplicate/edit. The command/CMD field can be edited to change the scope and depth of the scan according to the nmap manual. Be sure to quote each parameter in Portainer, so the CMD field should be entered as:
'-sT' '-A' '-T3' '-oX tmp/myscan.xml' '192.168.1.0/24'