flash ESP32 or ESP32-CAM with arduino ide software
These instructions may help you upload a fireware.bin file to an ESP32 dev board.
You are not alone if you meet a problem uploading a firmware bin file to an ESP32 development board. My advice is to first try any suggestions that you find but then try something different altogether. Repeating the upload on a different computer or PC/Mac is different altogether.
The following method is rarely suggested so I’ll record it here because it can work too.
Arduino IDE is one of a few software packages that lets us develop code for a writing on a chip. It can transfer a great many capabilities to a great many types of Arduino and ESP32 chips. The Arduino software might be dated but it’s also more mature. As with ESPHome it lets us develop code, create firmware and then flash it to an ESP32. (A further, but initially tricky alternative is to use Visual Studio Code and the platformio plugin).
connect your dev board and set your board parameters
Your ESP32 dev board (eg a mini MH-HT-LIVE) may already have a USB socket. If not, eg you have an ESP32-CAM, connect your to the computer USB with a FTDI UART module (pic below).
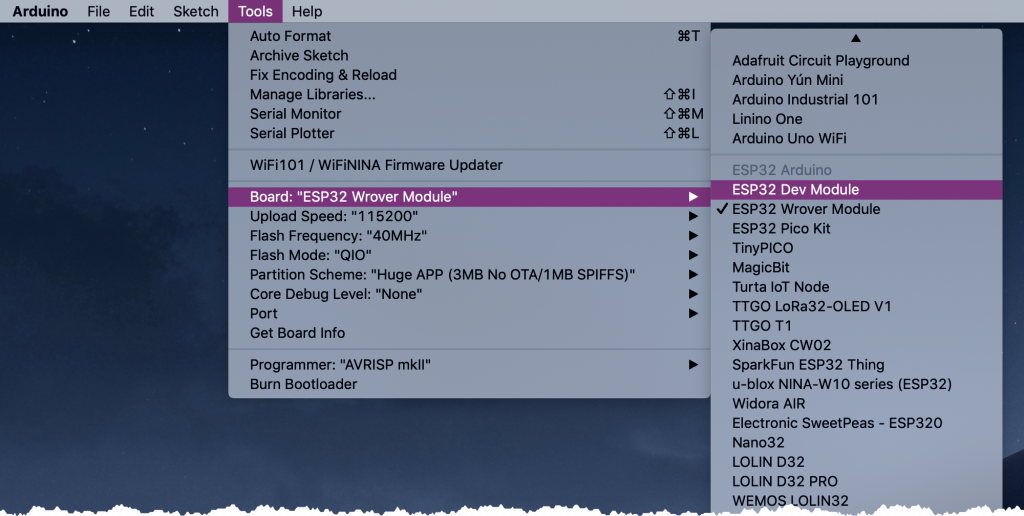
Go to the Arduino IDE Tools menu and set parameters for the chip you have: set the ESP32 development board that you have; set the frequency eg 40MHz and Flash mode eg DOUT. Turn on the serial monitor and adjust the upload speed until you can read the text output when you press EN or Boot button. The Partition scheme setting is puzzling but either leave it at the default or look at the size of your firmware .bin file. If it’s huge choose any option for that size.
upload a BIN file to ESP32 using Arduino IDE
You can upload ESPhome firmware.bin using Arduino IDE as an alternative using ESPHome Flasher (a process I outlined here). The ESPHome manual install option lets you download the firmware.bin file to your Desktop – do that first.
In Arduino IDE first choose your board or simply choose ESP32 Dev module / Wrover module. Set the board parameters as in the section above.
See the pictures below: go to File > Examples and look for ‘OTA’ – you will at least find a basic webOTA program there. Scroll through the code and add your wifi credentials. Scroll further to find eg the default login credentials for the interface (eg user: admin/password: admin). Cross fingers and click the buttons to Compile / Upload the ‘sketch’ (program).
Turn on the serial monitor to see the stuff in the pic below. Go to your browser and enter http://192.168.1.x/ or whatever IP address shows there. Login (admin/admin) and Upload. Cross fingers. Share your advice in the comments below.


flash webcam software to an ESP32-CAM using Arduino IDE
Choose Camera webserver from Examples and you’ll see a window containing code. Continue as below.

The above shows how to connect an ESP32-CAM. Other ESP32 boards will have a USB socket.


Find your ESP32-CAM model in the code window shown above and make that model active (change the line to read from //#define to #define). Then add your home wifi and password. Validate the code and upload it to your ESP32. Within a few minutes your ESP32-CAM should appear on your network. Find its IP address and visit that IP address with a browser. For a clear tutorial see Rui Santos at Randomnerd or watch his helpful video below: