Use Tailscale to remotely access your network – the zero-conf alternative to install at home and on your laptop; phone and more.
I’ve been using the Wireguard or nginx to access my home network* securely and I’ve explained in other posts (links below) how they’re used and set up. Tailscale however is my current go-to method – and the set up is faster – even though Tailscale does a poor job at explaining pretty much everything in their support docs. Just read on – there’s less to it than you think.
*Why do this? You may be in some away-from-home location and need to connect to a security camera, your computer, a home automation hub or the router as you normally would when you’re back at home. If not that you may want to access Netflix but for some reason you can’t get to it from where you are. Maybe, you’re at a hotel or a college and they’re not letting you muck about. Today I’m using Tailscale to get round this. Other posts explain how I used Wireguard to similarly safely connect to my home network and to obscure what I’m doing there. In another post about nginx proxy I explained how you could, alternatively, access your home automation system in a secure way.
set up Tailscale – summary of what to do
- Create an account at Tailscale using your Google or Microsoft login – ideally you’ve secured it with 2FA.
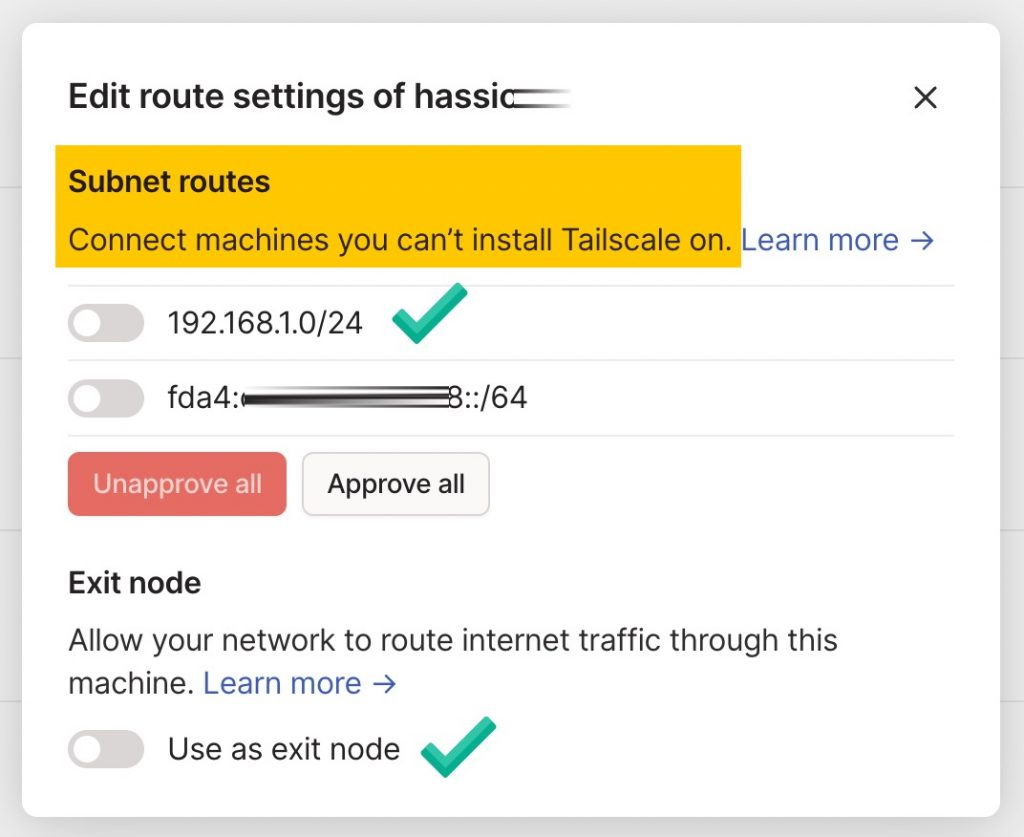
- Install Tailscale on always-on device/s at home. Set one of these to advertise as an exit node. Set one or more of these to advertise Subnets.
- Install Tailscale on your laptop; phone and or other portable devices.
- As you install on those devices be signed-in to the Tailscale web management console. Create key/s. Authorise each device with a ‘key’. Set the key / devices to not expire.
- Turn on Tailscale on the portable device/s; connect to the Internet and browse to devices on your home network using 192.168.1.x
set up Tailscale at home on Home Assistant
- You should already have Home Assistant running in say, a Raspberry Pi computer.
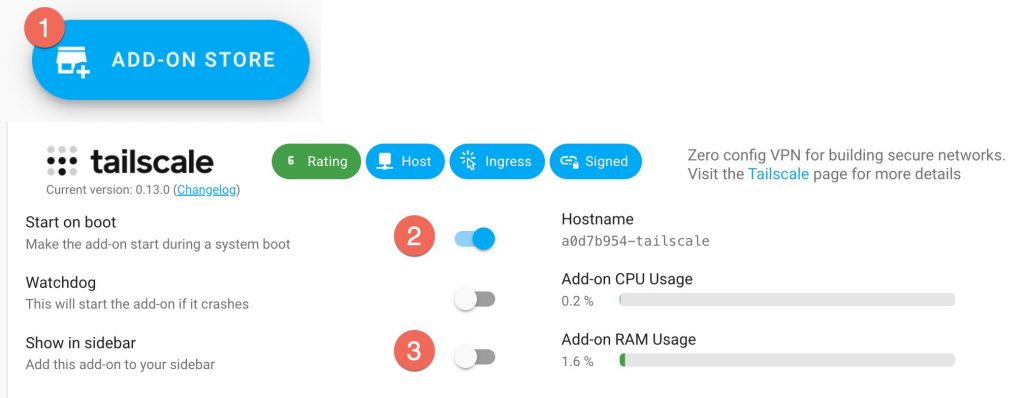
- Go to Home Assistant > Settings > Add-ons > Add-on Store. Install and start the Tailscale Add-on.
- Enter your Tailscale credentials & follow the instructions. You should have another browser tab open with the Tailscale web Admin console where you can approve this new installation and Disable key expiry.
- You DO want to advertise an Exit node. You DO want to advertise Subnets such as 192.168.1.0/24
set up Tailscale at home on a home server using Docker
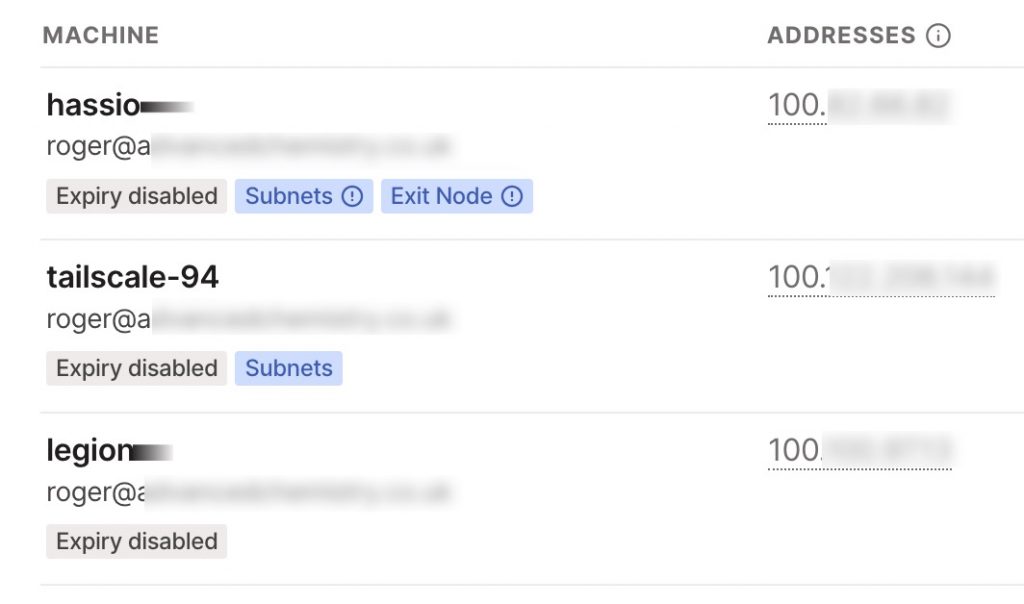
- You don’t need to install Tailscale on more than one home device. However you might prefer to have some redundancy by installing it on some other always-on machine – eg a home server; a Synology; a QNAP server.
- In my example I have an old desktop PC running a few services in Docker (eg Plex Media Server; Frigate DVR). All of this runs on a Debian Linux openmediavault setup.
- I’ve attached my docker-compose.yml text file to create the Tailscale Docker Container. You need to add a persistent / pre-authorised key to the file. Be prepared to approve the new machine.
- You should have another browser tab open with the Tailscale web Admin console where you can approve this new installation and Disable key expiry.
- Occasionally I need to delete the container, get a new key and run docker up again.
# this file is docker-compose.yml
version: '3.3'
services:
  tailscale:
    container_name: tailscale
    hostname: tailscale-94
    image: tailscale/tailscale:stable
    volumes:
      - /srv/dev-disk-by-uuid-XXX/tailscale:/var/lib # state data directory
      - /dev/net/tun:/dev/net/tun # required for tailscale to work
    cap_add: # required for tailscale to work
      - net_admin
      - sys_module
    network_mode: host
    environment:
      - PUID=1000 # I set these PUID / PGID on all my containers
      - PGID=100
      - TS_HOSTNAME=
      - TS_EXTRA_FLAGS=
#      - TS_USERSPACE=true
      - TS_STATE_DIR=/var/lib/tailscale/
      - TS_AUTH_ONCE=true
      - TS_AUTHKEY=tskey-auth-knVBVW4CNTRL-GET THIS FROM TAILSCALE
      - TS_ROUTES=192.168.1.0/24
    restart: unless-stopped
    command:
        - tailscale
        - tailscale up
        - "--advertise-routes=192.168.1.0/24"
        - "&& tailscale"
    privileged: true

# when you get the TAILSCALE docker container up and running you need to ssh into # your environment and run this command to be able to get tailscale to
# authenticate to your account: sudo docker exec tailscale tailscale up
install Tailscale on your phone and laptop
- There’s a Tailscale client app for every platform. Install this. You should have a browser tab open with the Tailscale web Admin console where you can approve each new installation and Disable key expiry.
test using Tailscale to access your network remotely
To simulate connecting to Tailscale remotely, turn off your phone wifi and turn on the switch in the Tailscale phone app. Use a browser to access 192.168.1.1 (or the IP of your router). Run the Netflix app. Know that you’re using data from your phone and your home broadband supplier.