how virtualisation and containers are useful: tips to start using proxmox
why a server? what can I use a home server for? a vpn, a router, an ad-blocker, storage for backups, a photo library, a music server, a printer server, a home automation hub, a homebridge for Apple home, a torrent server, a Mac timemachine location, a file server, an rsync drive, a wordpress, a syncthing to keep directories matched, a web server, a minecraft server, a proxy server, a self-hosted Nextcloud (cf Google Workspace), a self-hosted password manager, a monitor to tell you when a web page is ‘down’ plus the things that geeks do with ease. This page is a guide those geek things and it covers the following:
- containers, docker and VMs explained
- installing proxmox on any old PC
- things to get your head round in proxmox
- moving files between your PC, proxmox and other storage
- tips about storage including getting at your media files
- change the ownership of a mounted directory in your LXC container
- tips for installing frigate NVR and a coral.ai edge processor
- tips for installing plex as an LXC container and accessing your media
- tips for installing Home Assistant as a virtual machine on proxmox


some concepts: lxc containers, virtual machines and docker container apps
WHY VIRTUALISE: computers are powerful enough to be able to run one operating system on top of another. In other words they can ‘virtualise’ Windows XP or a Nintendo on top of say, Windows 11. For many years I’d use this to run an accounts program that couldn’t work on the new Windows. Later I copied this to a Mac and continued doing my accounts using the same Windows XP program. Key to its usefulness is getting files in and out of a virtual machine – hence I made the guide that follows.
The uses of a ‘virtual machine’ go way beyond this. A ‘virtual machine’ is merely a file – so it has the lovely property that you can pass it to another computer and continue using this ‘virtual’ machine. In a workplace the network manager can distribute an entire setup to dozens of employees. At home you may want to run a media server for the TV, a file store for backups, a music server, a torrent server and more. But you really don’t want to set these up each time you buy a new machine. You also really don’t want to run too many machines. And if everything is on one machine, you really don’t want one upgrade or one virus to bring the whole system down.
LCX CONTAINERS and DOCKER CONTAINERS: The better way to run apps, so that they don’t interfere with each other, is to put them in a file called a ‘container’. There are LCX containers and Docker containers and they contain all the files that an app needs – all except for the files that are common to all computers. One app might need a certain version of python to work but no matter, when you download it it’s pretty much guaranteed to work if the files that are common to all Linux computers (called the Linux Kernel) are nearby. A sweet bonus of ‘containered’ apps is that you store your settings and files outside the container. If ‘Microsoft Office’ ran in a container you could upgrade the container and your styles, fonts and printer settings would instantly apply to the new version just like they did before. There’d be no setting up again – except that Microsoft doesn’t play this game. However many Linux applications do.
Other things being equal my choice of LCX vs Docker is like comparing app stores. You can install DOCKER CONTAINERS on any computer and there’s a huge app store (at Docker Hub). Home Assistant is the better-known example of container apps in action. HA features an ‘add-on store’ where you can assemble the services your home needs. These add-ons provide pre-configured containers and just need a tweak. Any settings specific to your home are stored separately (eg in configuration.yaml; automations.yaml) such that if the system goes awry it’s possible to restore it. Home Assistant is a pretty good advert for containerised apps.
You can find ready-made LXC containers for some apps. You can however build your own. For example, I build Docker apps inside a LXC container and reap the benefit of its huge choice of apps.
PROXMOX: The program that hosts virtual machines and containers is called a hypervisor. Proxmox and Unraid and Xsphere are examples of many such tools. They allow us to run countless virtual machines and containers. One proxmox setup could host Windows, a plex media server, numerous versions of Linux, a firewall, a security camera recorder and all the things we’ve mentioned on this page. As I said computers can do so much more these days but proxmox also lets me reboot services, move them between machines and back them up to external storage. This god-like power over computers is part of its popularity. Yet I found no quick start guide to Proxmox so I summarised the hurdles I jumped below.
CLUSTERING: This term pops up frequently but it’s mostly for enterprises. When I’d set up more than one proxmox server I was able to link them and create a cluster. A cluster lets us create ‘high availability’ (HA) for services running on multiple servers. A cluster allows us to move virtual machines between them with almost no down time. A cluster might use a second, very fast network card to store data on remote machines. If you hear words like ‘Ceph’ or ‘Kubernetes’ these also concern getting computer servers to pool their resources. If you do ‘clusters’ remember this:
it’s important to have an odd number of machines in a cluster else lots of things won’t work. Everything gets worse! I got myself into this clusterf*k, saw error messages about ‘quorum’ and had to set up another qdevice as described in this video!
installing proxmox on any old PC
The proxmox installation assumes that you’re going to start fresh and format your computer hard drive. However, if you’ve a USB and/or another internal drive, you can keep your existing boot drive (eg Windows), and wipe the other drive instead. For example, I can install, boot and run proxmox from a USB stick. My system can then do many things. When I remove the USB stick the PC works exactly as it did. This is a good first step on a proxmox journey. As I also create lots of media and video I boot my system with a portable Sandisk USB SSD. I can also boost the media storage with an internal hard drive.
An unused intel/amd PC is the device to install proxmox. Use Etcher to create a proxmox installer on a USB drive and then do any of the following:
- Boot the USB installer and install proxmox on another external USB drive. This USB drive then becomes your boot drive. The USB drive can be 128 GB or 2 TB as you wish.
- Boot the USB installer and install proxmox on an internal drive. Proxmox will boot from this drive without wasting storage space. This drive could be a SSD, NVME or a spinning drive. It would be handy to have a second drive on which you can store your media, security camera footage and on-the-fly backups.
- You can boot your system from a micro SSD card – but some types of storage suit booting the OS; some suit fast cache reads and some suit dead storage. Do find out how fast and robust is your chosen storage eg in 2024 the advice was not to thrash today’s MMC or microSSD storage.
things I need to get my head round in proxmox
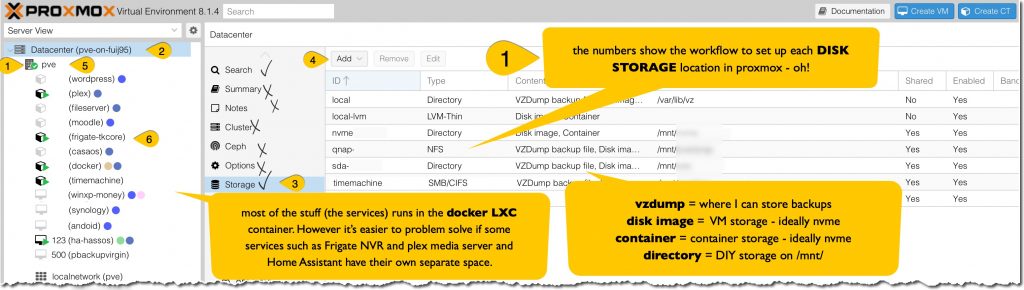
- The proxmox UI has five different sections. Datacenter, pve, the containers, the virtual machines, the disks. There are several places to fiddle with disk storage – and seen in the graphic at the top. Tip: name a mount folder to indicate what disk it’s on eg /mnt/sda1-wd4tb.
- The proxmox ‘shell’ and a container ‘console’ must not be confused – if you login as root in a container you’ll be ‘in’ a container raw image until you change directory and look at a mount point outside the container. If you install something with apt install xxx check whether this is supposed to happen in the shell or the container. Tip: I aim to not add unnecessary stuff to the ‘shell’. Tip: at first you’ll login as root with your password however you can do the same if you open a terminal on your PC and enter ssh root@192.168.1.115 followed by your password. This may fail if ‘root’ isn’t allowed to do ssh so fix it like this:
- on proxmox login as root in the relevant container or VM console
- at the root prompt enter nano /etc/ssh/sshd_config
- add the following to the authentication block PermitRootLogin yes
- Save, confirm and exit nano (ctrl x).
- enter systemctl restart sshd (or else enter reboot)
- Some virtual machines are accessible in the console and some are not. Some can be accessed from your PC via your browser and some can be accessed via a VNC app or Remote desktop app. Some need https:// and some need http://
- The proxmox Datacentre has an excellent backup feature allowing scheduled daily backups with a retention policy. If you mess up a container it’s an easy matter to restore a container or VM. A backup may also include the storage you’ve mounted, however you might feel it’s unnecessary to backup say, security camera recordings. Tip: review the Backup checkbox on the mount points in each container.
- Every new container or virtual machine is given a useful unique ID by proxmox eg 100, 101. These numbers help to identify backups but I also match the number to the self assigned IP address of a container. For example, I’ll give container 115 the IP address of 192.168.1.115. You could conceivably use dozens of IP addresses and port URLs. ‘Linkwarden’ allows you to build a library of these with the help of a Chrome web store extension in the browser.
moving files between your PC, proxmox and other storage
For such a basic task, I find that proxmox requires work to get files off say, a USB mounted drive. This suggests that we need to learn how to do things differently. Here are some of those different ways:
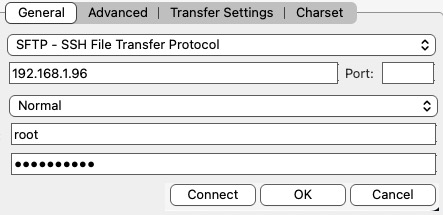
Use Filezilla the FTP app and you’ll have access to the entire directory tree. I can also see if my own folders are accessible or owned by root. Enter the settings opposite after ensuring that root is allowed to ssh (see how above). The thing to get your head round is that containers and VMs will appear as image files within which are files and folders.
An alternative app to Filezilla is WinSCP.
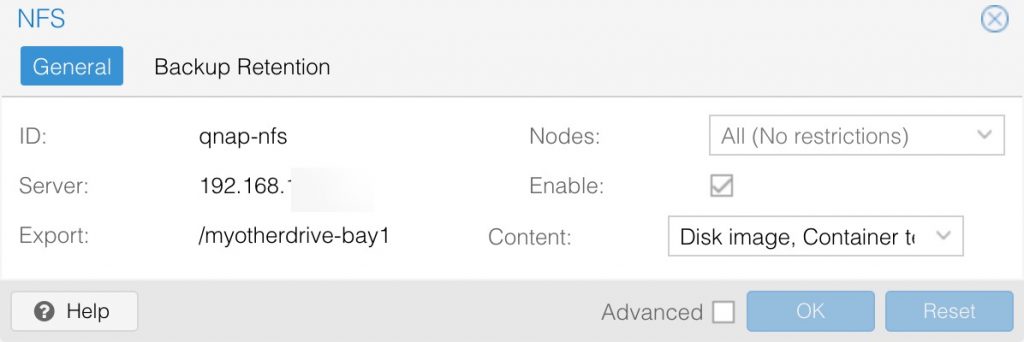
Setup (faster) NFS file sharing on a folder in your NAS, QNAP or Synology. Then go to proxmox Datacentre > Storage > Add > NFS and in the dialogue box enter the IP address of the NAS device and the folder.
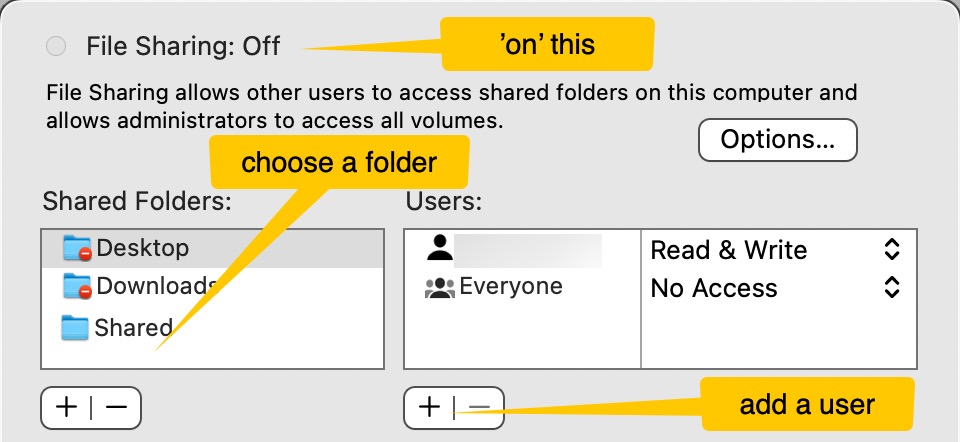
Turn on file and folder sharing on your PC and set who has access to the shared folder.
Then go to proxmox Datacentre > Storage > Add > SMB/CIFS and in the dialogue box enter the computer or PC address eg smb://192.168.1.x and the user’s name and password
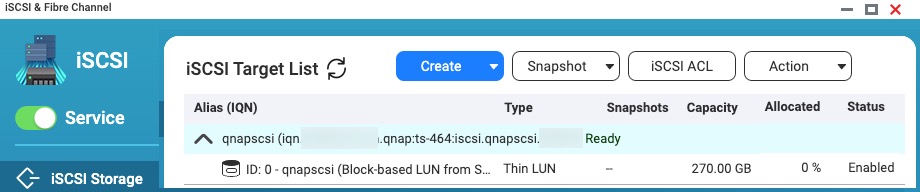
iscsi offers fast transfers but it’s a touch geeky: find the particular guide to setup iscsi storage on your NAS, QNAP or Synology. Then go to proxmox Datacentre > Storage > Add > iscsi.
In the next section I’ll show how to access internal storage so that you can store and exchange files on your connected disks.
tips about storage: “I need to get to my media files”
Let’s say you’re running proxmox and in the Disks section you can see a few devices labelled /dev/sda and /dev/sdb. Within these disks there will be partitions labelled /dev/sda1 or /dev/sdb1 or similar. The disk that has partitions labelled BIOS boot / EFI / LVM is probably your proxmox startup disk. The LVM (aka local-lvm) is a good partition to store your containers and virtual machines but you’re welcome to put them on another drive – as long as the partition is formatted for Linux.
If you’ve correctly identified the partitions that you don’t want to lose (perhaps they hold Windows or hold precious data), go ahead and wipe a not-wanted partition and then initialise it /format it as Linux ext4. If you’ve a partition with useful data I suggest that you exit promox, boot into a normal desktop (using Windows or an Ubuntu live USB), offload the data and then wipe the partition/disk and initialise it with Linux ext4. It may be possible to somehow mount and read Windows NTFS disks by installing something in Linux.
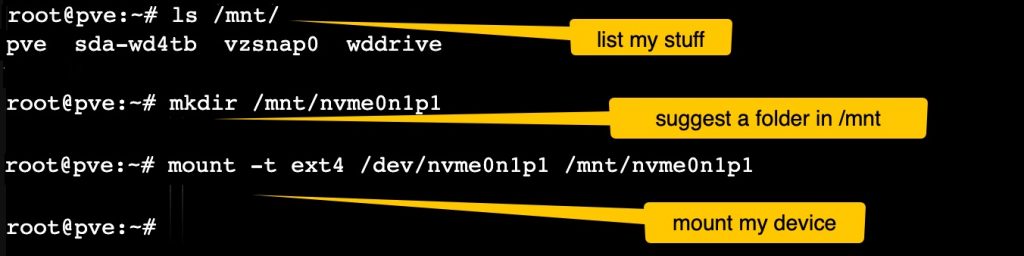
Following on, let’s say you’re running proxmox and you want to use a ext4 partition to store media, containers or virtual machine ‘images’ or whatever. Go to the Shell and make a folder; mount your hard disk partition device in this folder like this:
root@pve:~# ls /mnt/
pve  sda-wd4tb  vzsnap0  wddrive
root@pve:~# mkdir /mnt/nvme0n1p1
root@pve:~# ls /mnt/
pve  sda-wd4tb  vzsnap0  wddrive  nvme0n1p1
root@pve:~# mount -t ext4 /dev/nvme0n1p1 /mnt/nvme0n1p1
root@pve:~#

If you did the above go to Datacenter > Storage and you should see a new Directory entry as above. The advice says that I should add a line to /etc/fstab starting UUID to ensure the directory is mounted at each boot. I did this as follows:
IN proxmox SHELL find the UUID or PARTUUID of your storage device in the list that appears
root@pve:~# blkid

IN proxmox SHELL edit the fstab file using the nano editor:
root@pve:~# nano /etc/fstab

IN NANO, SCROLL TO THE BOTTOM and add this line using your own uuid and mount folder values
UUID=5ce486e9-224d-455f-a234-3de81b601d6f /mnt/nvme0n1p1 ext4 defaults 0 0
how to add a mount point to a LXC container
Let’s say you’ve installed plex or frigate in a container and you now want somewhere to store files on an ext4 disk. Following on from just above you can do this in these two ways – with very different results. The easier and first way below doesn’t let you explore your files on the disk when you’re looking at the container from the shell – they go into a raw image. In a sense it creates something like a zip file – but from the shell you’d only see its name. That’s fine if you just need storage space.
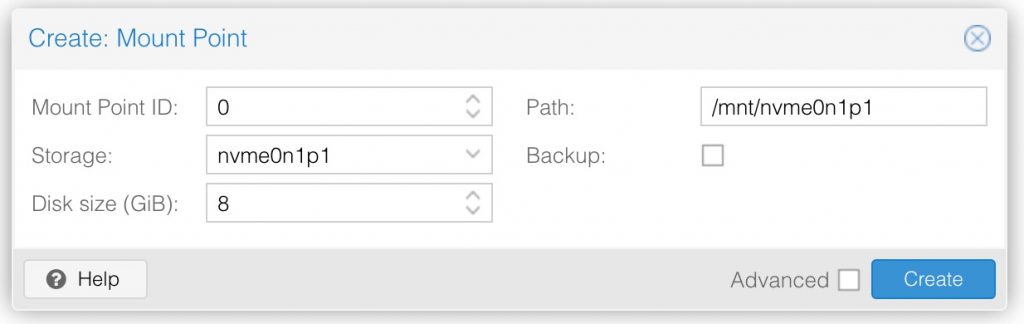
METHOD 1 IF YOU WANT THE CONTAINER APP TO STORE DATA ON THE MOUNT POINT THIS METHOD CREATES A RAW IMAGE TO STORE IT: Go to the proxmox container > Go to Resources. Add Mount point. Enter the path to the mount point we created earlier. If you wish, also change the size and the quota (maximum allowed size) and whether you want the drive backed up.
METHOD 2: MOST LIKELY YOU WANT THE CONTAINER APP TO STORE DATA IN THE MOUNT POINT DIRECTORIES OR EXISTING DIRECTORIES THAT YOU CAN SEE and HAVE ACCESS TO – SO DO THIS INSTEAD:
To have the container app store data in accessible directories and files go to the proxmox SHELL (not the container console) and enter the following. The example sets the name of the mount point for container 107:
pct set 107 -mp0 /mnt/nvme0n1p1,mp=/mnt/nvme0n1p1
In general the syntax is:
pct set CONTAINER_ID NUMBER MOUNTPOINT_No MOUNTED_DIRECTORY,mp=DIRECTORY_YOU_WANT_TO_USE
change the ownership of a mounted directory in your LXC container
Let’s say you’ve mounted an ext4 drive in your proxmox as above. You should be able to list any files or folders already on the disk in the /mnt directory using the following. If you think something is missing you’ll need to change some permissions and ownerships as Linux is so fickle. Here are some container console commands to consider – some of these are extreme and unnecessary or neccesary until I get the hang of Linux.
$ mkdir /mnt/testdirectory
$ ls /mnt/nvme0n1p1/
TO CHANGE FILE AND FOLDER PERMISSIONS FOR EVERYTHING IN THIS MEDIA DIRECTORY
$ findmnt # list the mount points
$ chmod -R 770 /mnt/nvme0n1p1/media  # less extreme
$ chmod -R 777 /mnt/nvme0n1p1/media  # most extreme
$ adduser roger
$ passwd roger # set a password for roger
$ usermod -a -G users roger # add the roger user to the users group
$ usermod -a -G sudo roger # add the roger user to the sudo group
roger$ sudo passwd root # change the root password
$ groups                   # will tell you which groups users belong to
$ ls -l                    # provides useful info on file ownership
$ chown -R :users /mnt/nvme0n1p1/media # change the owner of all your files to 'users'
$ chown -R roger: /mnt/nvme0n1p1/ #let roger own this folder and everything in it
tips for installing frigate NVR and a USB coral.ai edge processor
If you see a need to save security camera footage the Frigate NVR app justifies having a ‘home server’. Frigate records, finds and plays the video whenever there’s motion in front of a camera. I use this flexibly to check on bird and pet feeding, to see if the post arrived or if the gutter copes with the rain. A nearby air show flies over us with a mix of interesting and annoying planes that can be worth catching on video.
Frigate can distinguish between specific objects so you can set it to respond to people and cars or ignore birds and cats and dogs as you wish. This requires a lot of processing power such that if you’ve more than one or two cameras you’ll want to offload that effort to a Google coral.ai processor. The coral.ai comes in USB/PCI/M2 versions which are equally fabulous at allowing Frigate to run on a low power computer.
Before I got ‘into’ proxmox, I made a tutorial to install Frigate on an old PC running openmediavault. It will run today if I remove the proxmox USB boot disk. That’s now my backup installation. Use the following procedure to put Frigate in proxmox. I’ll outline what’s needed in this lengthy installation:
- install proxmox and have >500GB of free space to store your camera ‘feed’ recordings.
- ensure that your security camera can supply a RTSP feed url (in other words rtsp://admin:password@192.168.1.165:554/live/ch1). A secure ‘cloud camera’ or video doorbell from Google; Netgear and ring is unlikely to have an accessible RTSP camera feed.
- in proxmox install Docker and portainer in a privileged LXC container – you’ll find an install script to do this quickly here. Or you will learn more if you muddle along with ‘Create CT’ and follow the entire procedure on this page.
- the thing I did was to install a LXC container with the ‘turnkey core’ version of debian linux. I got to specify an IP address on my home network. You do not want a Virtual Machine version of this because this would be a ‘full fat’ version needing different instructions and tweaks to those that follow.
- in proxmox, run your Docker LXC and immediately login to portainer via the web browser on your PC. The url will be the one you specified plus a port number. This will be like https://192.168.1.115:9443/ or https://192.168.1.115:9000/. You can set up portainer’s login details if you access it within a few minutes of starting the LXC container. (Whenever I’m ‘in’ a fresh portainer I usually increase the session length (in authentication); add an Public IP address to local (in environments). Take a look at Containers; Application templates and finally Stacks.
- in proxmox login to your Docker LXC console as root. Before you install Frigate as a stack in portainer you really must create a config.yml file in this console. The command line will be nano /home/frigate/config.yml See the Frigate docs for an idea of what goes in config.yml – you just need a few lines for now (eg detectors: cpu1: type: cpu). Find the youtube instructions to install Frigate as a stack in portainer.
- if you bought a coral.ai processor you’ll need to configure the container to connect with the version that you have. The instructions that I used for my USB coral are on this page. Please go elsewhere for the instructions for connecting a coral PCI card to a LXC container as they are very different. My id.conf in the proxmox shell is as follows. If you have issues see this thread and don’t confuse the solutions for Coral USB / M2 / PCIe.
Which USB bus am I using? Go to the console for the docker/frigate LXC:
lsusb # this lists the USB devices
ls -la /dev/bus/usb/002/ # this is meant to tell which cgroup has the coral i.e cgroup2.devices.allow (proxmox 8) or cgroup.devices.allow


root# nano /etc/pve/lxc/108.conf
lxc.mount.auto: cgroup:rw
lxc.cgroup2.devices.allow: c 120:* rwm
lxc.apparmor.profile: unconfined
lxc.cgroup2.devices.allow: a
lxc.cap.drop:
lxc.mount.auto: cgroup:rw      # this line was a crash suspect but not on my setup
lxc.cgroup2.devices.allow: c 226:0 rwm
lxc.cgroup2.devices.allow: c 226:128 rwm
lxc.cgroup2.devices.allow: c 29:0 rwm
lxc.cgroup2.devices.allow: c 189:* rwm
lxc.mount.entry: /dev/dri/renderD128 dev/dri/renderD128 none bind,optional,create=file 0, 0
lxc.mount.entry: /dev/bus/usb/002 dev/bus/usb/002 none bind,optional,create=dir 0, 0
lxc.mount.entry: /dev/bus/usb/001 dev/bus/usb/001 none bind,optional,create=dir 0, 0
- if you want to store camera recordings on a separate and larger hard disk see my instructions further up this page. In short you need to mkdir a folder in mnt in the proxmox shell and mount your hard disk partition device in this folder. A pct set command in the proxmox shell also copies that mount action into the LXC container. You’ll surely now be able to see the mounted drive and its files in the proxmox shell. If you can’t see the drive files in the frigate LXC container console the linux permissions need fixing – also as above.
tips for installing plex as an LXC container and accessing your media files
Plex is a most excellent app for delivering all your home photos, video and movies to your TV or tablet. Your proxmox home server runs plex media server and you’ll get this to scan files stored on your hard drive in directories named eg photos, music, video, tv, movies. Your TV or TV box will have the plex app which presents your stuff netflix style. You can also install plex media server on your PC and similarly get it to scan your PC for playable media. (You’ll realise that this will only work if your laptop is ‘on’ hence an always-on home server adds value).
Ahead of installing plex on proxmox you’ll need some hard drive space where your media will be copied and stored. In my setup, in addition to the proxmox boot drive I’ve a large spinning drive for my media which occupies 850GB. I need to have ways to add files to this drive – you’ve a choice of FTP, NFS, rsync or Samba sharing.
Among the many tutorials, I recommend this one for setting up plex on proxmox in a LXC container. However you can massively shorten this with a promox unofficial script – look in the Media section. Do use a privileged LXC. I don’t know if it matters if the linux is ubuntu, debian or turnkey linux although I’m using turnkey linux.
After the plex installation continue to follow the instructions to use the proxmox shell to mount your media drive. My spinning drive has an ext4 format and contains all my media files. I logged into the plex LXC container ‘console’ and changed the file permissions for the whole media folder as below. I added the built-in plex user to the users group. I also changed the ownership of the media folder to the users group as follows:
$ chmod -R 770 /mnt/my4tbdrive/media
$ or chmod -R 770 /mnt/my4tbdrive/media

$ usermod -a -G users plex

$ groups # will tell you which groups users belong to

$ ls -l # provides useful info on file ownership

$ chown -R :users /mnt/my4tbdrive/media #change the owner of all your files
tips for installing Home Assistant as a virtual machine on proxmox
As a well established ‘app’ Home Assistant comes in various flavoured installations but the most complete examples are the virtual machines (and also the Home Assistant appliance for the Raspberry Pi). An install script for the Home Assistant OS VM can be found here. Run the script in the proxmox shell. Afterwards go to your router to reserve it an IP address that doesn’t change. You access the Home Assistant from a browser on your PC – ie not in proxmox. The url will be http://192.168.1.172:8123.
You may already be using Home Assistant but there’s no harm in having another. Make a full backup of your existing Home Assistant setup (Settings > System > Backups), download the ‘tar’ file and upload it to the freshly installed VM. You can be selective if there are irrelevant add-ins, integrations and automations. This will take a while to load in.