control a sonoff switch using eWelink and Home Assistant – without IFTTT or firmware flashing
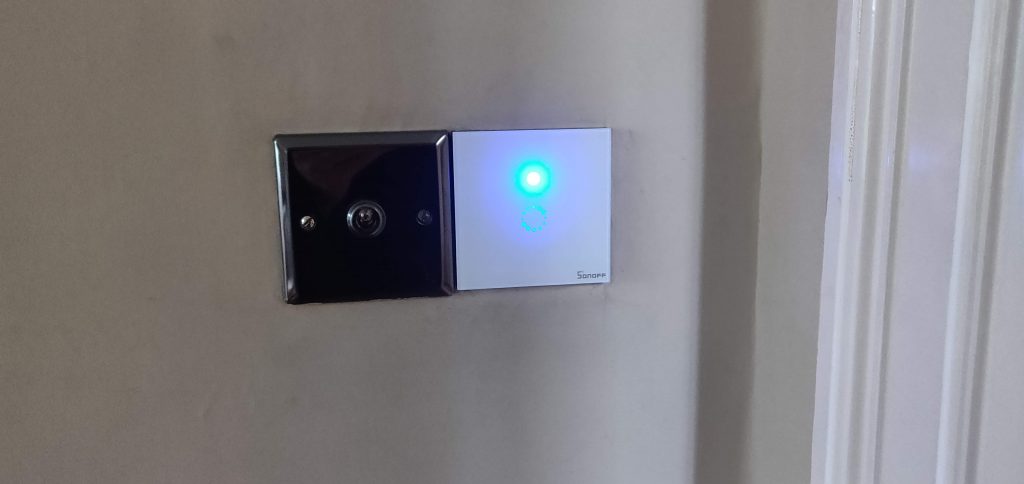
In this project I control a Sonoff light switch using Home Assistant. You can do the same with other Sonoffs. The switch shown here is the T4EU1C wall plate switch. It works over wifi and is inexpensive.
By 2020 the Sonoff ewelink app had a LAN mode. (The LAN mode allows the switch to work without access to the internet). What’s described below is the use of a Hassio community custom component (by AlexxIT‘ ) which allows Home Assistant to directly control sonoff devices.
BTW You should nevertheless explore other ways to control mains-wired Sonoff devices. You can ‘flash’ the Sonoff device with Tasmota or ESPHome software (to gain extra features) and you can then control it with Home Assistant. I chose not to do either because a light switch ‘belongs to the house’ – I felt that it ought not be hacked to cause problems for others.
You can instead use a combination of IFTTT, eWelink and Home Assistant – which is clever stuff – but there are many more stages to success. What follows is already enough.
A quick word about wall light switches
Many smart wall switch reviews on Amazon have one star reviews: almost all wall switches lack a neutral wire back to the supply. The neutral wire is needed to power the smart electronics. Those reviewers have discovered that wiring some switches requires more work or a workaround. What they should be looking for is a ‘no neutral wire required’ light switch like the Sonoff T4EU1C. The switch turns on and off. It’s not a dimmer. A dimmer is no good with many modern bulbs. I’m controlling regular not-smart bulbs here and I recommend you do that too.
1. Install the Sonoff wall switch and pair it with the ewelink app
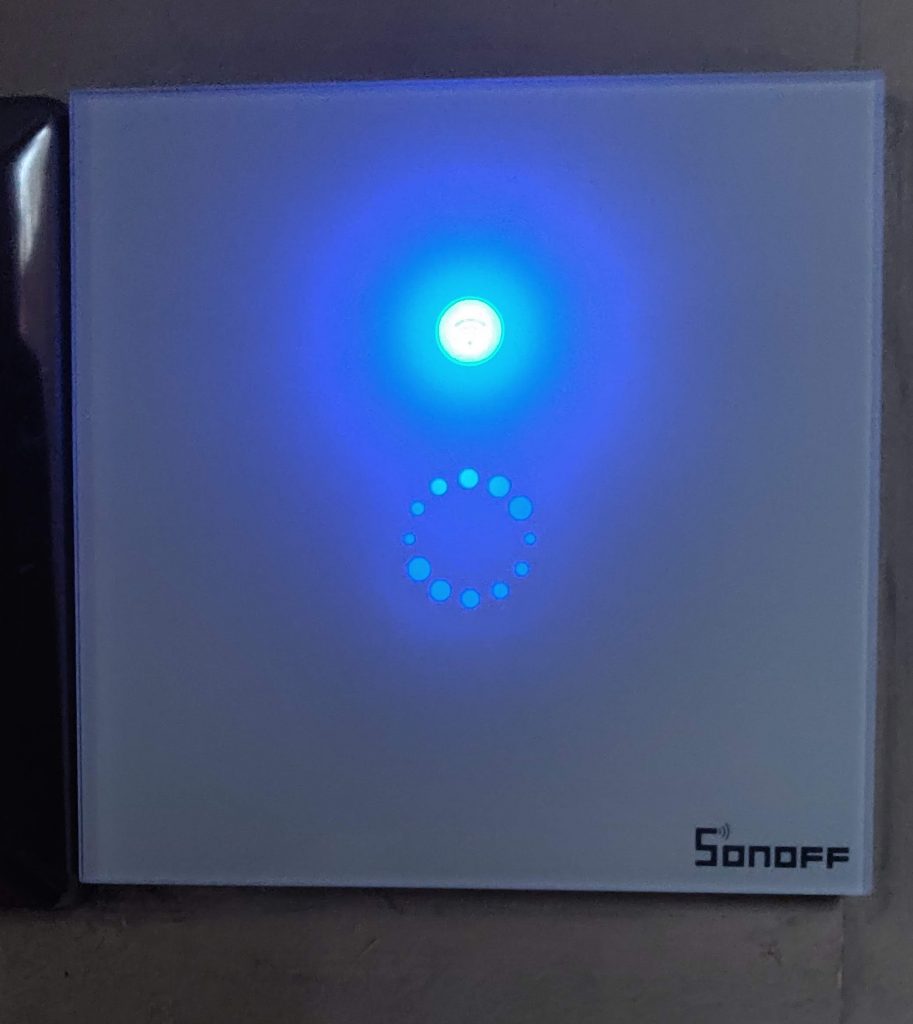
You’re dealing with mains electricity so you must disconnect the supply or consider your possible death. Check there’s no power using a meter – house circuits do sometimes interconnect. The T4EU1C easily fits a medium-depth back box and it uses the feed and load wires already in there. When that is fitted and closed up the wall light works like any touch switch. When you ‘press and hold’ the button you can pair it to the Sonoff ewelink app and your wifi.
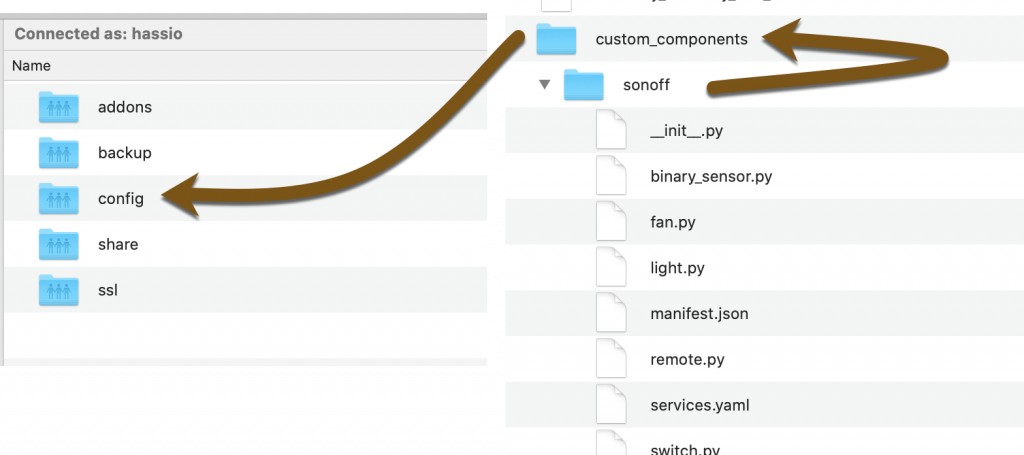
2. Install the Sonoff component into ‘Home Assistant’
You’ll have an easier time if you have the Samba file sharing add-on to put some files in your Home Assistant setup. Also have the File Editor or Configurator add-on. Install them using the Hassio Supervisor add-on store.
The Samba file sharing add-on lets you use Windows File Explorer/Mac Finder to copy files to your Home Assistant SD-card. At April 2020 you needed this custom component by AlexxIT. Go to github and download the zip file. Find the custom_components folder inside the zip file and drag it into ‘config‘ in your Home Assistant.
3. Add your ewelink login credentials to configuration.yaml
# Launch the Home Assistant File editor so that your can add these lines to configuration.yaml. If you can't remember your login details, you'll find them stored in your Google account or Apple Keychain.

sonoff:
  username: mymail@gmail.com
  password: mypassword
3: Restart Home Assistant
When Home Assistant restarts you should have gained an entity for the wall light switch. Look in Entities or Customisations to find it listed. The switch will have the same name as it had in ewelink. You might want to customise its name or icon as I have here. At this time the sonoff custom component doesn’t add new sonoff devices when you add them to ewelink. Read the component instructions for a workaround.

4: Add the wall light switch to the Home Assistant frontend
Go to Configure UI – if you add an entity card to Home Assistant you’ll have a dashboard switch as shown opposite. However, to get some real benefits you need some automations.

5a. Write an automation routine so that the wall lights go on when the TV goes off
You create automation routines using a tool in the Configuration section of Hassio. This tool has its own instructions, however it will create some code for you and save it in automations.yaml. I’ve put my code below. Although the items are unique to my setup, describing it may make clear what you can do.
- The table lamp (hue/ikea bulb) is my dim background lighting while watching TV. The TV remote turns on/off the table lamp as it turns on/off the TV. The TV and table lights are controlled by a Harmony hub (but that’s not essential for you). The table lamp off event triggers this automation and turns the wall lights on. Two conditions must be fulfilled: it must be evening and the TV must be off.
- Your situation will be different but the automation below waits for the table light to go off when the TV is off. All of that triggers the wall lights to go on at the end of an evening’s viewing.
THIS IS A SECTION FROM AUTOMATIONS.YAML CREATED BY THE EDITOR
id: 'XXXXXXXNUMBER'
alias: wall light goes on when tv goes off
description: when table lights go off wall light goes on
trigger:
entity_id: light.table_lamp
from: 'on'
platform: state
to: 'off'
condition:
condition: state
entity_id: sensor.tv_activity
state: PowerOff
after: '20:00:00'
before: 03:00:00
condition: time
action:
data: {}
entity_id: switch.sonoff_1000af10bb
service: switch.turn_on
5b. Write an automation routine so that the wall lights go off at night
A ‘good night’ automation is one automation you ought to have already – my one runs daily to turn off all the items that might be left on overnight. (I have other automation routines that turn on my power hungry kitchen lighting when there’s someone in the kitchen. Another routine turns off that lighting every few hours – just in case the routine fails).
# This 'good night' automation turns off a bunch of lights at a certain time every day.
id: '156numbershere'
alias: 'all lights off '
trigger:
at: 02:00:01
platform: time
condition: []
action:
data:
entity_id: group.all_lights
service: light.turn_off
entity_id: light.color_temperature_light_1
service: light.turn_off
entity_id: light.table_lamp
service: light.turn_off
data: {}
service: script.walllightoff
data: {}
entity_id: switch.sonoff_1000af10aa
service: switch.turn_off
5c. Write an automation routine so that you can switch the wall lights from the sofa – in other words use a physical button on the coffee table to switch the Sonoff T4EU1C
When a wireless black button is pressed a 433MHz signal goes to a Sonoff RF bridge. The bridge recognises the code and sends a MQTT message to Home Assistant. An automation routine in Home Assistant lies in wait for that MQTT message. The routine toggles the wall lights to suit TV use. The process is very similar to my smart letterbox except that instead of a door sensor I have a push button. That project shows the initial set up where you get Home Assistant to listen out for MQTT messages. You need to add this text to define a new binary sensor with your configuration.yaml

# the state topic below is set by the Sonoff RF bridge. rfsignal is my choice of
# name in the RF bridge set up. The value template should used as it is.
# The payload 'on' is the code sent by the button and received by the RF Bridge
# The payload 'off' is a dummy value as the button can only send one code.
# off-delay is how many seconds pass before the button can be pressed again.
binary_sensor:
  - platform: mqtt
    state_topic: "rfsignal/tele/RESULT"
    name: "walllightbutton"
    value_template: '{{value_json.RfReceived.Data}}'
    payload_on: "EFCA61"
    payload_off: "EFCA61off"
    device_class: power
# device: black round button
   qos: 1
   off_delay: 3
# Automation that waits for the black button to be pressed
id: '1587NUMBERS233111'
alias: wall light blackbutton
description: a button press toggles wall light on or off
trigger:
entity_id: binary_sensor.wall_lightbutton
# the entity above is the name of the 433MHz black button
# 'Binary' means that it can only be on or off
from: 'off'
platform: state
to: 'on'
condition: []
action:
data: {}
entity_id: switch.sonoff_1000af10aa
# the switch above is the name of the wall light switch entity
service: switch.toggle
Hi! I have a problem with this point: “At this time the sonoff custom component doesn’t add new sonoff devices when you add them to ewelink. Read the component instructions for a workaround.”
Where the heck can I find this workaround?? Can you help please?
Firstly, I believe that my configuration (below) deals with updating. It will include changes you made to your ewelink app setup. My Home Assistant configuration.yaml now reads as follows:
sonoff:
# sonoff: should be at the left margin. the lines below it should be indented 2 spaces
Secondly, the answer to your question is under Cloud and Local mode in the github documentation at https://github.com/AlexxIT/SonoffLAN#config-examples