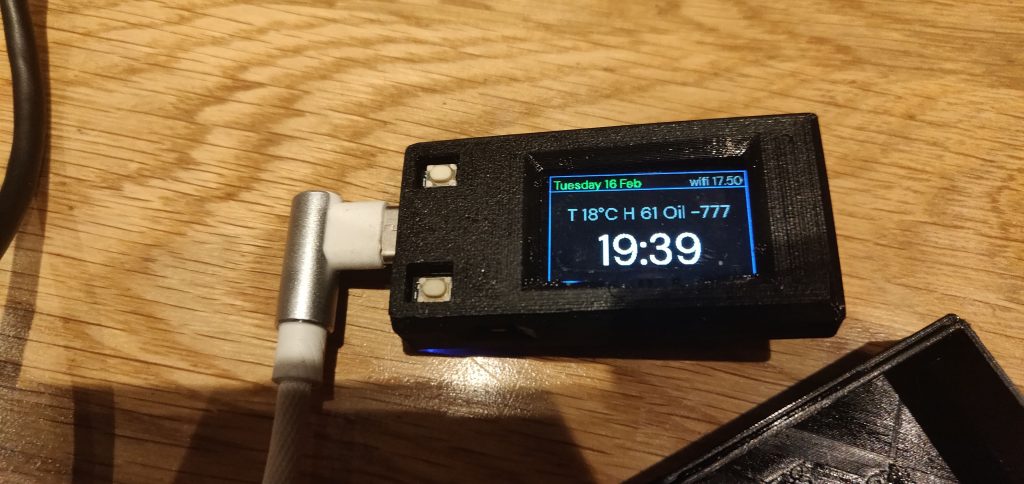
see your sensor readings on a TTGO T-display ST7789V TFT LCD
If you use Home Assistant you can show temperature, time and other sensor entities on this cute display.
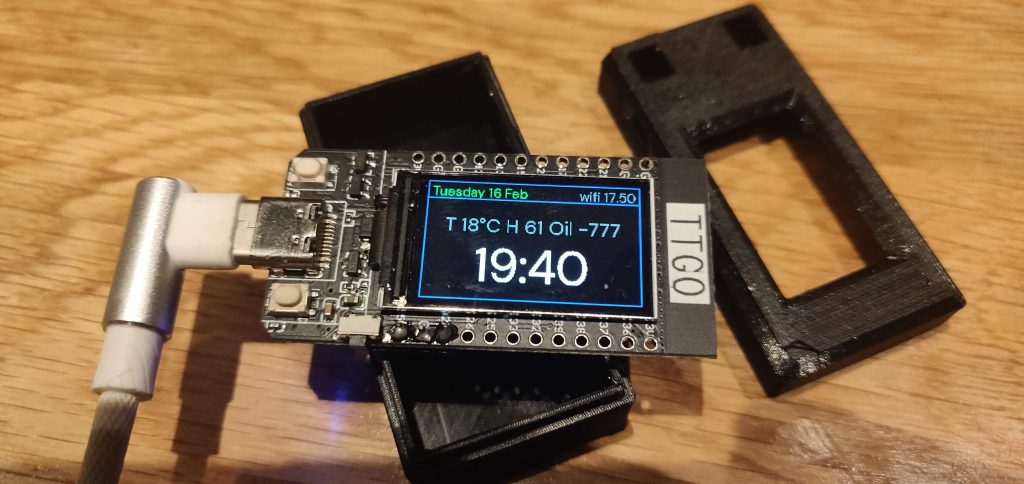
The inspiration for this mini-project came from a need to display my oven temperature in a convenient place in the kitchen. I might instead need to see the time of the next train, the oil tank level, my broadband speed or indeed the state of any Home Assistant sensor. This project needs only a TTGO LCD T-display and USB to power it. You’ll need a USB-C type cable because that’s what LILYGO/TTGO use on this device.
The first prerequisite for this project is a working Home Assistant setup. The last and only other need is this display and ESP32 in one unit. You can modify my code to suit your sensors.
The display is full colour, 1.14 inches and offers very good resolution. If you need to display lots of information at once consider this display project with an old monitor. I had this TTGO display for months before I knew how to work it so I hope it’s useful to bring some understanding forward. If you wanted to use a battery to power the display, a lead is supplied with the board. It helps if you’ve no sockets nearby. A phone power bank works the same more or less conveniently.

find a location for the TTGO T-display
If you use a 3D printer a search at thingiverse.com will find a suitable case to protect the unit. My kitchen location, where I glued the display to the back of a smoked glass door seemed like an ideal one. I powered the TTGO T-display via a USB splitter (1 male to 2 female). It draws very little power.
what you need for this
- a TTGO T-Display, USB cable and a USB power supply
- Home Assistant running on a Raspberry Pi – my Home Assistant setup instructions
- A Home Assistant ‘add-on’ called ESPhome which is found in the add-on store – see how I did it

go to ESPhome in Home Assistant, add a ‘new node’ and use this configuration
Go to the ESPHome section of Home Assistant and create a new device (+ sign). Follow through the ESPhome web dialogue to firstly connect to the TTGO display; prepare it and supply it with your wifi details. Next you must Adopt and rename the new device to something obvious. Ultimately you ‘edit’ the new device and add the code below to the editor panel
.
- Customize the code below using the Esphome editor and changing the options to suit.
- Put a font called Helvetica.ttf in the ESPHome folder in Home Assistant (use the File Editor to upload this). You can use any TTF font (such as Gillsans.ttf) but you must either rename it (to Helvetica.ttf) or edit the code below to get the font name right
- If nothing happens click View the logs. After pressing a (edge) button you might see ‘waiting for download’ which suggests now is the time to click Flash or Upload firmware.
# Create a new device in ESPHome. Add these lines to the device code

substitutions:
  devicename: ttgo_oven
# just change the device name above not the devicename below

esphome:
  name: ttgo_oven
  platform: ESP32
  board: featheresp32
logger:
api:
ota:
captive_portal:

wifi:
  ssid: "YOUR WIFI"
  password: "PASSWORD"
  manual_ip:
    # Set this to the IP of the ESP
    static_ip: 192.168.1.XX
    # Set this to the IP address of the router. Often ends with .1
    gateway: 192.168.1.1
    subnet: 255.255.255.0

    ssid: "ttgo fallback hotspot"
    password: "password"
  # fallback hotspot (captive portal) in case wifi fails

color:
  - id: my_red
    red: 100%
    green: 0%
    blue: 0%
  - id: my_yellow
    red: 100%
    green: 100%
    blue: 0%
  - id: my_green
    red: 0%
    green: 100%
    blue: 0%
  - id: my_blue
    red: 0%
    green: 0%
    blue: 100%
  - id: my_gray
    red: 50%
    green: 50%
    blue: 50%

font:
  - file: "Helvetica.ttf"
    id: helvetica_48
    size: 48
  - file: "Helvetica.ttf"
    id: helvetica_24
    size: 24
  - file: "Helvetica.ttf"
    id: helvetica_S
    size: 14
# put a ttf font called Helvetica.ttf in the esphome folder

binary_sensor:
  - platform: gpio
    pin:
      number: GPIO0
      inverted: true
    name: ${devicename}top push
    id: tdisplay_button_input_0

  - platform: gpio
    pin:
      number: GPIO35
      inverted: true
    id: tdisplay_button_input_1
    name: ${devicename}bottom push

switch:
  - platform: restart
    name: ${devicename} restart

# replace my entity IDs with your entity IDs below
sensor:
  - platform: homeassistant
    id: oven1_temperature
    entity_id: sensor.oven_temperature
    internal: true
  - platform: homeassistant
    id: oven2_temperature
    entity_id: sensor.oven2_temperature
    internal: true
  - platform: homeassistant
    id: my_timer
    entity_id: timer.oventime
    internal: true
  - platform: wifi_signal
    name: "ttgo wifi signal"
    update_interval: 60s

time:
  - platform: homeassistant
    id: esptime

spi:
  clk_pin: GPIO18
  mosi_pin: GPIO19

display:
  - platform: st7789v
    backlight_pin: GPIO4
    cs_pin: GPIO5
    dc_pin: GPIO16
    reset_pin: GPIO23
    rotation: 0
    lambda: |-
      it.printf(50, 30, id(helvetica_48), id(my_yellow), TextAlign::TOP_CENTER, "%.0f°", id(oven1_temperature).state);
      it.printf(50, 120, id(helvetica_48), id(my_yellow), TextAlign::TOP_CENTER, "%.0f°", id(oven2_temperature).state);
      it.strftime(60, 0, id(helvetica_S), id(my_green), TextAlign::TOP_CENTER, "%H:%M", id(esptime).now());
      it.strftime(60, 190, id(helvetica_S), id(my_green), TextAlign::TOP_CENTER, "%A", id(esptime).now());
how to configure the ESPhome code
- All of the above was adapted from the ESPhome guide to the ST7789V
- Notice that you have options to infinitely change the colour, the font and the font size.
- There are two buttons on the display and Home Assistant watches them for a press. You can use them to trigger turning on a light or relay entity found in your Home Assistant..
- The sensor section shows that you can pull information about any sensor in Home Assistant. I used oven temperatures.
- With ‘rotation’ set to O, the display is landscape, 240 pixels long x 140 pixels high. See the example at ESPHome for a portrait version of the display.
- The lamda section does the work of positioning the sensor values and the time. Yes, it’s evil – I suggest you get yourself some graph paper and experiment with the text placement.
go to Home Assistant > Integrations to add your TTGO display device entities
- Go to Home Assistant Configuration. Choose Integrations. If the display hasn’t already been discovered automatically, add ESPhome and enter the IP address you put in the code above.
the oven temperature mini- TFT screen near my cooker
A TTGO OLED T-display to display the temperature readings:


Another version of the display with code to use as needed
The display above is a later version after much fiddling with font positioning. The font used is Google’s DM Sans. I downloaded this from Google fonts, renamed “DM Sans.ttf” to “Helvetica.ttf” and put this font file in Home Assistant’s ESPhome folder.
# CHANGE THE ITEMS IN BOLD TO SUIT

substitutions:
  devicename: ttgo_oven

esphome:
  name: ttgo_oven
  platform: ESP32
  board: featheresp32

# Enable logging
logger:

# Enable Home Assistant API
api:
ota:
captive_portal:
wifi:
  ssid: "YOUR WIFI"
  password: "password"
  manual_ip:
    # Set this to the IP of the ESP
    static_ip: 192.168.1.x
    # Set this to the IP address of the router. Often ends with .1
    gateway: 192.168.1.x
    # The subnet of the network. 255.255.255.0 works for most home networks.
    subnet: 255.255.255.0
#  fast_connect: on
  ap:
    ssid: "ttgo fallback hotspot"
    password: "password"
  # Enable fallback hotspot (captive portal) in case wifi connection fails


color:
  - id: my_red
    red: 100%
    green: 0%
    blue: 0%
  - id: my_yellow
    red: 100%
    green: 100%
    blue: 0%
  - id: my_green
    red: 0%
    green: 100%
    blue: 0%
  - id: my_blue
    red: 20%
    green: 20%
    blue: 100%
  - id: my_gray
    red: 50%
    green: 50%
    blue: 50%
  - id: my_white
    red: 100%
    green: 100%
    blue: 100%

# put any ttf font renamed Helvetica.ttf in the esphome folder.

font:
  - file: "DMSans-Bold.ttf"
    id: helvetica_L
    size: 76
  - file: "DMSans-Bold.ttf"
    id: helvetica_M
    size: 34
  - file: "DMSans-Bold.ttf"
    id: helvetica_S
    size: 24

binary_sensor:
#  - platform: status
#    name: "ttgo status"
#    id: system_status
  - platform: gpio
    pin:
      number: GPIO0
      inverted: true
    name: "ttgo_oven toppush"
    id: tdisplay_button_input_0
#  - platform: gpio
#    pin:
#      number: GPIO35
#      inverted: true
#    name: "ttgo_oven botpush"
#    id: tdisplay_button_input_1
#    name: ${devicename} rcwl27
##  - platform: gpio
#    pin: GPIO27
#    device_class: motion


# We can still control the backlight independently
switch:
#  - platform: gpio
#    pin: GPIO4
#    name: "ttgo_oven backlight"
#    id: backlight
  - platform: restart
    name: ${devicename} restart

sensor:
  - platform: homeassistant
    id: oven1_temperature
    entity_id: sensor.oven_temperature
    internal: true
  - platform: homeassistant
    id: oven2_temperature
    entity_id: sensor.oven2_temperature
    internal: true
  - platform: homeassistant
    id: my_timer
    entity_id: timer.oventime
#    filters:
#      - filter_out: nan
    internal: true
  - platform: wifi_signal
    name: "ttgo wifi signal"
    update_interval: 60s


time:
  - platform: homeassistant
    id: esptime

spi:
  clk_pin: GPIO18
  mosi_pin: GPIO19

# THE FOLLOWING can be uncommented to DISPLAY AN IMAGE IN THE ESPHOME FOLDER
#image:
#  - file: "image.png"
#    id: my_image
#    resize: 200x200
#    type: RGB24


display:
  - platform: st7789v
    backlight_pin: GPIO4
    cs_pin: GPIO5
    dc_pin: GPIO16
    reset_pin: GPIO23
    rotation: 270
    lambda: |-
       it.printf(80, 45, id(helvetica_L), id(my_yellow), TextAlign::TOP_CENTER, "%.0f°", id(oven1_temperature).state);
       it.printf(185, 70, id(helvetica_M), id(my_yellow), TextAlign::TOP_CENTER, "%.0f°", id(oven2_temperature).state);
       it.strftime(40, 0, id(helvetica_S), id(my_white), TextAlign::TOP_CENTER, "%H:%M", id(esptime).now());
       it.strftime(165, 0, id(helvetica_S), id(my_white), TextAlign::TOP_CENTER, "%A", id(esptime).now());
Excellent tutorial, and working flawless. Simetimes i lose wifi cionbnection, si i woukld like to show th ip adress of the TTGO. Found out that you should use text sensor for wifi but i can;t get it to work. Any suggestions.
Cheers Erik. Knowing the ip address might be useful. Displaying the wifi signal strength might be useful too.
The text sensor instructions could be more helpful and provide examples. My suggestion is to send the IP address to HA and then use ‘- platform: homeassistant’ to get it back and to display it in the lamdba line with other variables. If that’s not clear shout back.
text_sensor:
– platform: wifi_info
ip_address:
name: ESPIPAddress
AND THEN
sensor:
– platform: homeassistant
id: ipaddress
entity_id: sensor.ESPIPAddress
internal: true