433MHz smarter letterbox – for when you don’t want to walk to the letter box
see also more about 433MHz devices
The letterbox is five doors and fifty metres from my desk. The uncertainty of the postie arriving in the afternoon means that I make wasted journeys to the gate. OMG something had to be done.

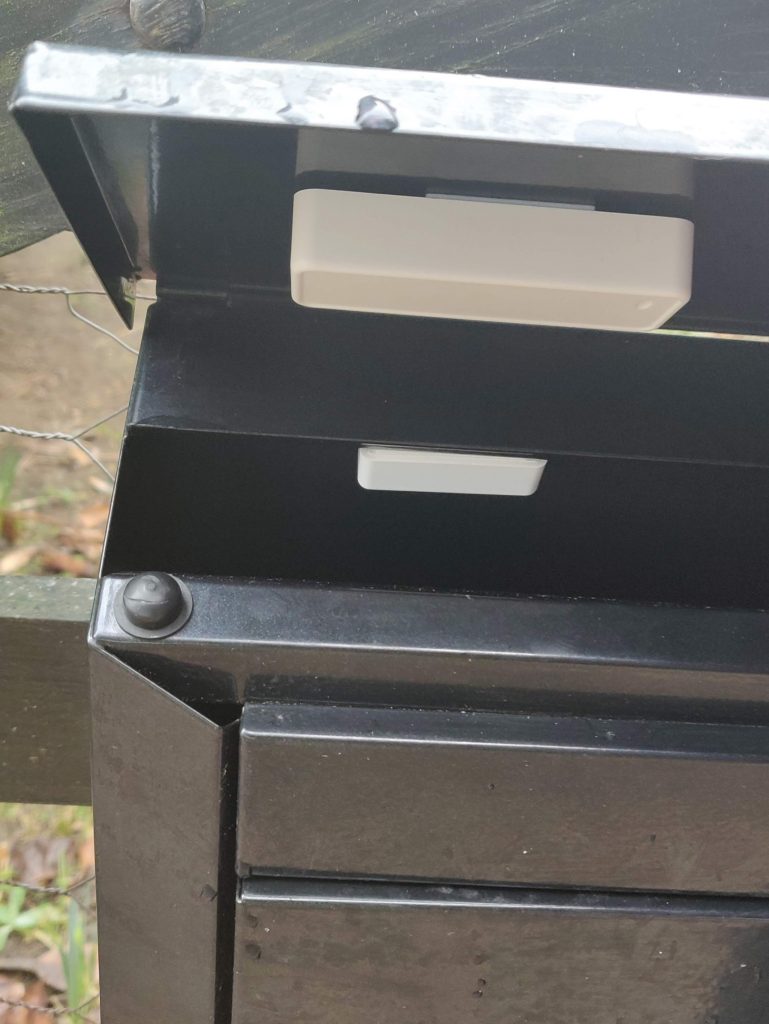
I fitted a 433MHz door/windows sensor to a letterbox lid. The sensor is inexpensive (£4) and works for months on one AAA cell. A wifi based sensor would need constant power or lithium cells.

how it works
- 433MHz door/windows sensors are used for wireless home security systems. Some door sensors emit two different RF codes. When the post lady opens the letterbox lid, the sensor is separated from a magnet so it sends one signal. When the lid drop,s it sends a different signal (‘closed’). However as the box is metal nothing ever hears that signal – but no matter. A single code door sensor would’ve been fine here.
- A 433MHz compatible chime can be paired with the door sensor such that you’ll hear the chime when the letterbox is opened. To pair the chime you hold down its pair button and quickly activate the door sensor to send an ‘open’ signal. It might take one or two goes if they’re far from each other, but the sensor’s range is impressive.
- You can stop here as that’s pretty much a full letterbox solution – but I went further because I plan to use many more sensors and alerting devices in my home automation setup.
- What follows is easier if you already have Home Assistant and are ready to learn how MQTT and Tasmota and 433MHz widen your range of sensors and options.
- So just 20 metres away, in line of sight behind a window, is a Sonoff RF Bridge. It’s powered by a USB charger and with no modification it will ‘hear’ the ‘open’ signal and send a message to the Sonoff app (Ewelink) on a phone.
- I wanted the letterbox sensor to alert other devices round the house. I’d later be fitting sensors to monitor someone at the door; someone at the back; several room temperatures. So I flashed the Sonoff RF Bridge with more versatile software called Tasmota. This software runs as a web server and it sends MQTT messages to Home Assistant, my home automation hub.
- A Raspberry Pi runs Home Assistant (as I show here). Home Assistant has an addon that receives MQTT messages – it is called the Mosquitto MQTT broker. When the letterbox is opened and Tasmota sends an MQTT message, a wide range of actions are available – from sending alerts in all directions, notifying a phone, blinking a light, posting an email or sounding a chime.
how to modify or flash the Sonoff RF Bridge
No need to flash the Sonoff: since 2020, a Home Assistant custom component allows you to use the Sonoff RF bridge without the need to open it and flash it with new firmware. If you prefer this approach, as do I, see my eWeLink project.
The Sonoff RF bridge does not need modifying if you’re happy just to receive letterbox notifications from the Ewelink app. But the Sonoff bridge can be flashed with Tasmota or OpenMQTTgateway to make it respond to more RF protocols. When Tasmota is running on the sonoff Bridge you can see most of the RF signals that the sensor sends and learn about their different codes. The main benefit is that the Sonoff Bridge with Tasmota will relay RF signals to Home Assistant which in turn can effect a wide variety of notifications and actions including say, giving you a record of when and how often the letterbox is opened.
To flash the Sonoff bridge you need some ‘female header pins’ and an FTDI unit as shown. Open the Sonoff Bridge case and solder some headers (as in the following video) under the green panel on the board. Use Dupont jumper cables to connect the FTDI to the Sonoff headers.
Next download Tasmota and use flashing software and a USB cable to put Tasmota on the Sonoff Bridge (video below).
When Tasmota is installed you’ll need to personalise it with your wifi settings and more. You do this in your browser and you’ll soon find the software to be very reliable.


connect Tasmota to Home Assistant and MQTT
- Install the MQTT add-on in Home Assistant. Instructions are provided on the add-on page. Avoid setting passwords at this untested stage.
- Go to your Tasmota web interface (it’ll be an IP address like 192.168.1.x) and launch the Console. You need to open and close the letter box and read the Data hex codes that will appear as you do this.

- Go to Home Assistant and use the Configurator to edit your configuration.yaml file to read as follows. Items in bold will be different for you. Restart Home Assistant when you have validated your coding. (Reminder: you can test sending and receiving MQTT messages commands in the Home Assistant Developer panel. I’ll explain that when I understand its syntax better).
binary_sensor:
  - platform: mqtt
    state_topic: "tele/rfsignal/RESULT"
    name: 'letterbox'
    value_template: '{{value_json.RfReceived.Data}}'
# set payload on to the open Data code seen in the console
# set payload off to the closed Data code - or anything you like
    payload_on: '4DC30E'
    payload_off: '4DC30A'
    device_class: door
# OFF-delay will assume the letterbox is closed 10 seconds later, ready to be triggered again. The letterbox closes by gravity.
    off_delay: 10
- Hereon, whenever the letterbox is opened, the open data code is sent. The text above tells Home Assistant to listen for those codes.
- Finally you need to write an Automation routine that does what you want to. In the video Dr Zzz talks about what he wants his automations to do. I’ve included my automation for comparison – it listens for the letterbox to open and then it sends notifications to the browser, my phone and ipad. Still to do is to make a doorbell do a unique chime and to notify Alexa.
id: 'uniquestringofnumbers'
alias: alert when something (letterbox) happens
description: letterbox sensor automation
trigger:
entity_id: binary_sensor.letterbox
from: 'off'
platform: state
to: 'on'
condition: []
action:
data:
message: at {{ states ('sensor.time') }} on html5
title: '{{ states (''sensor.time'') }} letterbox opened'
service: notify.notify_html5
delay: 00:00:02
service: script.sendalert
data:
message: at {{ states ('sensor.time') }} on html5_mac_chrome_browser
title: '{{ states (''sensor.time'') }} letterbox opened'
service: notify.notify_html5_mac_chrome_browser
alias: ''
data:
message: at {{ states ('sensor.time') }} on notify_html5_oneplus
title: '{{ states (''sensor.time'') }} letterbox opened'
service: notify.notify_html5_oneplus
data:
message: at {{ states ('sensor.time') }} on mobile_app_rogerpad
title: '{{ states (''sensor.time'') }} letterbox opened'
service: notify.mobile_app_rogerpad
see also more about 433MHz devices