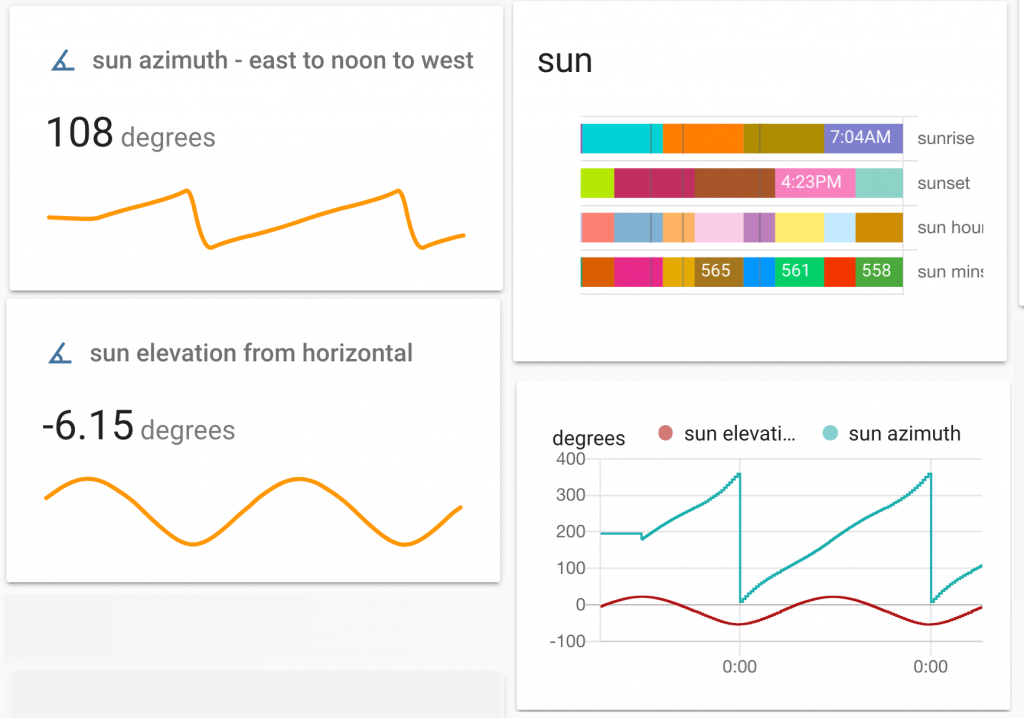
The Home Assistant dashboard (aka ‘Lovelace’) is very good at displaying live sensor data as well as historic sensor data. The image below shows a ‘just now’ measure of the sun and also a continuous line graph of ‘sun azimuth’ over the last few days.
However we may want to see changes over a longer period of time. I want to monitor my use of heating fuel – firstly I want to be able to predict when I need to order more heating fuel. Secondly, I wonder whether my oil use could be related to the outside temperatures. So the thing to do was to send daily level and temperature readings to a spreadsheet to analyse later. This page describes how, over four years, I sent daily data from my Home Assistant sensors called ‘oil_level’ and ‘weather temperature’ to a Google Sheet. (On another page you can see the smart oil tank level sensor I made).
Up till February 2024: I used a free IFTTT account to send 1300 daily readings as described below. Four years later IFTTT made this feature a paid-for thing. Fair enough. If you have an IFTTT Pro account read on. If not see the work around below. After February 2024: Home Assistant has a Google Sheets integration which requires a considerable amount of setting up. See below for a video and my notes about this.
how to split up a string eg a long date format such as ‘March 4, 2020 at 07:15AM’
how to reference the last reading in a spreadsheet
how to average the bottom, most recent readings in a spreadsheet
how to add days to a date
1. Get IFTTT to put the data I send into a Google sheet
Go to IFTTT, sign in and add the Webhooks service and the Google Sheets service. Follow this link if you need the official docs for Home Assistant IFTTT
2. Get a ‘key’ from the Webhooks service
Go to IFTTT > My services > Webhooks > settings and copy the key from the webhooks URL.
3. Add the key (the string of characters found in the URL) to your Home Assistant configuration.yaml
4: Create an IFTTT applet ‘IF Webhook THEN Google Sheets’
In the Google Sheets section of the IFTTT applet set the name and folder for the spreadsheet where you’ll store the data as follows:
5: Write a Home Assistant ‘automation’ as a yaml file
In Home Assistant create an automation that triggers IFTTT once a day and sends the sensor data to the spreadsheet. Don’t use the built-in automation editor – instead use a text editor to create a file called send_oil_level.yaml and saved in the Hassio config folder called ‘automations’. I suggest you copy and paste this editing just the bold text. The event name below must match the name above at IFTTT
id: '12399999'
# the id must be unique - the alias and description are for your reference
alias: oil_level_spreadsheet
description: oil daily readings in oil_level.yaml
# I want a daily oil level reading so the trigger I use is a time
trigger:
at: 06:30:00
platform: time
# The condition offers ways to limit when we'll send oil sensor data. eg don't bother in summer
condition: []
# The ifttt trigger service requires a data template. "event" and "value1" etc ought to match what your IFTTT app is expecting to receive. I suggest you copy and paste this.
action:
data_template: { "event": "oil_level", "value1": "{{ states('sensor.oil_level')}}", "value2": "{{ states('sensor.weather_temperature')}}", "value3": "{{ states('sensor.loose_temperature')}}" }
service: ifttt.trigger
To recap: this code is in a text file named send_oil_level.yaml which is in the Hassio config folder called ‘automations’. Check also that your configuration file named configuration.yaml has the following sections:
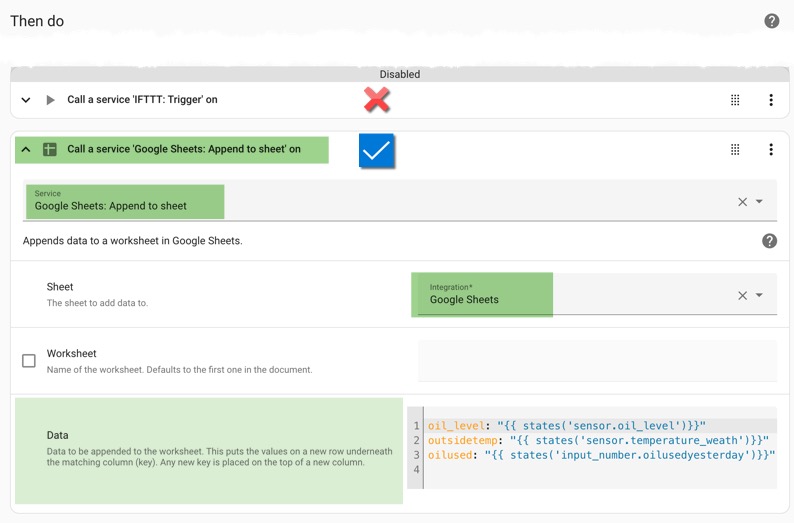
7. Instead of using IFTTT use the Home Assistant Google Sheets Integration
It is no less tricky but possible to get data out of Home Assistant and into a Google Sheet. The video tutorial below shows what to do – thank you Ed – I have added some notes in case you hit snags. I’ve added the modified code for the automation action just below the video.
If you’ve several gmail accounts be signed in to just one Google account.
Be prepared to delete credentials and go through the process again.
I used my duckdns Home Assistant URL rather than my local Home Assistant URL.
If Home Assistant has multiple credentials it’ll ask which one to use.
I’m hopeful that one day an integration like this could extract data from the spreadsheet.
8. Find a way to split the date time March 4, 2020 at 07:15AM
Columns A to E of the spreadsheet need to be left for IFTTT and Google Sheets to update whenever the automation runs. You can format them with colours or whatever but the bottom line must stay empty to catch the incoming data.
Use Column E rightwards when you want to do your calculations. Below I’ve put a split function in cell H2 and copied this down the column. The split function will break up a string of text that has a obvious separator. The obvious separator in ‘March 4, 2020 at 07:15AM’ is a space.
That’s why cell H2 has =split(A2, ” “) The formula sucks out the spaces from what’s in A2 and puts the individual elements in columns to the right of it. Pretty cool function that one.
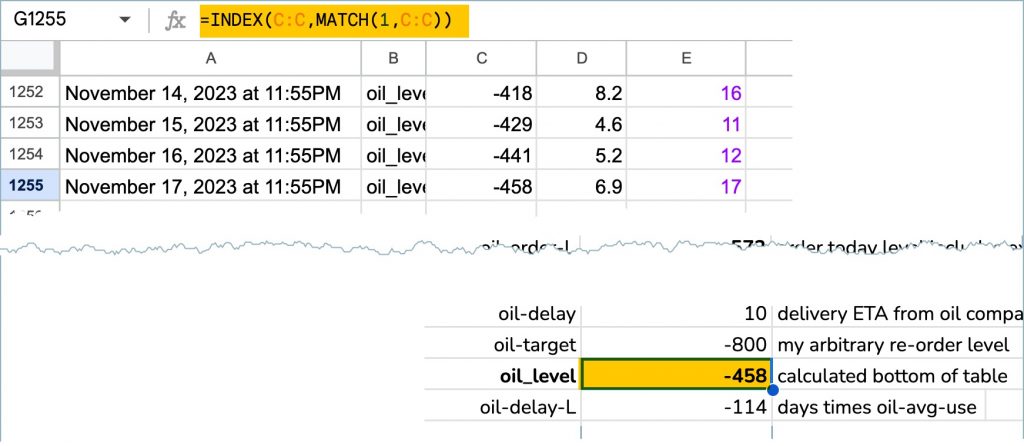
9. extract the reading at the bottom of the spreadsheet
As it’s changing and being added to daily it would seem that we can’t exactly do maths on the bottom row of the spreadsheet! But of course we can: I want to do maths on the current and most recent oil level. Put this code in the cell that you want to do the maths on. It will always update to the value at the bottom of column C in the table.
=INDEX(C:C,MATCH(1^1,C:C))
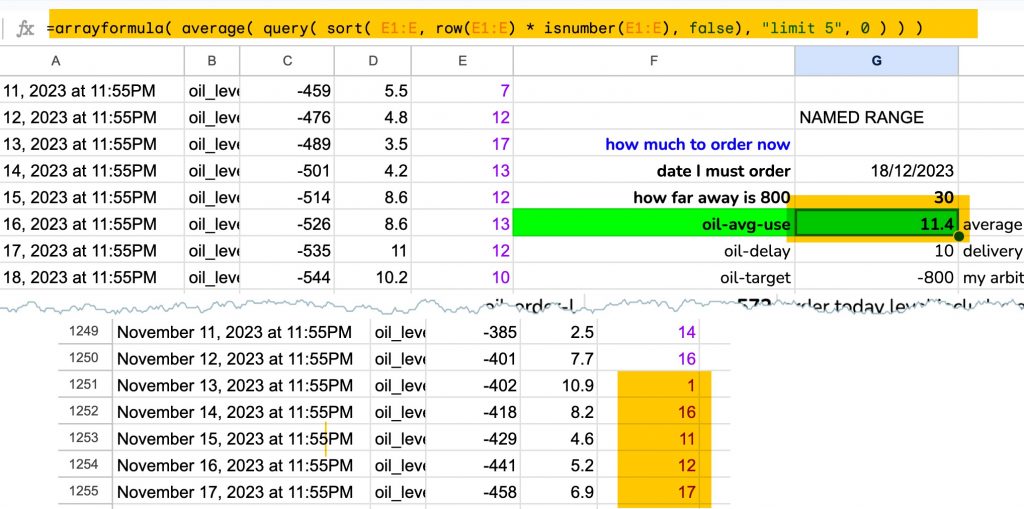
10. average the most recent values at the bottom of the table
The table is changing and being added to daily and I want to average the last five readings at the bottom of the spreadsheet. Put this code in the cell that you want to hold the average. It will always update to average the last five values at the bottom of column E in the table.
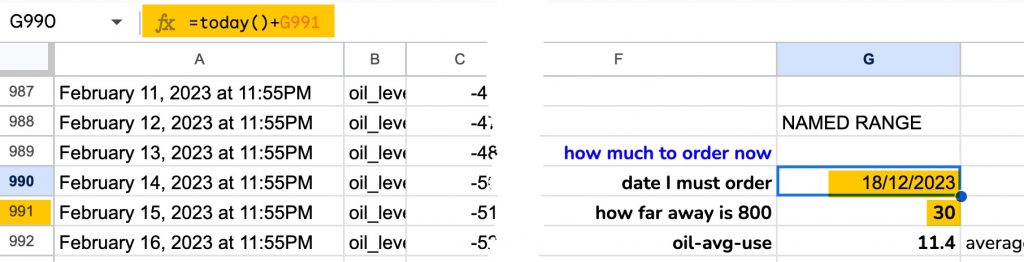
11 add a number (eg x days) to today’s date to calculate the date x days away
Date calculations firstly require you to Format your cell as a date so go to the cell and choose Format > Number > Date. Secondly in the cell you enter this function:
=today() + G991 //to add the value in cell G991 to today's date
or
=today()+ 20.5    //to get the date 20 days from today's date
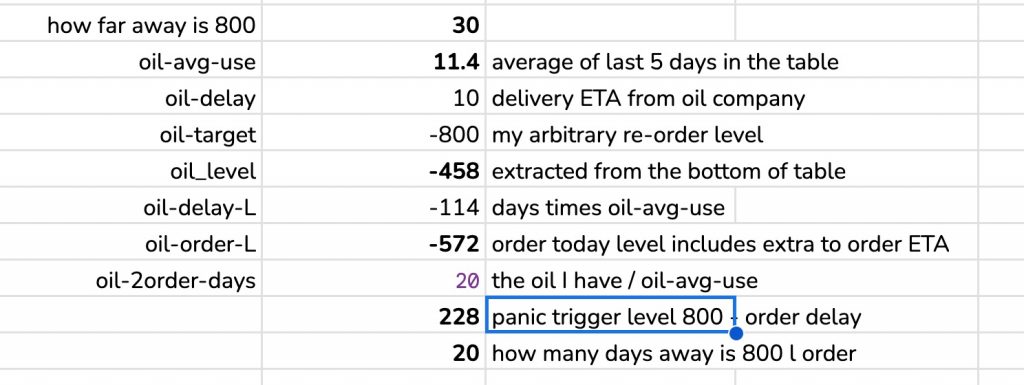
12 the completed calculation to estimate when I need to order oil
Here’s the spreadsheet I built to give a better measure of how much oil I need. Painful to create it was so useful. I later moved all of the calculations into Home Assistant and made the values into sensors and variables. See here for that project.
Hi! I would like to do this in my Home Assistant, but I have tried this and doesn’t work. Google’s driver spreadsheet does not change. I think could be the file yaml, some spaces, or formatting issues. Could you share your file or send a print of your yaml files? Thank you for share.
Sorry to hear this Jose. It is frustrating not being able to locate the cause of the failure when there are so many places to fail.
Getting the code below correct took ages – perhaps this is where it’s gone wrong. Setting up the webhooks part was hard but it was the easier bit!
This code is the entire content of a plain text file called oil_level.yaml which resides in the automations folder. I found that this automation code would not work in the automations tool.
Hello Roger, thanks allot for this tutorial 🙂
Runs perfect for me, the only thing I’m missing is already on the spreadsheet is formatting the date as you have in date split and if its possible the time in 24h
Thanks for writing in Daniel. Nice puzzle. I’ve added a paragraph (8) to the post illustrating the split function. As you’ll see the time is in column L. Without any additional number formatting it reads as a 24 hour clock so I hope that’s a result.
Hi,
thank you for your work. Is it possible to retrieve data from Google Home to Google Sheets without Raspberry or similar? If I have undertand correctly your method require hardware. Am I wrong?
Thank you for writing in. I wouldn’t say the data in Google Home isn’t retrievable as ‘developers.google.com’ offers a way that perhaps someone is trying. Please lets know.
But yes there is a ‘non-hardware’ way for you. It requires installing Home Assistant on a virtual machine on your PC, even an old PC. In this way any activity or temperature reading (etc) is recorded by HA or sent to a spreadsheet as on this page – instead of disappearing into Google Home.
The link below, and some Youtubes will guide you through that. Almost all the data I’m using now comes from a Home Assistant. My version runs on a Raspberry Pi connected by ethernet to the broadband router. Yours can run on a PC just as well or better … with the downside of it being ‘off’ when you PC is ‘off’.


Hi! I would like to do this in my Home Assistant, but I have tried this and doesn’t work. Google’s driver spreadsheet does not change. I think could be the file yaml, some spaces, or formatting issues. Could you share your file or send a print of your yaml files? Thank you for share.
Sorry to hear this Jose. It is frustrating not being able to locate the cause of the failure when there are so many places to fail.
Getting the code below correct took ages – perhaps this is where it’s gone wrong. Setting up the webhooks part was hard but it was the easier bit!
This code is the entire content of a plain text file called oil_level.yaml which resides in the automations folder. I found that this automation code would not work in the automations tool.
– id: ‘12399999’
alias: oil_level_spreadsheet
description: daily readings in oil_level.yaml
trigger:
– at: “23:55:00”
platform: time
condition: []
action:
– data_template: { “event”: “oil_level”, “value1”: “{{ states(‘sensor.oil_level’)}}”, “value2”: “{{ states(‘sensor.temperature_weather’)}}”, “value3”: “{{ states(‘sensor.power_today’)}}” }
service: ifttt.trigger
Hello Roger, thanks allot for this tutorial 🙂
Runs perfect for me, the only thing I’m missing is already on the spreadsheet is formatting the date as you have in date split and if its possible the time in 24h
Thanks for writing in Daniel. Nice puzzle. I’ve added a paragraph (8) to the post illustrating the split function. As you’ll see the time is in column L. Without any additional number formatting it reads as a 24 hour clock so I hope that’s a result.
https://www.rogerfrost.com/send-sensor-data-from-home-assistant-to-a-spreadsheet/
Hi,
thank you for your work. Is it possible to retrieve data from Google Home to Google Sheets without Raspberry or similar? If I have undertand correctly your method require hardware. Am I wrong?
Best regards
Luca
Thank you for writing in. I wouldn’t say the data in Google Home isn’t retrievable as ‘developers.google.com’ offers a way that perhaps someone is trying. Please lets know.
But yes there is a ‘non-hardware’ way for you. It requires installing Home Assistant on a virtual machine on your PC, even an old PC. In this way any activity or temperature reading (etc) is recorded by HA or sent to a spreadsheet as on this page – instead of disappearing into Google Home.
The link below, and some Youtubes will guide you through that. Almost all the data I’m using now comes from a Home Assistant. My version runs on a Raspberry Pi connected by ethernet to the broadband router. Yours can run on a PC just as well or better … with the downside of it being ‘off’ when you PC is ‘off’.
All best,
RF
https://www.home-assistant.io/installation/