heating oil tank level sensor – JSN-SR04T version
make a heating oil tank level sensor that’s more useful than anything you can buy
There is a replacement for this project – the latest project uses a DFROBOT A02YYUW Waterproof Ultrasonic sensor as described here. The sensor is a little more expensive (£16) but it may last longer.
The ultrasonic JSN-SR04T (described below) has been working reliably. However after five years the oil vapour destroyed the silicone and the sensor started falling apart and eventually failed. Silicone does protect the sensor from water damage so this would work on a water tank. A further limitation of the JSN-SR04T ultrasonic sensor is that it cannot measure at short range – it records the same level whether the tank is full or 20cm below full. When the level drops by 20cm (about 200 litres) the readings become very useful at alerting me to order more oil.
- measures oil level in any unit – litres, gallons or days until I need to refill the tank
- displays readings on a gauge or time graph (uses Home Assistant gauge & history graph).
- receive readings or alerts as an email or phone notification or flashing smart bulb in the house.
- uses an ultrasound sensor JSN-SR04T ultrasonic distance measuring sensor, waterproof (~£6 ebay). A few years later I changed to a different sensor – see the ‘time of flight sensor’ project write up
- uses an ESP32 development board – a chip with wifi (~ £6).
- if you need to use battery power an ESP8266 or other chip might be more appropriate. The battery power might be 6 x 18650 cells based on this one I made (also see Kev’s comment below)
- with a waterproof electrician’s housing this could work outdoors and on battery power.
- with a little modification this project would monitor the salt level in a water softener or the water in a water barrel (ref Dr Zzz – youtube)
Some homes use oil as a fuel to keep warm in winter. Over the course of a winter I might need to order two or three deliveries of oil but till now I’ve no way to predict the day when I’ll need to top it up. And I really don’t ever want to run out of oil. The oil is burned in a central heating boiler in the same way that many homes in the UK burn methane gas. Although we call the liquid ‘heating oil’ it’s more runny than the oil you know: it’s more like diesel or white spirits or turps or paraffin or kerosine.
This sensor had been in reliable use for a few years when I discovered that a ‘time of flight sensor’ might be even better. The ‘time of flight sensor’ project write up explains all for now and until we’ve spent more time with it. I an running both types of sensor at once just now.
I asked local firm Shelford Heating to quote a price for an oil level sensor. Their solution involved drilling the steel tank to fit an Apollo wireless kit – but £220 seemed excessive for this need. I could also have bought the kit, which sends an approximate oil level to a display but I really wanted something that could alert me better.
how to connect up an oil level sensor and wifi chip
A waterproof ultrasonic sensor, looking like a car bumper sensor, arrives with a long lead and a blue board. Female-female Dupont jumper wires will connect the four pins on the board to an ESP32. Two of the pins connect to ~ 5v power and ground. The other two, labelled TRIG and ECHO go to any suitable GPIO pin on the ESP32. I connected them to GPIO 15 and GPIO 16. Thus far we’ve four wires joining an ESP32 and a sensor board. We now need a lead (from a USB charger) to bring 5v power and GND to the ESP32.
(I initially used an ESP32-CAM instead of an ESP32 with a USB socket. This meant that I needed to hack a USB cable and make the wiring less elegant. I just happened to have a spare ESP-CAM but frankly instead I’d recommend a ESP32 with its own USB socket.


Download the STL model file here
The ultrasound sensor needs to be fixed so that it points down at the surface of the oil in the tank (photo). I used a tank hole that housed the dipstick used to measure oil level for the last 40 years. A suitable cap, as shown below, was made on a 3D printer. A container cap might have worked. You might instead drill a hole for it but I’ve no advice on this. Over time the ‘oil’ has destroyed the black plastic casing of the sensor but the sensor works as it ever did.


An electrician’s junction box like this fits my ESP32-CAM perfectly. A slightly longer box is needed for an ESP32 Dev kit. (HomeDepot /B&Q / Toolstation)
how to program the ESP32 with code – what does ‘coding and flashing the ESP32 chip’ mean?
My oil sensor is a ‘connected’ oil sensor. It takes readings, it stores and presents them and notifies me. To gain this connectivity you need a working Home Assistant installation on a Raspberry Pi (shown in an earlier project). What you do now is best seen demonstrated to gain understanding, but the idea is that you’ll first assemble a series of instructions (a program or code) and check the code for errors. You then get the code turned into a binary file that the ESP32 can use. Next follows a process of getting this ‘bin’ file from your computer onto the ESP chip via a USB cable. The bin or binary file is otherwise called firmware. The process of getting the file into the ESP32 is called flashing the ESP32 with new firmware.
- use your browser to interact with Home Assistant on 192.168.x.x:8123
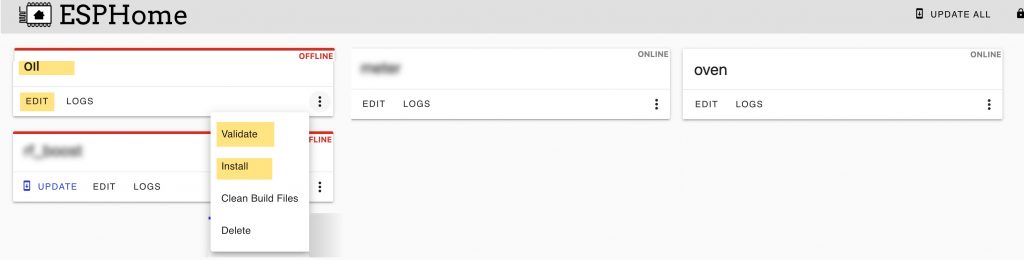
- in Home Assistant go to the Esphome add-on and add a ‘new device’ (aka new node).
- a wizard asks you for a name (eg oil) and then your wifi details and then whether you have an ESP32 or other chip.
- at this point ESPHome tries to connect to your ESP32 but you may skip this connection and do that manually later.
- choose ‘edit’ in the device box you just now created. add the code below but change the items in bold to suit your board, your wifi, your network and the GPIO pins you want to connect to.
- in the ESPhome section of Home Assistant choose INSTALL (=compile) and Manual download. This will inspect your code and compile it for the ESP32 chip and add ‘libraries’ for each feature you put in the code. After a few minutes ESPhome creates a ‘.bin’ file and saves it on your computer.
- using the ESPhome webtool, connect your ESP32 board with a USB cable. Choose the bin file, click flash and view the logs as the bin file is uploaded to the ESP32.
# SOME SECTIONS BELOW ARE CREATED BY THE ESPHOME WIZARD SO DON'T DUPLICATE THESE

esphome:
  name: "oil-tank"
  friendly_name: "oil-tank"
  area: Cottage

esp32:
  board: esp32dev
  framework:
    type: arduino

Enable logging
 logger:

Enable Home Assistant API
api:
  encryption:
    key: "FtKhT5Sf4cwe5bhxxxxxx"
ota:
  - platform: esphome
    password: ""

wifi:
  networks:
  - ssid: !secret wifiD_ssid
    password: !secret wifiD_password
  - ssid: !secret ee_ssid
    password: !secret ee_password
  - ssid: !secret wifi_ssid
    password: !secret wifi_password

mdns:
  disabled: False

captive_portal:

 # OPTIONAL WEBSERVER - USEFUL WHEN TESTING.

 web_server:
   port: 80

# this section defines how the sensor will work. Read on to see how I improved this.

sensor:
 platform: ultrasonic
 trigger_pin: GPIO15
 echo_pin: GPIO16
 name: "oil level"
 accuracy_decimals: 0
 update_interval: 10s


# battery powered version configuration - read more at ESPHome Deep sleep
deep_sleep:
  run_duration: 10s
  sleep_duration: 60min
add your sensor data to the Home Assistant overview
- when the flashing is done, power-up the ESP32 with an old USB charger and go to Home Assistant > Integrations > + > ESPHome. You might have to enter the IP address you chose in the code. You’ll then see the oil level device that has been added to Home Assistant. The device will have an entitity named something like sensor.oil_level
- go to the Home Assistant Overview where you stuff is normally displayed. Choose Edit dashboard in the top corner.
- add a new card called history graph. On the entity line select your sensor.oil_level
- add a new card called gauge to display your oil level. On the entity line select your sensor.oil_level

You don’t need to use YAML code, but for completeness the YAML for the card items above is shown below. You can edit any card’s YAML code to suit.
 # THIS IS FOR THE GAUGE
entity: sensor.oil_level
 max: 1100
 min: 0
 name: heating oil used
 severity:
   green: 100
   red: 800
   yellow: 600
 theme: default
 type: gauge
 # THIS IS FOR THE SMOOTH LINE GRAPH
entity: sensor.oil_level
 graph: line
 hours_to_show: 96
 name: of 1000 L oil used
 type: sensor
 unit: litres
# THIS IS FOR THE DETAILED HISTORY GRAPH
entities:
 entity: sensor.oil_level
 hours_to_show: 24
 refresh_interval: 0
 type: history-graph
*refine ‘the oil sensor code to correctly calibrate it – the mk II code

After several months use I needed to address some points. Because of these points I modified the code as shown below. Here’s why:
- the sensor doesn’t work well when the oil in the tank is less than 30 cm away. When the tank is full the sensor is 18 cm from the oil. This calculates as a level of 196 litres. Over the next ten days the level appears to remain at 197 litres but when it drops to around 36 cm the levels change and starts making sense. There isn’t a solution for this but the readings from now on are good.
- when my tank approaches empty the level seems to plateaux at 800 litres (720cm from the sensor). The tank holds 1200 litres so this ought not happen because, on paper, the sensor can measure to the bottom of my tank. The sensor is bouncing sounds off a metal strut inside the tank. I’d need to relocate the sensor somewhere else. Because of this I keep my daily eye on the history graph, looking for a plateau.
- the sensor measures in metres so I have to calculate the litres. My tank has a perfectly regular shape from top to bottom – so by measuring dipstick depths, I found that 100cm of tank depth contains 105.3 litres. In the ‘MkII’ code below the last two lines (filter and lamda) do this calibration. The two lines can be edited or entirely omitted to suit your tank.
- when the tank level was low the readings were a bit noisy. To counteract this I calculate the sliding average of an oil level reading.
- it was suggested that the ‘oil used’ graph should fall, not rise, so I made the reading negative. This also makes knowing how much oil to order easier. I should name the sensor ‘oil used’ because the number it returns is the amount of oil I need to buy to fill the tank. Next I really don’t need an oil level reading every 10 seconds so I increased the update interval.
You’re welcome to substitute the above ‘sensor:’ section with the following.
# You can add a filter to the sensor section to calibrate the sensor. Here's mine. # To produce a falling oil level simply add a negative sign as here! #filters:#- lambda: return x * -1053;# My complete sensor section follows:
sensor:
 platform: ultrasonic
 trigger_pin: GPIO15
 echo_pin: GPIO16
 name: "oil used"
 accuracy_decimals: 0
 update_interval: 60s
 unit_of_measurement: "litre"
  filters:
  - lambda: return x * 1053;
  - sliding_window_moving_average:
    window_size: 20
    send_every: 10
# When tank is irregular in shape calibrate the distance into the tank
# SEE THE POST FROM 'Kev' below where he improved the filter section
#  – calibrate_linear:
#  – 110 -> 0
#  – 95 -> 204
#  – 75 -> 544
#  – 55 -> 900
#  – 35 -> 1320
#  – 15 -> 1660
#  – 0 -> 1800
so when do I need to order some more oil?
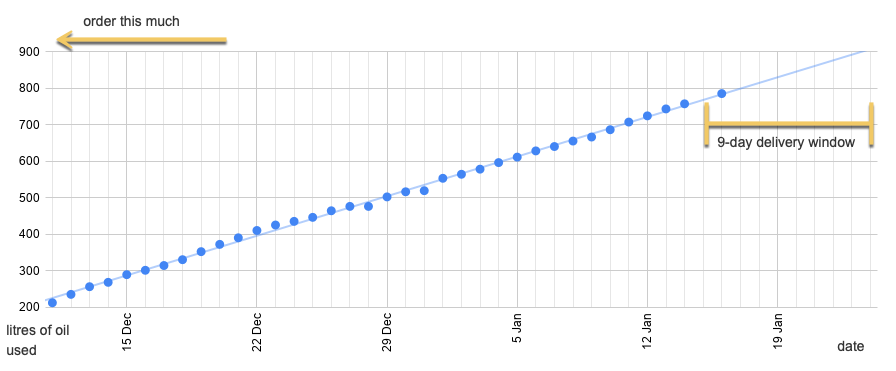
The first nice consequence is that I now know how much oil I need to order and how much I use. In a cold spell two households used 30 litres a day – I’ll be posting my metrics in a future post. And I can see I would need to order an extra 80 litres as it will take say, 9 days to arrive. As I write I was thinking about a way to predict the date when I’ll need to order more oil. Initially I put the data in a spreadsheet as below and it looks like I’ll order in mid January – unless I start to use oil faster. I’ve some tips on making the spreadsheet here. I finally got Home Assistant to do the calculations and tell me when I’ll need to order oil here
notify me with an email when more oil needs to be ordered
I order 900 litres of oil and I use 100 litres of oil as I wait for it to be delivered. Therefore I need an alert when the tank has 850 – 100 or 750 litres of oil.Home Assistant offers numerous alerts including
- get Home Assistant to send you an email – the easiest approach I reckon
- show a message in the browser or pop-up a ‘toast’ message on a phone. You can set a notification message to persist so that you can’t easily swipe it away.
- set an urgent notification to wake up a phone to tell you, or set one that waits quietly until you next pick up the phone.
Here is the automation code – if you’re starting out, the easiest method to get working is the email notification:
 # TIME TO ORDER OIL AUTOMATION - HOME ASSISTANT

 alias: heating oil level alert
 trigger:
 above: '750'
 entity_id: sensor.oil_level
 platform: numeric_state
 condition:
 after: 07:00
 condition: time
 action:
 data:
   message: at {{ states ('sensor.time') }}
   title: '{{ states (''sensor.oil_level'') }} L now. 850L oil to be ordered'
 service: notify.notify_html5
 data:
   message: at {{ states ('sensor.time') }}
   title: '{{ states (''sensor.oil_level'') }} L now. 850L oil to be ordered'
 service: notify.email
record your daily readings in a Google spreadsheet
Update March 2020
For a while it was OK to manually record the daily oil level in a spreadsheet. I soon saw that I was using 80 – 100 litres of oil a week during December. I therefore set up a connection from Home Assistant so that the daily level could be recorded in a spreadsheet. The code for the automation routine that takes the reading is below. My tutorial to link Home Assistant and Google Sheets is on this page: send sensor data from Home Assistant to a spreadsheet
# THE FOLLOWING IS A TEXT FILE CALLED oil_level.yaml in the folder AUTOMATIONS
# that is /config/automations/oil_level.yaml
id: '12399999'
alias: oil_level_spreadsheet
description: daily readings in oil_level.yaml
trigger:
at: "23:55:00"
platform: time
condition: []
action:
data_template: { "event": "oil_level", "value1": "{{ states('sensor.oil_level')}}", "value2": "{{ states('sensor.temperature_weather')}}", "value3": "{{ states('sensor.power_today')}}" }
service: ifttt.trigger
add your oil meter to the Home Assistant energy dashboard
Update June 2022
As well as getting help with ordering more oil, it may be extra useful to have your oil readings as kWh (energy). This needs some changes to the code to add necessary entity properties. I’ve used a guess factor of 10kW from 1 litre of oil. You could adjust that to allow for boiler efficiency but I’m only interested in what I use.
IN ESPHOME - revised code for ESP32 node
# the sensor
  - platform: ultrasonic
    trigger_pin: GPIO15
    echo_pin: GPIO16
    name: "oil kW"
    accuracy_decimals: 0
    update_interval: 60s
    id: myoillevel
    unit_of_measurement: "kWh"
    filters:
    - lambda: return x * 1018 * 10;
    - sliding_window_moving_average:
        window_size: 60
        send_every: 10
    state_class: total
    device_class: 'energy'
# change 10 to 9 for 90% efficiency however this will affect the other sensors
  - platform: template
    name: "oil_level"
    update_interval: 30s
    unit_of_measurement: "L"
    accuracy_decimals: 0
    lambda: |-
      return -0.1 * id(myoillevel).state ;

  - platform: total_daily_energy
    name: oil_energy_24h
    power_id: myoillevel
    device_class: "energy"
    state_class: "total"
    unit_of_measurement: kWh
    accuracy_decimals: 1
    filters:
        # Multiplication factor if needed eg convert from W to kW
    -  multiply: 1
Compile and install the code above in place of the original code above. Use File Editor to do the following and restart Home assistant.
The result of the above is to give you entities sensor.oil kWh (for the energy dashboard) and sensor.oil_energy_24h which tells how much oil is used each day.
Excellent write up. Thank you for taking the time to do this. It has helped with my own, very similar, project.
One thing I am experiencing is timeouts. I see this in the log:
[09:08:13][D][ultrasonic.sensor:025]: ‘Oil level in cm’ – Distance measurement timed out!
[09:08:13][D][sensor:092]: ‘Oil level in cm’: Sending state nan cm with 0 decimals of accuracy
This results in a ‘non-numeric’ error in Home Assistant. Have you experienced this? Any idea of the cause or a solution?
I have seen this error. At times I thought I had two many sensors on board so I slimmed down the code; at others I changed the ESP pins used or the ESP itself. Ultimately it seemed to be related to the strained connection of the sensor plug and the board. It went away so I took care not to touch the thing again.
Generally errors happen everywhere – eg when trying to upload the firmware – so it’s easy to be discouraged. My tips would be a) experiment a lot b) take notes in a book c) buy two of everything if that’s affordable.
As an avid user of Home Assistant, this is a fantastic help guide for monitoring an oil tank here in the UK, thank you. To save hacking up a USB cable, would something like this board work for the ESP module https://tinyurl.com/vj6x9wd ? Can you recommend a housing for the ESP and the sensor board?
Cheers Graham. Thank you for reminding that some ESP32’s have a USB socket.
For a housing on this occasion I used a £4 (electronics) project box from ebay. There are dozens in all sizes, with see-through lids and waterproofness. Since then I’ve bought (from Screwfix or Toolstation) electrician’s junction / connection boxes also called chocboxes. This one fits an ESP32-CAM at £1; others are larger and waterproof https://www.toolstation.com/junction-box-ip20/p59791
This is excellent. Do you have the plans for the oil cap that you custom printed? I’d love to order one like yours.
Sure > STL file for 3D printing https://www.rogerfrost.com/wp-content/uploads/2020/oilsensorholder.stl
I am just starting a similar project on my oil tank having managed to run out of oil on the coldest days. I don’t have access to a 3D printer and so have been trying to find a housing for the sensor to fit on the tank top pipe. I have found on my 600 Gallon tank a Sunpat Peanut butter jar lid fits the top rather well and will just need to have a hole cut to size for the sensor. I have yet to do this!
Sorry to hear this Dan but your/this project is worthwhile. It helps that my sensor cannot be displaced. For sure there’s a jar lid somewhere to suit. I’ve now updated the post with a hint to check the calibration and watch the graph as I now get a graph plateau at 0.72 m from the top. The actual reading therefore can mislead. As 760 litres was the trigger for ordering more oil the issue was never spotted – but something may have changed in the tank/sensor. I’ll investigate that as well as use collected data to somehow predict when oil might need a visual check. In the meantime thanks for reminding on a vital issue. (And while I ordered oil ahead of disaster last week, suppliers were offering dates three weeks ahead so an emergency delivery had to be bought).
Regarding the non-numeric issue that Ash inquired about; the fix is to add a filter to your code that ignores non-numeric readings. I added it after the lambda, so the code in your demo would be:
– lambda: return x * 1053;
– filter_out: nan
Oh thank you so much! I wish I’d known about that (– filter_out: nan) as a way to remove non-zero readings should they occur.
There’s another need for a filter in my TRAIN TIMES* project. The Home Assistant overview shows (something like “Non-numeric” or “Not available”) after midnight when there are no local times. A filter is probably the answer.
I’m currently posting projects on using unmodified Sonoff devices; using RFlink and 433MHz sensors. Pop back should these be of value. Thank you again Dan.
* https://www.rogerfrost.com/when-is-the-next-train-from-the-local-station/
Hi Roger – Sincere thanks for posting this!
I’ve now got a cost effective remote Oil Monitoring system for my overseas vacation home. In the past I have always been somewhat concerned not being able to see how much oil remains in the tank as we go through the cold winter months…
Thank you too for your feedback Lance and best wishes from here. Wow … measuring oil levels remotely offers a big gain. Thinking about the oil tank level as you’ll realise is an unnecessary worry. Even ordering oil is easier when you know you use say, 100 litres in a week. I will soon be posting a very easy project to constantly display the oil level on a TTGO T-Display.
Hi Roger. Thanks for the great write up on the oil level sensor. I have replaced my broken Apollo sensor with this setup so I can integrate it into my home assistant. I just thought I’d share here about the calibration that I used to convert the distance reading of the sensor to approximate oil in litres. ESPHome has a calibrate_linear function. Doing it this way let me calibrate better to my cylindrical shaped tank (1800 litres) and have a countdown of litres remaining instead of counting oil used. This would obviously work on a square tank too with much easier values! I have 1000 litres of oil coming next week so I’ll be able to test to see how accurate the readings are and adjust accordingly. The filters code for the sensor is below:
filters:
– lambda: return x * 100;
– filter_out: nan
– sliding_window_moving_average:
send_first_at: 7
window_size: 7
send_every: 7
– calibrate_linear:
# # Map 0.0 (from sensor) to 0.0 (true value)
– 110 -> 0
– 95 -> 204
– 75 -> 544
– 55 -> 900
– 35 -> 1320
– 15 -> 1660
– 0 -> 1800
I hope this provides some use to the readers of this blog! Keep up the good work!
Best regards
Kev
Thank you. That’s a brilliant use of a feature that I couldn’t quite get myself. I see your need for a calibration table. I’ll guess that you’ve worked that from the volume of a regular cylinder while my tank was a steel box. As an obsessive measurer I’m stuck on this *** do please let’s know if you find a solution!
o Keep your eye on the oil graph and if the readings plateaux, as mine seemed to, investigate the range of this sensor.
o Take oil and average temperature readings each night for a spreadsheet using IFTT
o Create a daily oil use (in litres per day) graph (still working on this) ***
o Use an hour meter or electric monitoring smart plug to monitor boiler burning time
Hi Roger,
As its been a while I thought I would just update you with how things are going. My oil sensor has been working well for most of the year now, I’ve made some changes to the code to move from “litres left” to a percentage figure. Because temperature affects the results and also that actual litres dont really matter I simplified it down to a reading maxing at 100 (percent). This has ironed out a significant number of spikes and dips in the resulting figure. Also to add that my oil tank is located away from the house so I had to utilise a battery pack and keep the ESP device sleeping for much of the time. It wakes up every 3 hours and takes a reading and then goes back to sleep again. I power it from a USB battery bank which has proved to last roughly 3 months although I’m sure with the colder weather coming that will decrease but its perfectly useable at that. I’ve attached my most recent code below which is very similar to that above. Hope all ok with your projects, please share anything else cool that you have done! Kind Regards, Kev
sensor:
– platform: ultrasonic
trigger_pin: GPIO4
echo_pin: GPIO12
name: “oil level”
accuracy_decimals: 0
pulse_time: 20us
update_interval: 2s
state_class: measurement
unit_of_measurement: “Percent”
filters:
– lambda: return x * 100;
– filter_out: nan
– sliding_window_moving_average:
send_first_at: 7
window_size: 14
send_every: 7
– calibrate_linear:
# Map 0.0 (from sensor) to 0.0 (true value)
– 95 -> 0
– 75 -> 25
– 55 -> 55
– 35 -> 75
– 15 -> 100
Hi again Kev and congratulations … especially for the attending to troublesome remote uses / battery operation / waterproofing needs.
Two things, although you’ve probably been there: in another post I’ve been making battery banks (aliexpress etc) using 3 x 18650’s but note there are banks with six cells. The other thing was that Andries Spiess on YTube compares ESP32 boards for power use.
I’m really happy with this project (I’m less happy with oil deliveries taking up to three weeks). Home Assistant sends an email daily with the tank level (it reassures me HA is working anyway). But now I am experimenting with tricky date calculations – the idea being to take say, yesterday’s oil use, the amount remaining in the tank and calculate the date when I ought to order. In your case a template sensor would get you back to litres. Anyway all the best there RF
Hi sir, excellent effort for this so i am trying to make your project and following this guide but i have stuck at the programing the esp32. Can you analyze every step more detailed and clearly to follow it because i am not so familiar with those? Thank you
Thank you for writing Mike. You’re right, this post should be clearer. I will do that.
If you’re having an issue with the flash process it’ll be a little while before that post is complete.
Do please tell us of your success too.
Hi, just wanted to say thank you for this information. I came across this site when searching for DIY oil level sensors after seeing the price for an off the shelf version! Currently have an old Watchman sensor which uses a battery tube and sends a signal to a plug in receiver with a small lcd on showing numbers 1-9 as a level indicator. After recently getting into Home Assistant I’m keen to get a better insight as to current level and usage, so I’ve ordered the necessary hardware. Need to check the plastic oil tank to see what sort of holder/cap I can use, and figure out a battery pack that will give sufficient duration. I did wonder about using zigbee rather than WiFi for power reasons – had anyone gone down that route?
Hello Scott, thanks for writing in … my thoughts
All the best for your project. It will improve on the Watchman. The battery changing inconvenience is just for six months of the year and frankly meeting this need is quite happy making. I hope to hear more.
RF
Hi Roger, thanks very much for your detailed response and the very useful links within! I hadn’t even considered attempting to read/hack my current Watchman setup as it is pretty old and basic, however I’m now going to investigate this option 🙂 I’ve read your post about setting up RFLink which was really informative. I’ve no idea what sort of data is being transmitted by the Watchman sensor mounted to the tank, sonwill head over to github shortly! The mains socket receiver in the garage just shows a number from 1-9 to indicate how ‘full’ tank is. I have a plastic 1300 litre tank and the Watchman transmitter has a battery tube which holds 6 AAA batteries. I do have a handful of spare 18650 batteries which I could potentially use instead though.
I’ll see if I can read the sticker on my transmitter to see if there is a model or any useful info, but I suppose the only way to see if it will be readable by RFLink will be to try! A bit more reading and I should be able to make a start. I’ll post back with progress…
Good to hear back from you Scott. Finding a way to decode the Watchman/Apollo data pops up in at least a few places. The devices seem to use similar hardware but then knowing which RF receiver software to use was unclear and is worth some questions to the posters. I’d first pursue the known world – ie the project on this page will get to a result. Some research into waking / sleeping improves the power use. For the record, in power terms you have 750mAh per disposable AAA cell and around 2300 mAh per 18650 cell.
mmm what I don’t get is how I convert the measurement in meter to a percentage. My full tank measures 0,26m but how do I say that this is 100percent?
Very good question. You know that 100% is 0.26 You need to know the 0% distance at the bottom level. You can also measure 50% if you like.
Please adjust my indentation (see link below) and use the following as untested.
– unit_of_measurement: “%”
filters:
– multiply: 1
# the number above is a guess
– calibrate_linear:
# # Map 0.0 (reading from sensor) to 0.0 (true value). Indent more spaces than shown – see https://esphome.io/components/sensor/index.html?highlight=filter
– 0.26 -> 0
– 0.40 -> 50
– 0.8 -> 100
My personal preference is to know how much oil I used and how much oil is required to fill the tank.
hey! you can also try this one: https://github.com/Phreak87/OilMeter
Wow. This link is for a fabulous project to measure OIL CONSUMPTION. Very good Markus and thank you. BTW are you able to keep track of the oil you need to order?
Hey!
Thank you for that compliment! meanwhile i developed more and more features for the project – so now water level monitoring (for rain water) via jsn/hs-sr04 is included too and more sensors
like laser, weight, radar, pressure are coming.
with the oil consumption i also track the actual tank volume in liter and percent – so if the esp was running all the time the value should give a nearly exact value how much liter you need to
fill up completely. if you like to be part of the project you are very welcome!
Cheers and all the best. I’ll be following your progress as the burner monitoring was remarkable.
I changed my oil and water level sensors and my oil reordering is now spot on. The time of flight sensor is however noisy. This issue I am not yet understanding – e.g. it might be due to vibration as the liquid surface vibrates. My solution to a noisy trace uses averaging which slows the response time – which in itself is not a problem.
https://www.rogerfrost.com/oil-tank-level-sensor-vl53l0x-time-of-flight-sensor/
Hi Roger,
I had the same Idea, using the ToF sensor for surveilling my oil levels and was glad finding soneone having done this before. There are several things I‘ve already noticed. 2 of my sensors died for unknown reasons. Have you switched ranges for your project? My oil tanks require a range of 1.5 metres, beyond the accurate range, why I was switching frequently. I was surprised about the sensor heating up to 50C and hesitate using it inside of the oil tanks. How is your long term experience with the sensor? How often do you measure your oil levels.
Kind regards
Mike
THIS COMMENT BELONGS ON THIS PAGE: https://www.rogerfrost.com/oil-tank-level-sensor-vl53l0x-time-of-flight-sensor/
My three sensors have now run well for two years. One of them has failed – due to water or condensation inside my sensor box. The box is in a loft hence not easily visited to see that there’s rust in there (The error was ‘Component vl53l0x.sensor is marked FAILED’). As you see I take readings continuously and average these readings as shown in my config. I now can predict a date when I must reorder oil. It’s very useful!
The range and config of my Vl53L0X sensor is correct for a range of 1.5 metres
For more experience I must point to the discussion on my page link above
Please provide your information source for the 50’C heating effect. It’s hard to ignite Diesel with a flame never mind this little sensor.
Is your sensor swithing accuracy and high range beyond 1200cm? I was coding the on the esp8266 for better understanding the sensors instead of using esphome yet. My sensors are off by a couple of cm, which might result in an extra calibration loop first. As for the noise you‘ve noticed too, I considered averaging it before sending it to any backend, which leads to quite accurate results (50 single gauges averaged with a std. deviation of less than 1% at 1.6 metres). One sensor once got very hot and I was actually surprised, but it must have been an wiring issue back then. It just made me hesitate and reconsider electronic parts inside of diesel tanks.
Hello Mike,
Yes as shown on the diagram the VL5310x range is up to 2000cm – go to this page https://www.rogerfrost.com/oil-tank-level-sensor-vl53l0x-time-of-flight-sensor/
If my tank level was 1200mm I’d need to order oil anyway!
I suggest to use use ESP32 and ESPHome. The accuracy, testing it on the floor impressed me.
The KALMAN smoothing suits the kind of noise I found – better than averaging.
Fair point about diesel but I checked here for you, my sensor is not hot.
Best wishes
rgr
Hi Roger, i apologise in advance for a probably stupid question. I have the rtl_433 (next) add on and corresponding auto doscover add-on runniong and am licking up my airgap entity “sensor.oil_sonicsmart_679311502_depth”. (from the watchman Alarm) and “sensor.oil_sonicstd_16915_depth” from the Apollo unit.
I not e the code below to translate teh airgap to litres in the tank but am at a loss at where to add that code. I guess it creates a custom sensor which manipulates the “sensor.oil_sonicsmart_679311502_depth” wich the litres at certain levels (I have taht data form teh manufacturers (2 tanks both horizontal cylinders). Woudl you be able to point me in the right direction please?
many thanks!!
Jaap
Congratulations if you have entities. Do you have some ‘value pairs’ to share so that we can do some calibration*? For example you need both ‘sensor.oil_sonicsmart_679311502_depth’ and also the actual air gap in cm (or better, the volume this depth represents). When you’ve got a pair you make a Template sensor. (Settings > Helpers > Template a Sensor). The syntax is tricky but if your value pair indicates that you multiply the depth by (say) -4.5 to get the volume then the Template would be
{{ states (‘sensor.oil_sonicsmart_679311502_depth’) | float(0) * -4.5 }}
You’ll have to tweak this but you’ll be further forward than now!
*The maths on my (oil sensor) page is for Esphome.
Hi. This looks neat & others have clearly got it to work well.
I’m stuck at the assembly stage. im using the SN-SR04T & ESP32 Development Board,ESP32 WROOM Expansion Board Kit,ESP32 Breakout Board, Not any type of engineer & not used this type of thing before, but have 2 M5stack bluetooth proxies working in ESPhome builder in Home assistant. Essentially I try to work out which instructions to follow.
I can flash the code to the esp32, via usb from the pi running HA & that looks ok & the device connects to wifi, & I can ping it & look at the logs. it times out on the sensor as nothing comes back.
However when I connect the USmodule to 5v & gnd the esp32 won’t boot. instead it loops with
22:04:38]rst:0x10 (RTCWDT_RTC_RESET),boot:0x13 (SPI_FAST_FLASH�ets Jul 29 2019 12:21:46
[22:04:38]
[22:04:38]rst:0x1 (POWERON_RESET)|P����Y�����0x13 (SPI_FAST_FLASH_BOOT)
[22:04:38]flash read err, 988
[22:04:38]ets_main.c 384
[22:04:38]ets Jul 29 2019 12:21:46
I read that it can be power hungry so tried kit in a 2.4A psi rather than pi or MacBook usb – no difference.
also I’m using gpis 33 & 32 as 12 produced a strapping warning message in the complier log & it seemed best to avoid.
I can’t see a ‘water level’ sensor in HA when the esp is running, which surprises me as I would have expected the successful installation to have produced a sensor.
any suggestions gratefully received
S
I’ve updated some of the code on my page since ESPHome has changed a few details. I don’t now use a manual sef-assigned IP. I used the mdns line these days.
However your code wouldn’t have compiled if yours was terribly wrong. I’d recommend a manual download of the bin followed by uploading via the web.esphome website
Your ESP32 pins for trigger and echo are fine on 33 and 32. If you have a sensor section in your code the Home Assistant Esphome dashboard, the initial part of the log will show if the sensor has or not been set up. If yes this will be followed by periodic sensor updates in the logs. If no, there’s a message to look up before trying anything else.
IF the above logging shows yes, a sensor exists and you’ve added the ESPHome device to the integration then somethings up. Delete the device in HA, reboot and add it again.
Just occasionally you’ll get a duff ESP32. I feel there’s too much advice on this point. I found mostly it works or half works and then you fix the code.
Thanks for the quick & comprehensive response. It was the PSU; I took the 5v from the esp32 & it clearly wasn’t up to the job. a separate usb lead supplying the SN-SR04T fixed it.
Great. It worked that’s the main thing. I’m guessing as to your setup ..I’d expect one USB psu to power the ESP32 and borrow from it’s 5v pin to power the sensor. BTW I’ve project pages for several sensors of this kind including one from DFROBOT.