access your Home Assistant remotely using DuckDNS, Letsencrypt and the nginx SSL proxy
The Home Assistant home automation hub is more useful if you can access it remotely. In addition to having anywhere access with a browser URL, there’s an excellent phone app to access Home Assistant. A bit of nginx magic achieves this but the resulting benefits are not only great, the mobile app can access sensors (GPS; battery, status) in your phone for very useful information.
If you want to do more than access Home Assistant securely from outside the home, for example you also want to access other devices such as a NAS or Synology or a server on your home network you need a different add-on (nginx Proxy Manager) and a different workflow to achieve that. Leave this page now and see using nginx proxy manager with home assistant – avoid the infernal ‘internal error’
Otherwise, if you simply want to access Home Assistant securely from outside your home proceed as below.
BTW an alternative procedure, which is very reliable, uses Wireguard to connect your phone to securely browse to your Home Assistant internal IP, router, IP camera, printer or NAS drive as if you were at your desk. I explain how to set up Wireguard on Home Assistant here. I can’t tell you whether using nginx or using Wireguard is ‘better’ but I’m reliably using both of them.
The following nginx SSL proxy setup procedure can be summarised:
- Create an account and a subdomain at DuckDNS
- Set up the DuckDNS add-on in Home Assistant
- Edit configuration.yaml
- Forward port 443 in your router.
- Set up the nginx SSL proxy add-on in Home Assistant
- Access your Home Assistant remotely and securely using your DuckDNS subdomain without a port number.
connect Home Assistant to a subdomain at duckdns.org
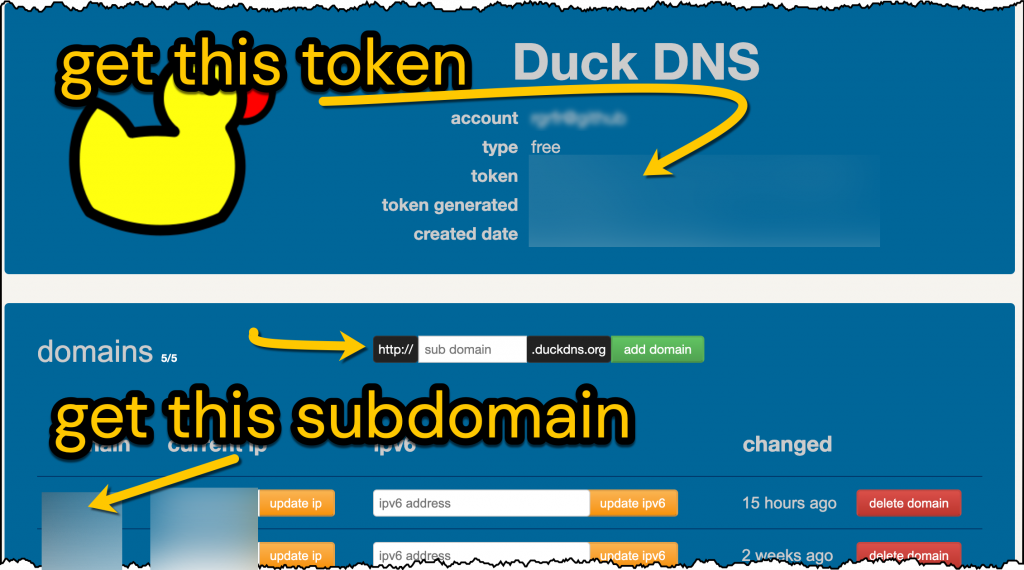
When you’re away from home, the first problem to solve is to be able to find your home network. You can do that by firstly having an easy to remember network name (e.g myhome.duckdns.org). Create an account at duckdns.org, choose an easily remembered subdomain and get the token (or long password) from your DuckDNS page.
The second problem to solve is that your home IP address can change. If it changes, thankfully the Home Assistant DuckDNS add-on updates this for us – it will tell DuckDNS what your current home IP address is. Go to Home Assistant > Supervisor > Add-on Store > Install Duck DNS. Then, on the Duck DNS Configuration tab fill in the information shown in bold below:
lets_encrypt:
  accept_terms: true
  certfile: fullchain.pem
  keyfile: privkey.pem
token: 8730bbcf-YOUR-TOKEN-FROM-DUCKDNS
domains:
  - YOUR-SUBDOMAIN.duckdns.org
  - ANY-OTHER-SUBDOMAIN.duckdns.org
aliases: []
seconds: 3000
When the DuckDNS add-on is running, you’ll be able to use your phone to access your home network from anywhere. However, as well as port forwarding there’s still more to do if you want this to happen securely. If you also want to connect to other devices, in addition to Home Assistant, on your home network you’re on the wrong page see using nginx proxy manager with home assistant
open up ports for nginx in your router
Go to your home router admin page and find the port forwarding section. Forward the public inward tcp port 443 to your internal private port 443 on the IP address of your Home Assistant computer. Do not forward public tcp ports 80 or 81 to any computer.
edit your configuration.yaml to permit nginx
The Home Assistant docs suggest editing configuration.yaml as follows. The commented out lines can be deleted entirely. Go to the Server controls page in Home Assistant Configuration. If the configuration check here is good, restart Home Assistant.
http:
   # ssl_certificate: /ssl/fullchain.pem
   # ssl_key: /ssl/privkey.pem
  use_x_forwarded_for: true
  trusted_proxies:
   # - 10.0.0.200
     - 172.30.33.0/24
use nginx SSL proxy to get your domain connected
Go to Home Assistant > Supervisor > Add-on Store > Install NGINX Home Assistant SSL proxy. (BTW you don’t need to install the Letsencrypt add-on). Type your DuckDNS subdomain for the domain entry. All else can be left as is. (Do not install the similar sounding nginx Proxy Manager for this). Start the nginx add-on. Wait some minutes after you start the add-on. Read the Log tab nearby and hope for only happy messages there.
start using your subdomain to access Home Assistant
To simulate connecting to your Home Assistant remotely, disconnect your phone from your home wifi and use a browser to try out YOUR-SUBDOMAIN.duckdns.org in the browser. You don’t need to add the port number to the URL because nginx is doing that for you (indeed, it’s acting as a proxy and doing some obfuscating). Here is what to do if it works first time, or if it doesn’t
- Home Assistant login page: yay it works! Go to the mobile app settings > App configuration and enter the external Home Assistant URL as https://YOUR-SUBDOMAIN.duckdns.org. If you also enter your Home Network wifi SSID, the app will know when you are away from home and will switch from using the internal URL to use the external DuckDNS subdomain.
- If an error appears, go to the nginx SSL proxy add-on logs and look for clues. Go to the Server controls page in Home Assistant Configuration. If the configuration check here is good restart Home Assistant and wait a few minutes or till the nginx proxy logs show that it’s all OK.
- You may see a Blank page with Bad request. Likely nginx has blocked access. Other things being equal the http: section in configuration.yaml might be different to the one suggested above. Also do not be also running the other Home Assistant nginx add-on.
- You may see a Home Assistant page with retry: first check that you can access Home Assistant using the normal internal address eg 192.168.1.42:8123. Check that you are accessing Home Assistant remotely and not over your wifi (although it may not matter). Check all the setup steps after you’ve cleared the cache of your browser or tried another browser. Edit the URL to try access with http:// or https:// and without the port number.
- Remember that the DuckDNS add-on also needs to run to refresh your certificates and your IP address. If it fails, your certificate or broadband IP address will go out of date and nginx will fail too.
So the “nginx SSL proxy” add-on is just to remove the `:8123` part from the URL? Unless I’m missing something that doesn’t seem necessary?
Yes nginx might not be necessary as I recall that we can access Home Assistant remotely without the nginx SSL proxy. The URL was eg myhomeassistant.duckdns.org:8123
With the nginx SSL proxy add-on in Home Assistant, the proxy add-on will redirect the URL myhomeassistant.duckdns.org to the port for us.
The bigger benefit (of the fussy setup) comes from accessing HA securely (via https port 443) instead of an unsecured port 8123.