connect remotely to your home network using the WireGuard add-on in Home Assistant
Why do this? At an early point on the journey to network heaven you may have a need to connect from some holiday location say, to a camera, your computer, a home automation setup or the router exactly as you normally do back at home. You may instead want to access a service such as Netflix which works well at home, but for some reason you can’t get to it from where you are. Maybe, for example, the hotel you’re at, has things in place to stop you mucking about like this. When you set up Wireguard you create a connection back to your home network that is safe and so obscured that no one knows what you’re doing inside your network. If you use this to access Netflix, outside your network, your home ISP will know just as they know anyway. You’ve created a secure tunnel back to your home.
I now use an alternative method that Wireguard is embedded within – see my post on Tailscale
In another post about nginx proxy I explained how you can have access to your home automation system in a secure way. If you want to extend that access to other network devices or services such as Netflix you can do that by setting up Wireguard. A strapline says that Wireguard is simple when really it’s tricky, but below I explain it, show you my setup and point you to a video tutorial that helped me.
Summary of the procedure to set up Wireguard in Home Assistant:
- Already have Home Assistant – eg running from an SD card in a Raspberry Pi computer
- Create an account and a subdomain at DuckDNS
- Install the DuckDNS add-on in Home Assistant and configure that
- Install the Wireguard add-on in Home Assistant and configure the server and the peer settings
- Forward UDP port 51820 to the IP address of the computer running Home Assistant (eg 192.168.1.42)
- Install the Wireguard peer app on your phone and scan a QRcode hidden away in Home Assistant
- When all this is set up, turn off the wifi on your phone; turn on Wireguard and connect to your home network cameras or other devices or Netflix or anything you normally only access from home. For example, use the browser to access your router on 192.168.1.1 or Home Assistant on 192.168.1.x:8123.
connect Home Assistant to a subdomain at duckdns.org
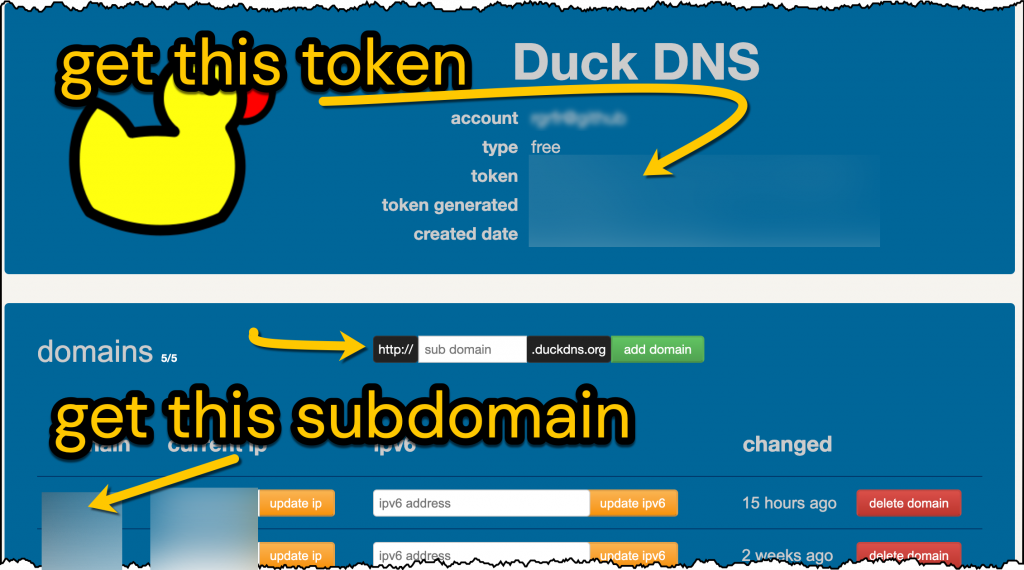
When you’re away from home, the first problem to solve is to be able to find your home network. You can do that by having an easy to remember network name (e.g mywireguard.duckdns.org). So create an account at duckdns.org, invent a subdomain and get the token (or long password) from your DuckDNS page.
The second problem to solve is that your home IP address can change. If it changes, thankfully the Home Assistant DuckDNS add-on updates this for us – it will tell DuckDNS what your current home IP address is. Go to Home Assistant > Supervisor > Add-on Store > Install Duck DNS. Then, on the Duck DNS Configuration tab fill in the information shown in bold below:
lets_encrypt:
  accept_terms: true
  certfile: fullchain.pem
  keyfile: privkey.pem
token: 8730bbcf-YOUR-TOKEN-FROM-DUCKDNS
domains:
  - mywireguard.duckdns.org
  - ANY-OTHER-SUBDOMAIN.duckdns.org
aliases: []
seconds: 3000
As long as the DuckDNS add-on is running, you can now find your home network from anywhere… however we still need to secure the connection.
open up the port for Wireguard in your router
Go to your home router admin page and find the port forwarding section. Forward the public inward UDP port 51820 to your internal private port 51820 on the IP address of your Home Assistant computer. Do forward public UDP port and not TCP 51820 and not ‘Both’.
install the Wireguard add-on in Home Assistant
Go to Home Assistant > Supervisor > Add-on Store > Install Wireguard. Type your DuckDNS subdomain for the host entry then add your router IP address for the DNS plus a name for the device (ie phone) you’ll use. The rest needs explaining…
You don’t want Wireguard to assign IP addresses that will clash with those set by your router (typically 192.168.1.1) so we’ll tell Wireguard to operate on an IP address eg 192.168.2.1 on a different subnet. You want your phone ‘peer’ to have an IP address in that same subnet so we’ll set that at 192.168.2.2.
Lastly, set the IP addresses that the phone peer/client is then allowed to browse when it’s connected – I suspect these will be on your router’ network range ie 192.168.1.1 up to 192.168.1.254 and also the Wireguard subnet 192.168.2.1 up to 192.168.2.254. The shorter way to write these ranges is 192.168.1.0/24 and 192.168.2.0/24.
When you’ve set the following, save your configuration and restart the Wireguard add-on

give your phone the credentials it needs to be a peer/client on your Wireguard connection
The configuration above will create a folder, somewhere in Home Assistant, that contains the credentials that your phone needs to connect. To find these go to Home Assistant > File Editor. Now browse the folder tree to get to the root of the file system. Look for a folder marked ssl/wireguard/‘name of peer’. In my case that’s ssl/wireguard/oneplus6. In this folder click the file qrcode.png and an image should appear in the browser.
If Home Assistant File Editor doesn’t allow deeper browsing, go to the File Editor add-on configuration text and see that you have a line that says ‘enforce_basepath: false’.
Install Wireguard on your phone. Open the app and choose scan QRcode. When the QRcode is recognised you can name the connection eg homeassistant51820.

start using Wireguard to access your network remotely
To simulate connecting to Wireguard remotely, turn off your phone wifi and turn on the switch in the Wireguard app. Use a browser to access 192.168.1.1 (or the IP of your router). Run the Netflix app. Appreciate that you’re using data from your phone and your home broadband supplier. Remember that the DuckDNS add-on needs to run to refresh your certificates and your changing IP address. If DuckDNS fails, Wireguard will also fail.
there’s another way to do this using nginx proxy manager
If you want to connect to devices on your home network you can also be using nginx proxy manager with home assistant
Is it possible to skip the DuckDNS part during setup and just enter the public IP instead of a valid domain name?
Yes it would be simpler doing that if you’ve a fixed IP destination. It’ll work but needs further advice starting with say, the list of concerns headed ‘optional checklist of ways to add safety to a risk as it isn’t wise to expose all of your home network to the Internet” at https://www.rogerfrost.com/use-a-sub-domain-to-access-your-home-server-eg-home-assistant-via-nginx-proxy-manager-the-cname-trick/