take your D-Link DCS-D150 out of the cloud and into Home Assistant
I wouldn’t especially recommend the D-Link DCS-D150 motion sensor but it does have some features that had me buy it. Firstly it plugs into a wall socket above a worktop so it can sense when someone is in the kitchen. (I can then turn on the lighting – whatever). Secondly this motion sensor was one of the few sensors that worked without the need for a separate hub. It could send its ‘motion detected’ signal to IFTTT and I could then make the lights turn on and more. At £25 that’s not bad.
A few years later D-link went over to a new system and the DCS-D150 was no longer supported. A few years later still, in 2020, D-link dropped support for IFTTT so that I was left with a stupid sensor that talked to a stupid app that talked to nothing.
Luckily I found a custom component for Home Assistant. The motion sensor is back in use and can now be ‘heard’ over the network. If you want a motion sensor today (2020) consider using an RF or Zigbee model. And if you’ve any words to feedback to D-link for ‘killing off’ support like this please add them below.

Install the Dlink component into Home Assistant (method 1)
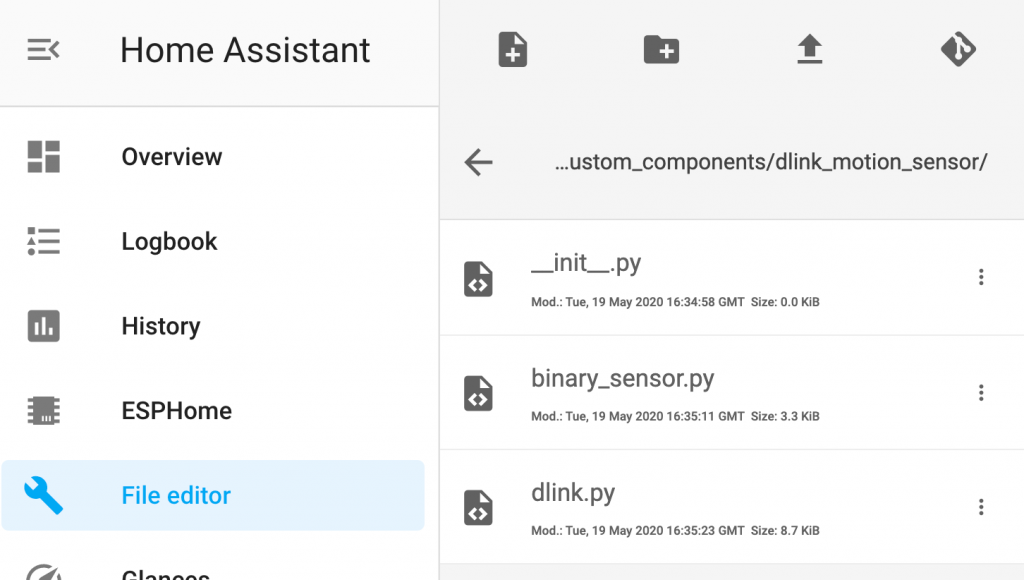
Go to the file editor in the Home Assistant frontend.
- In /config create a new folder ‘custom_components’.
- In the custom-components folder make another folder ‘dlink_motion_sensor’
- Add the three files shown (go to the end of this thread to find the files)
- Still in File editor open your configuration.yaml and add this code to the binary_sensor section.
- Save the edits and completely shut down and restart the Raspberry Pi
binary_sensor:
  - platform: dlink_motion_sensor
    name: kitchen_motion
    host: 192.168.1.131
    password: 9957XX
# the password or PIN is printed on the sensor. The ip address can be found # via the router.
# do set the router to use a fixed IP for this sensor because if the IP changes this config will fail
After Home Assistant restarts
You’ll now have an new entity called binary_sensor.kitchen_motion. When you walk past the sensor the state changes from Open to Closed.
Create an automation to turn on the lights and start a timer
id: '1566591XX7312'
alias: motion day lightson
trigger:
entity_id: binary_sensor.kitchen_motion
from: 'off'
platform: state
to: 'on'
condition:
after: 06:30
before: '23:00'
condition: time
action:
data: {}
entity_id: switch.cupboard_lights
service: switch.turn_on
data: {}
entity_id: switch.ceiling_lights
service: switch.turn_on
data: {}
entity_id: timer.ceiling_lights
service: timer.start
Create an automation to turn off the lights when a timer finishes
id: '1578935XX2018'
alias: motion light timer finished so turn off lights
trigger:
event_data:
entity: timer.ceiling_lights
event_type: timer.finished
platform: event
action:
alias: ''
data: {}
entity_id: switch.ceiling_lights
service: switch.turn_off
data: {}
entity_id: switch.cupboard_lights
service: switch.turn_off
Install the Dlink component into Home Assistant (method 2)
After a while my D-link motion sensor stopped working in Home Assistant so I looked for further solutions and found this Github code based on HNAP (Home Network Administration Protocol – whatever). The solution was to again
- Copy the dlink_hnap folder to your Home Assistant custom_components folder.
- Add this text to the binary sensor section of configuration.yaml (as above). Save, validate, restart home assistant and then look for an entity called binary_sensor.kitchen_motion.
- Continue as above – “After Home Assistant restarts …
binary_sensor:
  - platform: dlink_hnap
    name: kitchen_motion
    host: 192.168.1.131
    password: 9957XX
    type: motion
    username: Admin
    timeout: 35
# the password or PIN is printed on the sensor. The ip address can be found # via the router.
# do set the router to use a fixed IP for this sensor because if the IP changes this config will fail