use nginx proxy manager with home assistant to access many network devices
This page is for those who want to access Home Assistant from outside the home, and also want to access other devices, a router, a camera or a server on your home network. If that’s you, you need* to install the Home Assistant add-on called nginx Proxy Manager and not install a similar sounding add-on called ‘nginx Home Assistant SSL proxy‘. The procedure to set this up is tricky but follow along to learn how it’s done. Importantly if you want to access those IP services with local HTTPS (or remote https) see this post – there’s an extra installation step for comprehensive coverage whereas everything happens in Home Assistant on this page.
If you only need to access Home Assistant remotely away from home, and nothing else, skip this page and instead go to access your Home Assistant remotely using DuckDNS, Letsencrypt and the nginx SSL proxy.
*BTW there are other ways to secure access to your home network – one method uses the Wireguard add-on to connect your phone to the network then browse your Home Assistant internal IP, router, IP camera, printer, NAS drive as if you were at your desk. The process of setting up Wireguard in Home Assistant is here. For yet another another method – see how I set up my favorite – the Tailscale add-on.
what you do to setup the nginx proxy manager:
- Create an account and up to 5 subdomains at DuckDNS
- Set up the DuckDNS add-on in Home Assistant
- Temporarily edit configuration.yaml
- Set up the nginx proxy manager add-on in Home Assistant
- Forward some ports in your router.
- Set up the subdomains in nginx proxy manager
- Request certificates via nginx proxy manager
- Re-edit configuration.yaml and restart Home Assistant
- Access your Home Assistant securely using your DuckDNS subdomain without a port number.
connect Home Assistant to a subdomain at duckdns.org
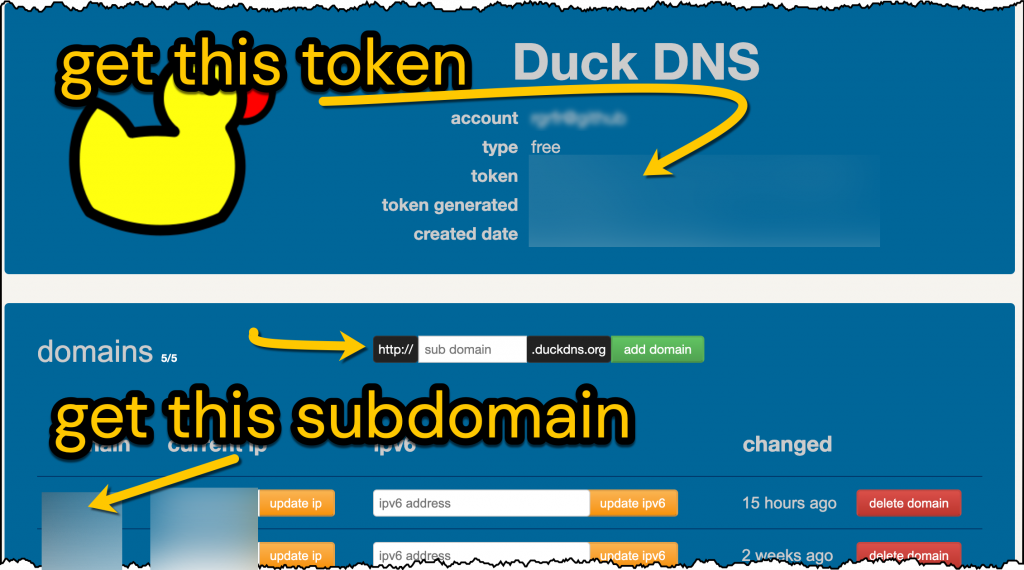
When you’re away from home, the first problem to solve is to be able to find your home network. You can do that by firstly having an easy to remember network name (e.g myhome.duckdns.org). Create an account at duckdns.org, choose a subdomain and get the token (or long password) from your DuckDNS page.
Your home IP address changes making it unfindable – eg when you reboot the router. If you now install the Home Assistant DuckDNS add-on, DuckDNS will keep track of your current home IP address. Go to Home Assistant > Settings > Add-on Store > Install Duck DNS. Then, on the Duck DNS Configuration tab fill in the information shown below:
lets_encrypt:
  accept_terms: true
  certfile: fullchain.pem
  keyfile: privkey.pem
token: 8730bbcf-YOUR-TOKEN-FROM-DUCKDNS
domains:
  - YOUR-SUBDOMAIN.duckdns.org
  - YOUR-OTHER-SUBDOMAIN.duckdns.org
aliases: []
seconds: 3000
As you also want to connect to other devices on your home network I suggest that you create additional DuckDNS subdomains now and add them to the configuration above.
When the DuckDNS add-on is running, you’ll be able to use your phone to access your home network from anywhere. However, there’s still more to do if you want this to happen securely.
use nginx proxy manager to get your domain connected
Go to Home Assistant > Add-on Store > install nginx Proxy Manager. Then, on the nginx Proxy Manager Configuration tab fill in the information as shown below.

Wait some minutes after you start the nginx add-on. Read the Log tab nearby and hope for only happy messages there. Ideally you want the host entrance port to be 80 not 8888 but as Home Assistant reserves incoming port 80 for something else (emulated hue), we change it to the alt http port 8888. Port 81 is the port you’ll need to configure your nginx as below.
open up ports for nginx in your router
Go to your home router admin and find ‘port forwarding’. Forward the public inward ports to your internal private ports as follows:
- forward public tcp port 443 to private port 443 on the IP address of your Home Assistant computer
- forward public tcp port 80 to private port 8888 on the IP address of your Home Assistant computer
- don’t forward port 81 – that’s just for our internal management of nginx settings
temporarily edit your configuration.yaml to set up nginx
The Home Assistant docs suggest adding some lines to configuration.yaml. However I had more success setting up nginx when I commented out (#) the entire http block:
# http:
   # ssl_certificate: /ssl/fullchain.pem
   # ssl_key: /ssl/privkey.pem
  # use_x_forwarded_for: true
  # trusted_proxies:
  #   - 10.0.0.200
  #   - 172.30.33.0/24
set up the host redirect on nginx proxy manager
Go to the nginx proxy manager add-on page and click Open Web UI of nginx proxy manager. There should be a sign-in page there that lets you log in with admin@example.com and password changeme. When you’re signed in create a login with your own name, email address and password.
Go to the Hosts tab of nginx proxy manager. Create a new Proxy host. Enter your DuckDNS host name eg YOUR-SUBDOMAIN.duckdns.org. Turn on Websocket support. Add the internal IP address for your Home Assistant device and the port of 8123. Block common Exploits if you wish. Click Save:
Go back to the Hosts tab of nginx proxy manager. Find your DuckDNS host name eg YOUR-SUBDOMAIN.duckdns.org click the three dots to Edit this entry. Click SSL tab. Check Force SSL. Click the drop-down to Request a new SSL certificate. Agree terms and enter your DuckDNS login email address. Click Save and wait a minute for this to complete. You may also select HTTP/2 support for performance as well as Enable HSTS

With luck you’ll see that a certificate was granted (by the invisible Letsencrypt). You may see Internal Error or other message in which case try again and check the steps above (which differ from the official procedure).
If you also want to connect to other devices on your home network repeat the above for those devices. In other words, create proxies for your other DuckDNS subdomains and enter the forwarding IP addresses and ports. eg 192.168.1.25:5000 might access a Frigate NVR.
edit your configuration.yaml to get the benefit of nginx
We’re almost done. Use File Editor to change your configuration.yaml as below. It permits Home Assistant to allow access by nginx proxy (as in use_x_forwarded_for: true). The trusted proxies IP addresses are internal addresses and you may add your computer’s IP to this list if it helps it work. The two certificate lines make my Home Assistant inaccessible so I’ve removed them by adding #. Your configuration.yaml http section can now read exactly as follows.
http:
# ssl_certificate: /ssl/fullchain.pem
# ssl_key: /ssl/privkey.pem
  use_x_forwarded_for: true
  trusted_proxies:
    - 172.30.33.0/24
 #  - 192.168.1.x # sometimes you'll need to add a local IP address
Go to Home Assistant Developer Tools. If the configuration check here is good restart Home Assistant. To simulate connecting to your Home Assistant remotely, disconnect your phone from your home wifi and use a browser to try out YOUR-SUBDOMAIN.duckdns.org in the browser. You don’t need to add the port number to the URL because nginx is doing that for you (indeed, it’s acting as a proxy):
- If you see the Home Assistant login page: yay it works!
- If an error appears, go to the nginx proxy manager add-on logs and look for clues.
- You may see a Blank page with Bad request. Likely nginx has blocked access. Other things being equal the http: section above might be absent.
- Do not be running the other Home Assistant nginx proxy add-on.
- You may see a Home Assistant page with retry: first check that you can access Home Assistant using the normal internal address eg 192.168.1.42:8123. Check that you are accessing Home Assistant remotely and not over your wifi (although it may not matter). Check all the steps above after you’ve cleared the cache of your browser or tried another browser. Edit the URL to try access with http:// or https:// and without the port number.
- Remember that the DuckDNS add-on needs to run to refresh your certificates and your IP address. If that fails your certificate or broadband IP address will go out of date.
use nginx proxy manager to protect and allow access to other devices on your network
The point of the above tricky process was that, as well as Home Assistant, you want to access other devices such as a Synology box or a server on your home network. Suppose your other device was Frigate NVR on port 5000 with an internal address 192.168.1.20:5000. Do the following:
- Go to DuckDNS and create a subdomain such as myfrigate.duckdns.org
- Go to the DuckDNS add-on and add myfrigate.duckdns.org to its configuration. The add-on should restart.
- Optional (but required on my system): use Home Assistant File Editor to comment out the http: section of configuration.yaml. In Server Controls check the configuration and restart Home Assistant.
- Optional – check that the router has the open ports as earlier. (You may have changed the ports since you set up the initial Home Assistant proxy.)
- Go to the nginx proxy manager add-on. Open web UI and login again (your previously entered login should be used). Set up a new proxy for that subdomain – enter the forwarding IP address 192.168.1.20 and the port 5000 as used by the Frigate box and Save it.
- Edit the proxy and use the SSL tab to Request a new certificate. Enter your email and Agree to terms. Force SSL and click Save.
- If you get an Internal Error rather than a Letsencrypt certificate then you may well need the optional steps 3, 4 and 8 to make progress. It may simply need more time or another go.
- Optional (but required on my system): use Home Assistant File Editor to restore the http: section of configuration.yaml. In Server Controls check the configuration and restart Home Assistant.
- Use a browser to access Frigate from outside your network with myfrigate.duckdns.org
summary of ports open to your router
Go to your home router and find port forwarding / virtual servers. Check the ports as follows:
- forward public tcp port 443 to private port 443 on the IP address of your Home Assistant computer
- forward public tcp port 80 to private port 8888 on the IP address of your Home Assistant computer.
In this setup, what URL should be placed in HA/Settings/Home Assistant URL?
It says…
Configure what website addresses Home Assistant should share with other devices when they need to fetch data from Home Assistant (eg. to play text-to-speech or other hosted media).
Do I enable Local Network Automatic?
What URL shall be used…is this the external https://XXXX.duckdns.org:PORT URL?
remember that nginx does the port for you when you set up a proxy you’ll be entering the port e.g. 8123
what URL should be placed in HA/Settings/Home Assistant URL this >> https://XXXX.duckdns.org
What URL shall be used https://XXXX.duckdns.org (without a port)
1) URL from outside goes to your home router. Your home router forwards this to the port of home assistant nginx proxy manager config page
2) as you set up in npm, nginx proxy manager now directs the outside request to eg home assistant
Thanks for the follow-up.
I assume this is if using the typical 443 for SSL.
My HA/hassio is on a VM of my main PC, so I have 9123 as my SSL. Using just https://XXXX.duckdns.org fails, in my case.
“Using just https://XXXX.duckdns.org fails, in my case” and presumably adding a port doesn’t help.
Much as it makes sense I would investigate your idea that it’s possible to change the SSL port to anything other than 443. So go like this
router forwards port 443 to 443 on the VPC and nginx and not 9123. Put that another way, I’d try the regular thing first.
I’m happy to help. stackexchange eg has a bigger pool of talent for network advice.
Actually, adding the port does work; what I have as that URL. https://XXXX.duckdns.org:9123
If I forward 443 traffic to my VM, that means all SSL traffic gets sent to my VM… I don’t want that. The reason I created the new port.
It all works, set up as above. I’m assuming that all traffic w/in HA is still local. Thanks for the input!
That’s good Scott and I see now what you’re doing and the want to keep it local. I wish all this away.
In light of the publication today by Home Assistant about misconfigured reverse proxies, doesn’t this article need to be updated to correctly capture the forwarding header?
https://community.home-assistant.io/t/disabling-new-login-page-functionality/655819
No the process above doesn’t need changing as it appears to differentiate between internal and external incoming traffic. It’s right to flag problems where they exist and do your own tests and be forever vigilant.
Home Assistant have some cheek to introduce such a trivial, and unsafe, feature and then blame everything else for it not working safely.
Hi! Tried to get NPM on HA working with DuckDNS for days now, just found your article, and the :8888 port solved it for me! Thank you!
yay. Thanks for the encouragement. I always come back to this article myself.
My plan B for remote access to my internal network has Tailscale installed on a few always-on devices at home (HA, fire TV)