Your browser ‘distrusts’ http;// sites. If the browser ‘trusts’ the destination URL it’ll offer to remember a password, autofill a login, allow push notifications and nag you less. And there are bigger benefits as shown below.
This guide describes how to make a service (like Frigate; proxmox or portainer or a camera or synology or qnap) accessible via HTTPS using a domain name. You’ll want access to some services from outside your network while the rest will only be available at home. My choice was to have remote, anywhere access to Home Assistant and local only access to my Proxmox server:
local only https:// access to ‘sensitive’ services on the network (eg proxmox; frigate cameras; portainer; qnap; synology)
remote https:// anywhere access to turn things on/off in Home Assistant
The method below uses duckdns to find your home IP address and then uses nginx proxy manager (NPM) as an IP address switchboard. It’s reliable, you don’t need anything else and you don’t have to adjust your DNS or renew certificates yourself. I’ll also show how you can use a duckdns sub domain as a destination for your own sub domain eg ha.mydomain.com) as well as add extra security.
🛡️ how is https:// better than http://
The modern browser ‘distrusts’ http;// sites. If the browser ‘trusts’ the destination URL it’ll offer to remember a password, autofill a login, allow push notifications and nag you less. https:// comes with benefits, for example:
server apps such as Proxmox insist on https because login details and passwords could otherwise be snooped on by baddies. HTTPS encrypts the data in transit. The browser will save passwords (such as your proxmox login).
when accessed over https a server running Frigate NVR (home cameras) allows notifications from cameras to alert of motion events and so on. As Frigate is a Progressive Web App (PWA) it will now install, with a shortcut icon, on a phone or desktop. It’ll behave like an app and remember settings. HA can also be installed as a PWA on your desktop
Home Assistant / ESPHome / security cameras play better over https. There are occasions when your browser refuses to show mixed http / https content so when you access say, Home Assistant via https, it will display secure content and allow push notifications.
Don’t panic if you normally access cameras, servers, proxmox, router, docker services across your local home network using say http://192.168.1.150 vs the more secure https://192.168.1.150. Secure access ensures that passwords and data are exchanged over an encrypted link. But if baddies can’t access your local network URLs or your passwords are unknown, you’re still pretty much OK.
⚙️ how does it work
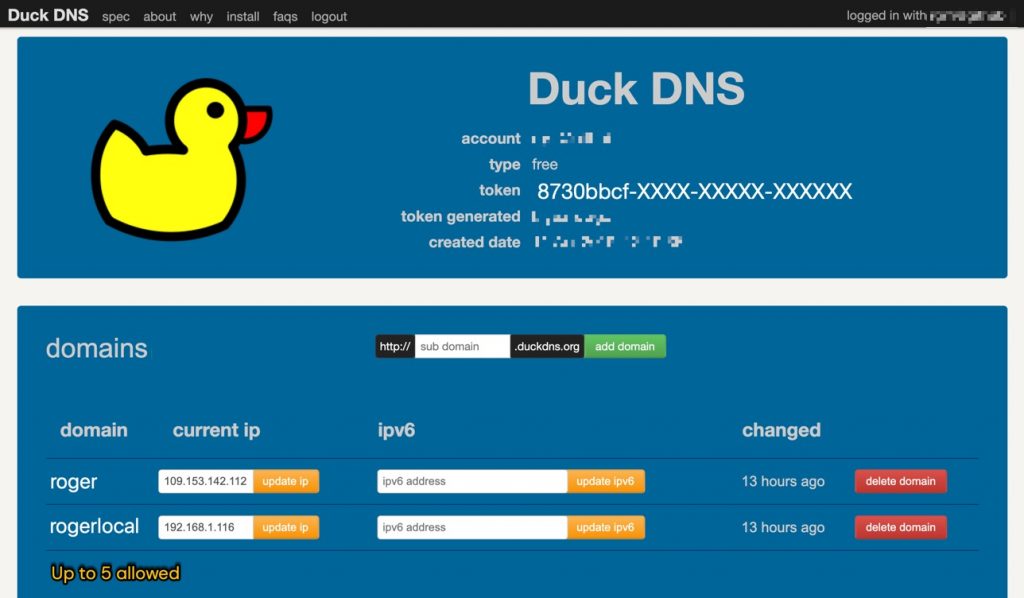
duckdns provides free sub-domain names that link back (‘resolve’) to your home router’s WAN IP address. We use a duckdns service to do the single job of updating duckdns with that IP address. duckdns can be installed as a docker container but it may be convenient to use the Home Assistant duckdns add-on.
We use the duckdns web portal to set up two sub-domains: duckDNS updates only one with the router’s WAN IP address (eg roger.duckdns.org). The other subdomain is not updated (rogerlocal.duckdns.org). This is set to a local IP address (eg 192.168.1.50) and if it is unknown to the duckdns service it won’t be updated. In our example below 192.168.1.50 is the internal IP address of NGINX Proxy Manager (NPM). Anyone browsing to rogerlocal.duckdns.org (which resolves to 192.168.1.50) will not find our home router. We also add a rule to NPM to limit access to local IPs.
We use NGINX Proxy Manager (NPM) to create the (‘letsencrypt’) certificates that will make https work. We attach a certificate to proxmox.rogerlocal.duckdns.org so that https://proxmox.rogerlocal.duckdns.org is a legitimate call to access proxmox over an encrypted connection. The method of getting certificates for the local https is called a DNS Challenge (aka DNS-01). The use of sub-sub domains gives us dozens of uses of the same ‘wildcard’ certificate (for eg *.rogerlocal.duckdns.org).
📝 what you need to set up local and remote https
duckdns free account
for remote access only – duckdns service (eg via docker) or Home Assistant with duckdns add-on
nginx proxy manager eg installed as a docker container for local and remote access
router to forward ports 80 and 443 to nginx proxy manager IP address
nothing else but optionally adguard or pi-hole to reduce inefficient ‘hairpinning’ (more below).
🐳 start NGINX Proxy Manager (NPM) in Docker
NGINX Proxy Manager (NPM) has a web GUI to simplify configuration and Let’s Encrypt certificate management. In our case we set up nginx in Docker (on a proxmox LXC with many other services including portainer and Home Assistant). Go to the nginx IP address (which will be the same as the IP address of its docker) on port 81 (eg 192.168.1.50:81) and enter a name, password and a proper email address.
Now go to your router and forward ports 80 (tcp) and 443 (tcp) to the IP address of nginx. The IP address will be the same as the IP address of the docker container and needs to be set as static or be self-assigned.
Home Assistant could host nginx proxy manager as it’s available as an add-on – and I’ve used it for years. You might proceed with that – however my HA installation failed to get certificates using a DNS challenge so I chose to set up the latest version separately as a container for Docker.
🌐 sign up and setup two DuckDNS subdomains
DuckDNS provides this for free. Go to DuckDNS and register and then create two subdomains. Make one of them eg rogerlocal.duckdns.org as the intended local only domain. In the IP address field update the IP address of your nginx proxy manager (e.g. 192.168.1.50) – this should never change. For the other (e.g. roger.duckdns.org) we’ll consider this the intended remote access domain. This IP will update to your WAN address when we’re fully configured. Keep this browser tab open as we’re going to need your DuckDNS token from this page.
📡 only setup a DuckDNS add-on or service if you want remote access
If we want remote access to our network for say, Home Assistant, we’ll need a DuckDNS service to monitor our network and tell DuckDNS our external WAN IP address. You could create a service on docker but Home Assistant has a quickly installed add-on for this. With this you add your DuckDNS remote access URL and token to the add-on configuration. Because we are using a separate NGINX installation this advice is very different to the Home Assistant docs: You shouldn’t have another HA nginx add-on running. We’ll still have proxy protection. We’ll make our own certificates. We just need to update the external IP for eg roger.duckdns.org. This is for Home Assistant DuckDNS configuration:
In Home Assistant configuration.yaml add or edit these lines
http:
# ssl_certificate: /ssl/fullchain.pem # ie don’t use this
# ssl_key: /ssl/privkey.pem # ie don’t use this
 use_x_forwarded_for: true
 trusted_proxies:
 - 192.168.1.50 # this should be your IP for nginx
 - 172.22.0.0/16 # this is a typical IP range of the whole nginx docker network
 - 127.0.0.1  # this is for luck
 - ::1   # this is for IPv6
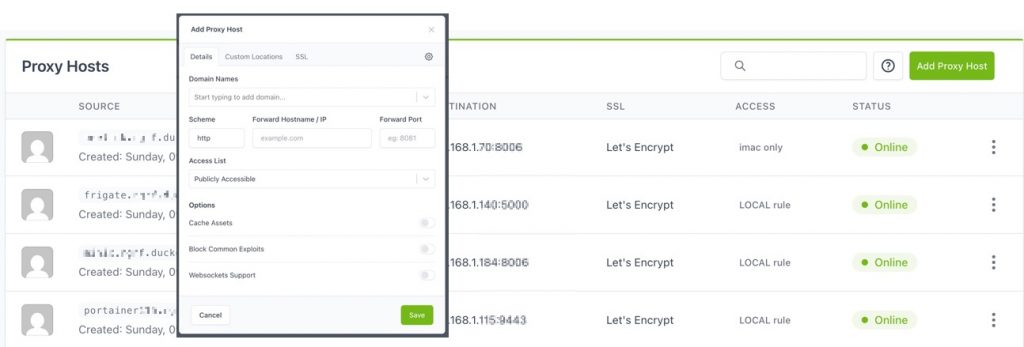
💻 setting up hosts in NGINX Proxy Manager (NPM)
Go to the nginx IP address (which will be the same as the IP address of its docker host) on port 81 (eg 192.168.1.50:81). We now need to set up hosts that redirect to each service and create certificates. This process can be fickle so I do this one step at a time, creating and saving hosts and then applying certificates one at a time. We’ll set up one host for remote access to Home Assistant and one local host.
for local access
SET UP A ‘LOCAL’ SUBDOMAIN HOST IN NPM: navigate to Proxy Hosts and click Add Proxy Host
Type the local service domain (e.g. let’s start with pve.rogerlocal.duckdns.org. Press enter.
Select http or https (depending on whether the service is running on HTTP or HTTPS – for PVE, it’s typically HTTPS.
Enter the local IP address of a local service such as Proxmox (e.g., 192.168.1.150).
Forward Port: Enter the service’s local port (e.g., 8006 for PVE). Check Block common exploits for luck. Now save this.
for remote access
SET UP REMOTE SUBDOMAIN HOST IN NPM: navigate to Proxy Hosts and click Add Proxy Host for remote access to Home Assistant
Type the remote service domain e.g., roger.duckdns.org. Press enter.
Select http – for Home Assistant it’s HTTP.
Enter the local IP address of Home Assistant (e.g., 192.168.1.100).
Forward Port: Enter the service’s local port (e.g., 8123 for HA). Check Block common exploits. Check Websocket support as Home Assistant needs this. Now save this.
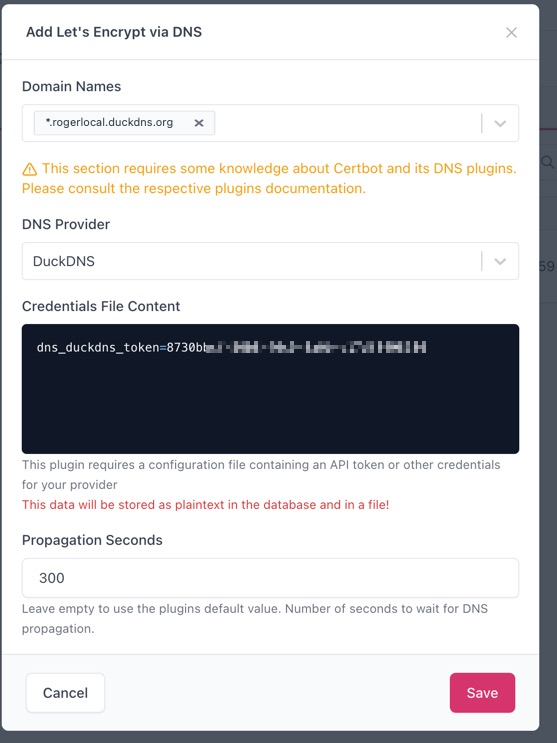
🔑 for local access: generate a wildcard certificate for the local host in NGINX Proxy Manager
To secure both rogerlocal.duckdns.org and all your sub-subdomains (e.g., pve.rogerlocal.duckdns.org), you need a wildcard certificate for *.rogerlocal.duckdns.org.
Add SSL Certificate: In NPM, navigate to SSL Certificates and click Add Let’s Encrypt Certificate via DNS.
Domains: Enter both the main local subdomain and its wildcard subdomain:
rogerlocal.duckdns.org
*.rogerlocal.duckdns.org
DNS Challenge: Select choose “DuckDNS” as the provider.
Enter Credentials: Paste your DuckDNS token into the “Credentials File Content” field without spaces. Increase the Custom timeout to 200 seconds. Save the settings and wait.
If this fails, go back and try again or try again one domain at a time.
NPM will use the DuckDNS token to create a temporary TXT record in DuckDNS’s DNS records, which Let’s Encrypt will check to verify ownership (= DNS-01 Challenge). Once verified, the wildcard certificate will be issued.
🔗 attach the wildcard certificate to any local host in NGINX Proxy Manager
On the list of proxy hosts in NPM edit the local host we created earlier: pve.rogerlocal.duckdns.org.
On the SSL Tab:
Select the wildcard certificate you just created (eg *.rogerlocal.duckdns.org)
Enable “Force SSL” to automatically redirect HTTP traffic to HTTPS.
Enable HTTP/2 Support (recommended). Enable HSTS if you wish. Click Save.
If you now browse to https://pve.rogerlocal.duckdns.org you’ll be taken to the IP address: port saved in that host. If you browse to this URL from your phone with wifi turned off this request must fail.
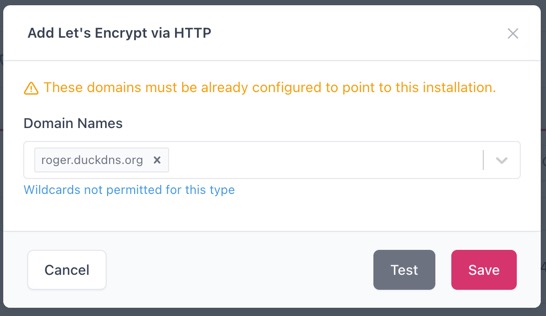
🔑 for remote access: request a certificate for the remote host in NGINX Proxy Manager
To secure the remote host eg roger.duckdns.org for home assistant we need a Let’s encrypt certificate
Add SSL Certificate: in NPM, navigate to SSL Certificates and click Add Let’s Encrypt Certificate via http
Domain names: Enter the remote subdomain: eg roger.duckdns.org
Save the settings and wait.
If this fails, go back and try again. Reminder – Let’s Encrypt may expect an email address in your account. Let’s Encrypt will verify ownership – once verified, the certificate will be issued.
🔗 attach the above certificate to a remote host in NGINX Proxy Manager
On the list of proxy hosts in NPM edit the host we created earlier (eg roger.duckdns.org was targeted at the Home Assistant IP:8123).
On the SSL Tab:
Select the Let’s Encrypt certificate you just created (eg roger.duckdns.org)
Enable “Force SSL” to automatically redirect HTTP traffic to HTTPS.
Enable HTTP/2 Support (recommended). Enable HSTS if you wish.
Click Save. If you now browse to https://roger.duckdns.org you’ll be taken to the IP address: port saved in that host.
If you browse to this URL from your phone with wifi turned off this the request should succeed. If you need remote access to more services on your network, you’ll need to add more updateable subdomains to duckDNS (maximum is 5), create a proxy host for each one and request a certificate for the subdomain.
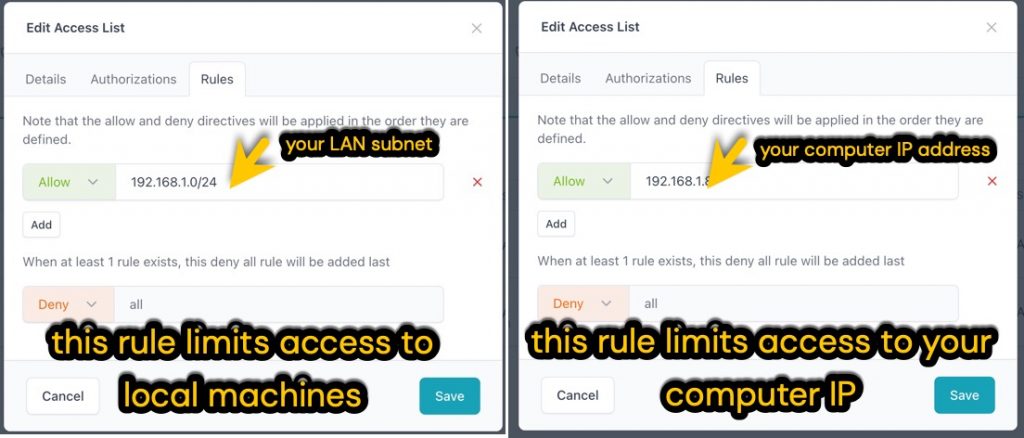
🚪 make it extra local with an Nginx Access List
nginx proxy manager by virtue of being a ‘proxy’ offers security beyond simply opening a port on your router. However NPM is also able to limit access to the URLs in the proxy hosts. I’d recommend setting a rule to limit access to local computers, just in case the DuckDNS IP address accidentally got changed to your router WAN IP address – in which case the internal service login page would be exposed. One of the rules below limits access to your own computer, the other limits access to the local network.
On a home network I’d remind that the un-proxied destination IP address (e.g., 192.168.1.150:8006) is equally accessible as https://pve.rogerlocal.duckdns.org. The hosts that provide remote access are more exposed, so you could add a username and password challenge using the Access list.
⚡ make it faster with Adguard or PiHole
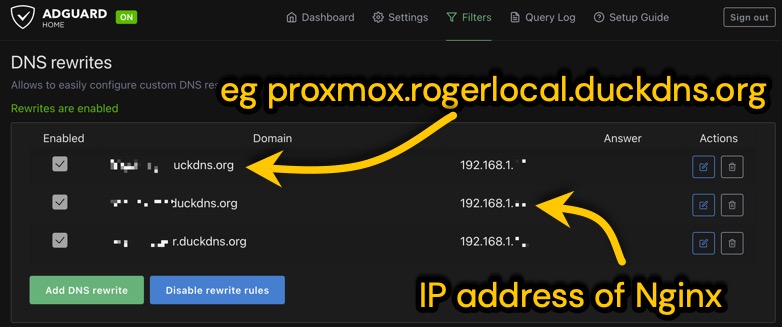
Our method is safe, but inefficient. When you enter a local domain like https://pve.rogerlocal.duckdns.org, your browser asks an external DNS server (e.g., 8.8.8.8) for the IP address. Even though the DNS server returns a local IP (192.168.1.50), the request must still travel out of your network and loop back into your router (a process sometimes called NAT Loopback or Hairpinning). This unnecessary external trip adds latency (delay) and slows down page loading a little. If you consistently find a longer delay, consider using Adguard or PiHole to ‘catch’ these local URLs before they leave your router. It doesn’t bother me but here’s what to do.
Adguard and PiHole are two open source apps better known for their ability to filter ad sites and quietly block some (< 25%) of the ads that arrive on your computer. Less well known is that Adguard and PiHole have DNS managers. They offer DNS rewrite to ensure that your traffic to local domains never leaves your network (which is OK but inefficient).
You can designate AdGuard Home (AGH) and Pi-hole as your computer’s or your whole network’s DNS Server. When your computer wants to resolve any hostname (like google.com), it sends the DNS request directly to the AGH/Pi-hole server instead of sending it to the router or an external public server. You do two things for this to work:
Add a wildcard DNS record (aka Host Override) to point *.rogerlocal.duckdns.org to the local IP of your NGINX Proxy Manager host. This ensures that local requests hit your NPM server directly, where NPM will apply the certificate.
Go to your computer’s network adapter and set DNS1 to the IP address of the server running Adguard or PiHole. You can set DNS2 to fallback to 8.8.8.8 or 1.1.1.1. You may instead set up the router DNS in which case you’ll cover every computer on the home network.
✨ make it fancy by using your own domain or subdomain for a local service
Whoever you use to manage your ‘mydomain.com’ will also allow you to create subdomains – such that eg ha.mydomain.com can be set to point anywhere on the Internet. Create the ha.mydomain.com subdomain, edit its destination to go to one of the remote access duckdns domains we’ve set up in nginx proxy manager. You can alternatively adjust the domain records – see my page on this here.
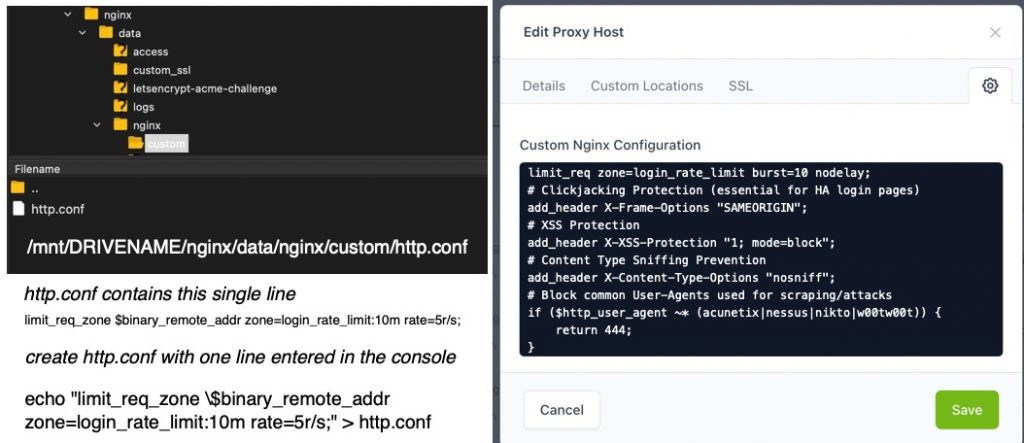
🚨 make NGINX safer still with a Global Rate Limit Definition (DDoS/Brute-Force)
This custom configuration requires you to have access to the files where nginx creates and saves your work. If you use Docker, these files are saved in a local volume so that software updates don’t rub out your work. Go to the cmdline console of the Docker container or Proxmox and browse to the location shown:
GO TO /mnt/my_ssd or DRIVENAME/nginx/data/nginx/ TYPE mkdir custom THEN cd custom ARRIVING AT /mnt/DRIVENAME/nginx/data/nginx/custom/ THEN PASTE THE ECHO LINE TO MAGICALLY CREATE A FILE
This defines a zone called login_rate_limit that stores connection states keyed by the client’s IP address ($binary_remote_addr). It allows an average of 5 requests per second (5r/s) from any single IP. Next return to the NGINX UI and edit any host (eg Home Assistant) that has remote access. Optionally, for in-house threats, do this for any host that has a login. Look for Custom configuration (eg a cog) and enter the code below – you may remove the comment lines. This will apply the rate limit and security headers
# Apply the global rate limit definition for brute-force protection
limit_req zone=login_rate_limit burst=10 nodelay;
# --- Standard Security Headers ---
# 1. Clickjacking Protection (essential for HA login pages)
add_header X-Frame-Options "SAMEORIGIN";
# 2. XSS Protection
add_header X-XSS-Protection "1; mode=block";
# 3. Content Type Sniffing Prevention
add_header X-Content-Type-Options "nosniff";
# 4. Block common User-Agents used for scraping/attacks
if ($http_user_agent ~* (acunetix|nessus|nikto|w00tw00t)) {
    return 444;
}
ℹ️ a few words about the HTTPS lock icon (red / green)
If you see a red/crossed-out HTTPS lock this is a browser warning, but it does not mean the connection isn’t encrypted—it means the browser has a Certificate Validity concern.
‘red/crossed out’ means that the browser found a Certificate Name Mismatch or Mixed Content (e.g., the Frigate web interface loads an internal resource via HTTP while the main page is HTTPS). Frankly – it’s OK as the connection is encrypted, which satisfies the PWA/Notification requirements. To fix it, you’d need to ensure the SSL certificate precisely covers the subdomain, or use HTTPS for all loaded resources.
“not secure” should only appear if the URL is http://. If you see this on an https:// address, it’s typically because of an expired or invalid certificate. Solution: Enable “Force SSL” in NPM and maybe renew the certificate.
ℹ️ watch a video – similar process
Here’s Wolfgang’s take on this. He starts from a different point but it’s reassuring so thank you Wolfgang, we subscribe:
rogerfrost.com is about using technology with a curious mind. We’re interested in home automation, gadget hacks and using sensors to understand what’s going on around the house. You can use keywords and the search box above to find content.
Please enjoy and share this advert free content. To say hi – ‘leave a reply’ button on this page – the message goes only to me in Cambridge, UK.
Roger Frost (his cv) has been writing about technology for all the years since 1988 and this web includes his articles; tutorials, radio interviews and, going back to our early days, lesson ideas for science teachers.